
Batik Dyeing: How to Create Wax-Resist Patterns on Fabric

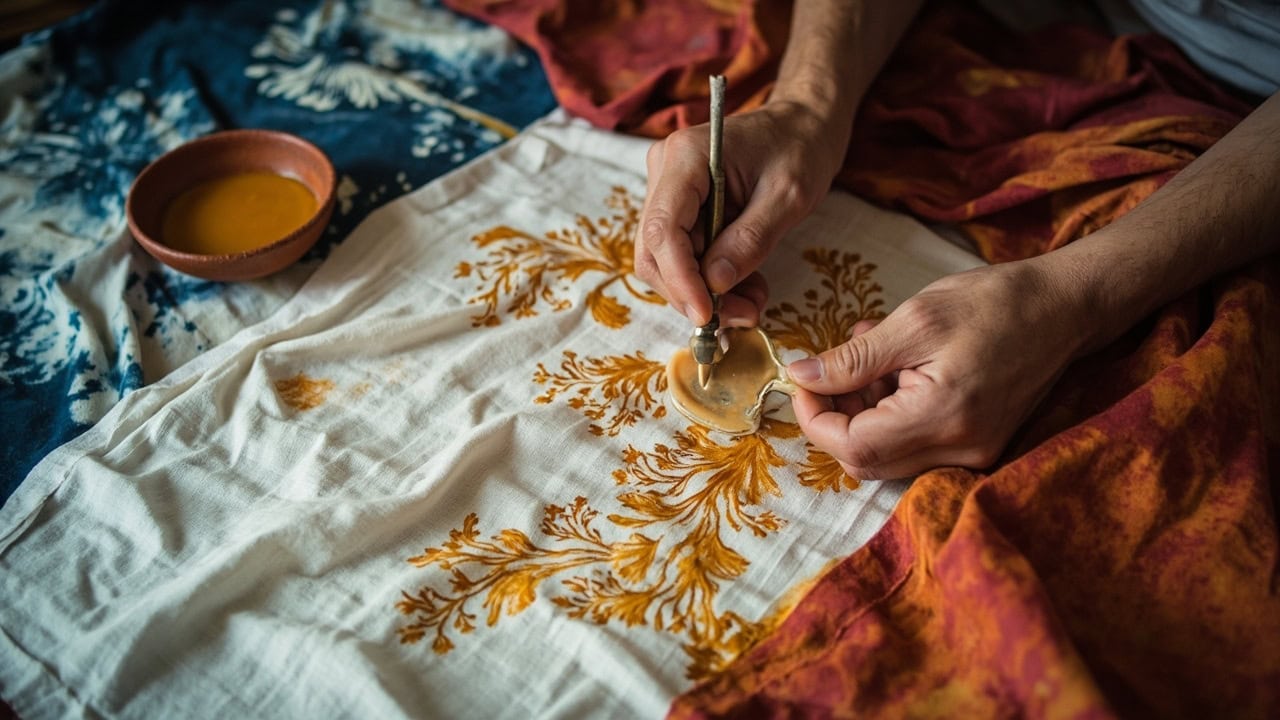
Batik dyeing is a wax-resist dyeing technique where melted beeswax or paraffin is applied to specific areas of fabric to block dye from penetrating those zones, producing intricate patterns with characteristic crackle effects. The wax is melted to 60–70°C and applied using a tjanting tool (copper needle-pointed canting) or traditional stamp cap (canting cap), then the fabric is immersed in a dye bath — areas covered in wax remain the original fabric color while exposed areas absorb the dye.
In 2009, UNESCO recognized Indonesian batik as a Masterpiece of the Oral and Intangible Heritage of Humanity, acknowledging centuries of cultural tradition centered primarily on the island of Java. The technique divides broadly into two categories: tulis (hand-drawn batik, drawn with a tjanting tool in fine lines) and cap (stamped batik, using copper stamp caps for repeated geometric motifs). Both produce the wax-resist effect that makes batik unmistakably distinctive in the world of textile art.
What Is Batik Dyeing?
Batik is a wax-resist textile dyeing technique that originated in Indonesia, particularly on the island of Java, where it has been practiced for centuries. The word “batik” is derived from the Javanese word amba (to write) and titik (dot) — a reference to the painstaking process of applying hot wax in precise patterns before dyeing. In 2009, UNESCO designated Indonesian batik as a Masterpiece of the Oral and Intangible Heritage of Humanity, recognizing both the technique’s cultural significance and the skilled artisans who carry it forward.
The fundamental principle is elegantly simple: wax applied to fabric acts as a barrier against dye. When fabric is immersed in a dye bath, the waxed zones repel the dye solution and retain their original color, while exposed areas absorb the dye and take on the new hue. The result is a clean, controlled contrast between dyed and undyed zones — or, when multiple dye baths are layered with strategic re-waxing, a rich tapestry of multiple colors in a single piece.
The two main classifications of batik are tulis and cap. Batik tulis (hand-drawn batik) is created by tracing designs freehand with a tjanting tool — a copper bowl with a needle-pointed spout mounted on a wooden handle. This method produces highly detailed, unique designs and commands the highest prices. Batik cap (stamped batik) uses copper stamp caps pre-formed with repetitive motifs; the artisan dips the stamp in molten wax and presses it across the fabric in rows. Cap produces consistent patterns rapidly and is more affordable, though it lacks the one-of-a-kind character of tulis work.
What truly distinguishes batik from other wax-resist techniques is its characteristic crackle effect. When dried waxed fabric is folded, crumpled, or bent, hairline fractures form across the wax surface. These microscopic cracks create narrow channels through which dye seeps in thin, branching lines — producing the spider-web-like crackle lines that are batik’s most recognizable visual signature. No two crackle patterns are identical, making each piece of batik genuinely unique.
Multiple dye baths build up layers of color in a process akin to building with transparency: wax the fabric, dye it, let it dry, wax selected areas again, immerse in a second dye color, and repeat. Each cycle adds a new layer of color over previously dyed zones, creating the complex, multi-hued designs typical of traditional Javanese batik. Artisans in Java routinely work with five to ten wax/dye cycles for deeply complex pieces, with each layer building depth and complexity.
Materials and Equipment Needed
Before beginning batik dyeing, gather all materials so the process flows without interruption. Once wax begins to cool and solidify, pausing to search for a missing tool disrupts the quality of the work.
Fabric
Batik dyeing requires natural fibers only — cotton, linen, and silk absorb dye effectively and respond reliably to the wax-resist process. Polyester, nylon, and other synthetic fibers require disperse dyes activated at temperatures above 100°C, which melts standard wax mixtures and makes the batik technique fundamentally incompatible. Cotton is the most forgiving fabric for beginners and holds up well to multiple wax/dye cycles; silk yields exceptionally vibrant colors due to its natural sheen and high absorbency; linen offers similar results to cotton with slightly superior dye uptake but at higher cost and reduced availability.
Wax
The standard batik wax mixture is equal parts beeswax and paraffin wax — a combination that balances two essential properties. Beeswax provides flexibility and adhesion, helping the wax cling to fabric fibers without flaking during handling. Paraffin wax provides the brittleness needed for a clean crackle effect: when the dried waxed fabric is creased, paraffin fractures cleanly to create sharp, well-defined crackle lines. Using beeswax alone produces a flexible wax that bends rather than cracks; using paraffin alone creates a brittle coating that flakes excessively but produces dramatic crackle patterns.
Tjanting Tool (Canting)
The tjanting tool is the defining instrument of hand-drawn batik. It consists of a small copper bowl (approximately 3–5 cm diameter) with a needle-pointed spout, mounted on a wooden handle. The copper bowl holds molten wax by capillary action, and the craftsman tilts the tool to let wax flow from the needle tip in a controlled, consistent stream. Skill with the tjanting tool develops over years of practice — a skilled artisan can lay wax lines as fine as 1 mm or as broad as 5 mm depending on the angle, pressure, and wax temperature. A alternative to the tjanting is the canting cap (stamp cap), a copper mold carved with a repeated motif that is pressed into molten wax and then stamped onto fabric.
Wax Pot or Double Boiler
A dedicated wax pot or double boiler system is essential for maintaining wax at a consistent 60–70°C throughout the waxing session. Direct high heat risks scorching the wax (evidenced by smoking or bubbling at the surface), which produces an unpleasant odor, degrades the wax, and can create uneven application. A double boiler insulates the wax from direct flame contact. Commercial batik setups often use electric wax pots with built-in thermostats for precise temperature control, but a simple stovetop double boiler works equally well.
Dye
For cotton and linen, fiber-reactive dyes (such as Procion MX) are the industry standard for home and studio batik — they activate in warm water around 20–40°C, bond chemically to cellulose fibers, and produce vivid, colorfast results. For silk, acid dyes activate at near-boiling temperatures and produce rich, luminous shades. Cold-water dyes (fiber-reactive for plant fibers, acid for protein fibers) offer the most controlled batik effects because the lower bath temperature keeps the wax firmly set during immersion. Hot-water dyes risk melting wax at the edges of waxed zones, causing dye to bleed under the wax boundary and blurring design lines.
Additional Equipment
- Dye bath vessel: Large enough to fully immerse fabric without folding or creasing — any plastic or stainless steel container that can hold several liters works. Avoid aluminum, which can react with some dyes.
- Rubber gloves and apron: Essential for handling dye solutions, which can stain skin and clothing permanently.
- Newsprint or cardboard: Laid between layers of fabric during waxing to protect the work surface and prevent wax from sticking to unintended areas.
- Old towel or absorbent cloth: For pressing fabric and protecting the work surface during handling.
- Steam iron and newsprint: For the final wax removal step.
Step-by-Step Batik Dyeing Process
The batik process unfolds across eight distinct steps, from fabric preparation through final wax removal. Each step requires patience and precision — rushing leads to uneven wax coverage, blurred dye boundaries, and diminished crackle definition. Allocate a full day for the complete process, with overnight drying between key stages.
Step 1: Prepare the Fabric
Begin with clean, pre-treated fabric. Wash your fabric in warm water with a mild detergent to remove any sizing compounds (factory starch or chemical treatments applied during manufacturing), natural oils from handling, and general impurities. Clean fabric absorbs dye evenly; fabric with residual sizing produces mottled, inconsistent color with patches that reject the dye. While the fabric is still slightly damp, stretch it taut and pin it onto a flat working surface — a foam board, padded table, or clean floor covered with several layers of newsprint works well. The fabric must be wrinkle-free and held under even tension; any folds or ripples in the fabric surface will disrupt wax application and produce unintended resist boundaries.
Step 2: Melt and Prepare the Wax
Combine beeswax and paraffin wax in equal proportions — typically 50/50 by weight or volume — in your wax pot or double boiler. Heat the mixture to 60–70°C (140–158°F). At this temperature range, the wax flows like honey: fluid enough to draw clean lines with the tjanting tool, but not so hot that it soaks through fabric or bleeds under waxed edges. Test the wax temperature by dropping a small amount onto a scrap of your fabric — it should form a translucent, slightly opaque spot within 1–2 seconds. If the wax spreads excessively and soaks through, it is too cool and needs more heat. If it smokes or bubbles aggressively at the surface, the temperature is too high and the wax is scorching; allow it to cool slightly before continuing. The ideal application consistency is smooth and continuous, with no stringy or gloppy sections.
Step 3: Apply Wax to Areas to Be Reserved (First Waxing)
Dip the copper bowl of the tjanting tool into the molten wax and allow it to fill by capillary action — this takes only a few seconds. Hold the tool at approximately a 45° angle, with the needle-tip pointing toward the fabric surface. Touch the needle tip to the fabric and tilt slightly to start the wax flow, then move the tool smoothly along your intended design line. The wax should emerge as a consistent, controlled stream — roughly 1–3 mm wide for a standard tjanting tool at this temperature. The design is drawn freehand: wherever the wax lands becomes a zone that will resist the dye. Work relatively quickly, as the wax cools and begins to solidify on the fabric within seconds. Reheat the tjanting tip in the wax pot whenever the flow slows or becomes intermittent.
For the first dye bath, wax all areas that should remain the original, undyed fabric color — typically the lightest values in your design. As you work, you are essentially drawing in wax the negative space of your design: the wax marks show exactly where dye will be blocked. Traditional batik artisans work from light to dark across multiple dye baths, so the first waxing protects the lightest color (the fabric’s natural tone) from all subsequent dye layers.
Step 4: First Dye Bath
Prepare the dye bath in your large vessel following the dye manufacturer’s instructions. For fiber-reactive dye on cotton or linen: dissolve the dye powder in a small amount of warm water, stirring until fully dissolved, then add to the main vessel along with additional water, salt (which helps drive the dye into the fiber), and soda ash (sodium carbonate, the fixative that activates the fiber-reactive chemical bonding process). The fabric is fully immersed in the dye bath, which should be at room temperature or slightly warm — never hot enough to soften the wax. Agitate the fabric gently throughout the immersion, lifting and turning it periodically for 5–15 minutes depending on the depth of color desired. Lighter shades require 3–5 minutes; saturated, dark shades may require 15 minutes or longer with continued agitation.
Remove the fabric from the bath and rinse in cold water until the water runs completely clear — this can take several minutes of running water rinsing. Do not wring or twist the fabric aggressively, as this can crack the wax layer and allow dye to seep into protected areas. Hang the fabric to dry completely, ideally overnight. This resting period is essential: the wax must fully harden and bond to the fabric before the next phase. Working with incompletely dried waxed fabric risks smearing, wax transfer, and disrupted design boundaries.
Step 5: Crackle Effect (Optional)
Once the fabric is thoroughly dry, you can create the crackle effect that defines batik’s characteristic appearance. Deliberately fold, crumple, twist, or bend the waxed fabric to fracture the dried wax surface. The cracks form along lines of stress — fold along a straight line for regular crackle lines, crumple randomly for an organic, web-like pattern. The crackle effect is entirely optional and depends on the desired aesthetic: fine, deliberate fold lines produce orderly crackle patterns, while aggressive crumpling creates dramatic, chaotic webbing. This step cannot be undone once dye is applied, so consider the intended effect carefully before proceeding.
The hairline cracks created in this step are typically invisible to the naked eye, but they are critically important functionally: they create microscopic channels through which subsequent dye baths will penetrate into waxed areas, producing the thin, branching colored lines that make batik unmistakable. The density and distribution of crackle lines depends on wax thickness, wax composition (paraffin-heavy mixtures crack more dramatically), and the force and pattern of fabric manipulation.
Step 6: Second Waxing (For Multi-Color Designs)
If your design calls for more than one color, a second waxing session is necessary before the second dye bath. At this stage, apply wax to the areas that should retain the first dye color — in other words, wax the zones you want to protect from the second dye bath. Re-wax only the areas that carry the first dye’s color. The newly applied wax should be applied somewhat more thickly than the first application, as the fabric and existing wax layer will absorb slightly less of the fresh wax. Maintain the same 60–70°C temperature for consistent viscosity and flow.
The logic of multi-color batik is cumulative protection: each waxing shields whatever color exists in those zones from subsequent dye baths, allowing new colors to be added only to previously undyed or crackled areas. A skilled batik artisan thinks in terms of layers, planning the wax sequence backwards from the final design: the last dye bath colors the smallest number of zones, the first dye bath colors the largest area.
Step 7: Second (and Subsequent) Dye Baths
Immerse the fabric in your second dye color, prepared identically to the first bath but using a different hue. The new dye penetrates in two ways: through the hairline crackle channels in waxed areas (producing the branching crackle lines in those zones) and freely into any areas that were never waxed or were waxed and then re-waxed with gaps. Waxed zones protected by an intact wax layer retain their previous color. The interplay between these two penetration modes is what gives batik its characteristic visual complexity — crisp wax boundaries with organic crackle branching within the waxed zones.
Repeat the wax-dye cycle for each additional color in your design. Practical experience shows that most studio batik work uses 2–4 colors; designs with more than 5–6 colors become progressively harder to manage as earlier wax layers degrade with each hot dye bath immersion. After 4–5 cycles, the fabric fiber itself begins to weaken from repeated saturation and handling, and the wax becomes increasingly difficult to remove completely.
Step 8: Remove Wax
After the final dye bath, the wax must be completely removed from the fabric. Lay the fabric flat on a stack of several sheets of newsprint with the wax side facing down. Set your iron to the cotton temperature setting (approximately 150–200°C) and press firmly on the reverse side of the fabric — never directly on the waxed surface. The heat melts the wax, which soaks into the absorbent newsprint below. Hold the iron in place for 10–15 seconds per section, then lift and move to the adjacent area. Replace the newsprint with fresh sheets each time it becomes saturated with wax — typically after every 2–3 ironing passes. Continue until no more wax transfers to the newsprint.
The alternative method is boiling: submerge the fabric in a large pot of water with a generous amount of laundry detergent and bring to a gentle boil for 10–15 minutes. The boiling action melts the wax and the detergent emulsifies it, releasing the wax into the water. Remove the fabric with tongs, allow it to cool slightly, then rinse thoroughly. Boiling is faster than ironing for large pieces but carries a risk of agitating delicate fabric excessively.
Regardless of removal method, finish by washing the fabric in hot water (40–60°C) with a standard laundry detergent to eliminate any residual wax, dye fixatives, or mordant deposits. This final wash also completes the colorfixation process for fiber-reactive dyes. The fabric emerges clean, colored, and ready for use.
Common Mistakes and Troubleshooting
Batik dyeing requires precision at every stage, and several common errors can compromise results. Knowing the root causes and fixes allows you to respond quickly and salvage work that might otherwise be lost.
| Problem | Cause | Solution |
|---|---|---|
| Wax comes out thick and blob-like; edges are uneven | Wax temperature below 55°C — too cool to flow smoothly through the tjanting spout | Reheat the wax pot, stirring to eliminate cool spots. Allow the tjanting tool tip to warm fully in the pot before continuing. |
| Wax soaks through thin fabric; dye bleeds under waxed edges | Wax temperature above 80°C — wax is too fluid and penetrates the fabric, seeping beyond intended boundaries | Cool the wax slightly (remove from direct heat) and use a double boiler setup to stabilize temperature. |
| Crackle lines are uneven, too faint, or absent | Wax layer is uneven — too thick in some zones, too thin in others; or wax composition is too beeswax-heavy | Aim for consistent 2–3mm wax coverage across the entire waxed area. Add more paraffin to the mixture (60% paraffin / 40% beeswax) for more dramatic crackling. |
| Wax sticks to fabric after ironing; residue remains | Iron temperature too low; insufficient ironing time; newsprint not replaced frequently enough | Increase iron to full cotton setting. Apply sustained pressure for 15–20 seconds per area. Replace newsprint with fresh sheets every 2–3 passes. |
| Dye penetrates into supposedly waxed areas; design is blurry | Wax layer too thin; pinholes in wax from sharp creases; or wax not fully set before dyeing | Apply a second coat of wax to thin or pinholed zones. Ensure wax is fully cooled and hardened before immersing in dye bath. |
| Fabric wrinkles and distorts during waxing | Fabric not pinned taut enough; tension released during waxing | Re-stretch fabric and re-pin at more frequent intervals. Work on a padded, grippy surface that helps hold pins securely. |
Fiber Compatibility for Batik Dyeing
Not all fabrics are suitable for the batik wax-resist technique. The fiber type determines which dyes are appropriate, what temperature the dye bath must reach, and how the wax behaves — and these factors interact in ways that make some fibers excellent batik candidates and others fundamentally incompatible.
Cotton (Ideal for Batik)
Cotton is the gold standard for batik dyeing. Its excellent absorbency allows even, thorough dye penetration in exposed areas, and the fiber’s mechanical strength tolerates multiple wax/dye cycles without significant degradation. Cotton’s relatively low protein content means it responds best to fiber-reactive dyes — specifically Procion MX type dyes — which bond chemically to the cellulose at room temperature, keeping the wax bath safe from heat damage. For beginners, cotton poplin, cotton lawn, or plain-weave cotton canvas provide the best combination of absorbency, workability, and affordability. Pre-washing cotton fabric before waxing removes manufacturing sizing that would interfere with even dye absorption.
Linen (Excellent)
Linen behaves very similarly to cotton in the batik process, with slightly superior dye uptake due to its higher cellulose content and more open fiber structure. The trade-off is cost and availability: high-quality linen suitable for detailed wax work is considerably more expensive than cotton and less commonly found in fabric stores. Linen yields sharper crackle effects than cotton because its fibers are stiffer and transfer stress more directly to the wax layer when creased. For fine-line batik work, linen is arguably the best fabric, though cotton’s lower cost makes it more practical for experimentation and learning.
Silk (Good — Requires Adjusted Technique)
Silk produces extraordinarily vibrant batik colors because its natural triangular fiber cross-section refracts light at multiple angles, creating the luminous quality characteristic of dyed silk. However, silk’s surface is smoother than cotton or linen, so wax adheres differently — it tends to peel off more readily if not applied thickly enough. The standard recommendation is to use a heavier wax-to-fabric ratio for silk than for cotton, applying a thicker wax layer to ensure adequate bond. Additionally, silk requires acid dyes rather than fiber-reactive dyes, and acid dye baths are typically near-boiling (85–100°C) — significantly hotter than the 60–70°C safe range for standard batik wax. This temperature conflict means silk batik requires either specialized high-melting-point wax formulations or careful monitoring to prevent wax from melting during the dye bath. Professional silk batik artisans typically use a higher paraffin-to-beeswax ratio and work quickly to minimize wax exposure to the hot dye bath.
Rayon/Viscose (Acceptable — With Limitations)
Rayon (also called viscose or tencel) is a regenerated cellulose fiber and absorbs dye similarly to cotton. However, rayon is significantly weaker when wet — it can lose 30–50% of its dry strength when saturated — and repeated hot wax/dye cycles accelerate this degradation. Rayon batik is acceptable for single-cycle, two-color pieces but becomes risky for multi-layer work where fabric handling is repeated. Additionally, rayon is more prone to shrinkage if washed in hot water after dyeing, which can distort the finished design.
Polyester and Nylon (Not Suitable for Traditional Batik)
Polyester and nylon are synthetic fibers that require disperse dyes for coloration, and disperse dye activation requires sustained temperatures of 100–130°C under pressure in an industrial dyeing vessel. At these temperatures, standard wax mixtures (which melt between 55–75°C) liquefy completely and wash away instantly. Traditional batik wax-resist is therefore chemically and thermally incompatible with polyester and nylon. There is no workaround within traditional batik practice — synthetic fibers simply cannot be batik-dyed using wax-resist methods without specialized industrial wax alternatives that are not available to most practitioners.
Frequently Asked Questions
Q: Can you do batik dyeing without a tjanting tool?
A: Yes — for simpler designs, you can use a silicone basting brush to apply wax in broad strokes, a small rubber stamp to apply wax in a repeated pattern, or even a wooden craft stick to drip wax along edges. For fine detailed work, however, a tjanting tool is irreplaceable for controlling wax flow precisely. Alternatives work well for geometric patterns and broad applications but cannot match the 1–3mm line precision of a well-used tjanting tool.
Q: How many colors can you get in one batik piece?
A: Theoretically unlimited — each color requires a separate waxing and dye bath cycle. Practical limitations include fabric degradation from repeated handling, diminishing crispness of earlier wax layers after multiple hot baths, and the fact that each subsequent dye bath affects all previously dyed areas, creating gradual color mixing rather than hard color separation. Most studio batik uses 2–5 colors; traditional Javanese artisans working with high thread-count fabric can achieve 8–10 colors through exceptional skill and careful planning.
Q: Does batik need to be set with heat after dyeing?
A: Yes — most fiber-reactive dyes (used on cotton and linen) require a heat-setting step to permanently bond the dye to the fiber. After the final dye bath and wax removal, steam the fabric for 30–45 minutes or tumble dry on high heat for 20 minutes to complete colorfixation. This step ensures the dye is chemically bonded to the fiber and will not wash out in subsequent laundering. Skipping the heat-setting step significantly reduces the colorfastness of the finished batik.
Q: How do you care for finished batik fabric?
A: Hand wash in cold to lukewarm water with a mild detergent — never machine wash on a hot cycle, as this combination of heat, agitation, and moisture stress can cause both shrinkage and dye migration. Do not use bleach, which degrades the dye and can cause color bleeding. Dry flat or line dry in shade to protect the fabric’s dimensional stability and prevent UV degradation of the dye. Iron on the reverse side (the unprinted side) if needed, at a temperature appropriate for the fabric type — typically the cotton setting for cotton batik. With proper care, batik fabric maintains its color and integrity for decades.
References
- UNESCO. (2009). Nomination for Intangible Cultural Heritage — Indonesian Batik. UNESCO Intangible Cultural Heritage Section. https://ich.unesco.org/doc/src/00130.html
- Clothroad Project. Batik: A Traditional Textile Art of Indonesia. Clothroad Initiative. https://clothroad.org
- AATCC. (2021). AATCC Test Method 61-2013 — Colorfastness to Washing: Domestic and Laundering, Commercial. American Association of Textile Chemists and Colorists. https://www.aatcc.org
- Textile Exchange. (2023). Preferred Fiber and Materials Market Report. Textile Exchange. https://textileexchange.org
- Liles, J. N. (1990). The Art and Craft of Batik. Schiffer Publishing. ISBN: 978-0887402324.
- Cotton Incorporated. (2023). Fiber-reactive Dyeing Technology for Cotton. Cotton Works. https://cottonworks.com


