
Shibori Dyeing: Step-by-Step Guide to Japanese Resist Dyeing

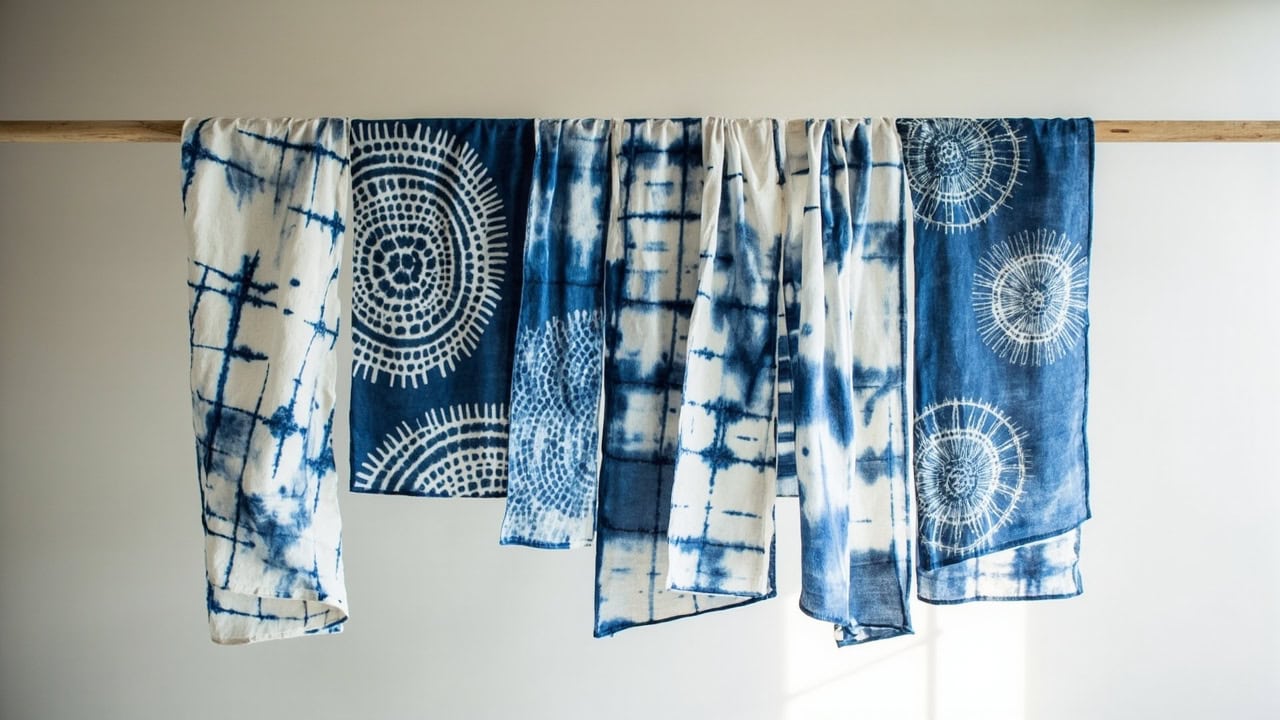
Shibori is a traditional Japanese resist dyeing technique that produces intricate, organic patterns by physically binding, folding, twisting, or compressing fabric before dyeing — the bound areas resist the dye, creating patterns that range from bold concentric circles to delicate linear ripples. Indigo shibori is the most iconic variation, requiring fabric to be immersion-dyed in an indigo vat maintained at 20–25°C with 3–5 successive dips, each producing a deeper blue until the desired shade is achieved.
What Is Shibori? Understanding the Japanese Art of Resist Dyeing
Shibori is an ancient Japanese textile dyeing technique dating to the 8th century Nara period, with the earliest written mention appearing in a 238 CE Chinese document describing cloth gifted to the Cao Wei emperor. The oldest surviving shibori-dyed fragments — including bound resists, wax resists, and folded and clamped resists — date to 756 CE and were donated to Tōdai-ji temple in Nara by Emperor Shōmu.
The word “shibori” derives from the Japanese verb shiboru, meaning to wring, squeeze, or press — a literal description of the technique. Artisans create patterns by resisting dye penetration in specific areas of the fabric through binding, folding, twisting, or compression. The technique requires only fabric, dye, and binding materials — no special equipment is needed, making it accessible to craftspeople at every level.
Each shibori technique produces a unique pattern determined by the folding or binding method employed. The patterns range from precise geometric shapes — such as the sharp diamond grids of itajime — to organic, flowing designs created by the irregular gathering of kumo pleats. Historically, shibori techniques were categorized into three groups: kōkechi (tied and bound resists), rōkechi (wax resists), and kyōkechi (folded and clamped resists). The indigo molecular formula is C₁₆H₁₀N₂O₂ (molar mass 262.27 g/mol), and the conjugated double bond system absorbs orange light at λmax = 613 nm, producing the characteristic deep blue color.
The Six Traditional Shibori Techniques
Japanese textile artisans developed six primary shibori techniques, each producing a distinct visual character. Mastery of these techniques allows the dyer to select the appropriate method for a desired pattern or to combine techniques for complex, layered results.
Itajime (Board Shibori)
Itajime, meaning “board” shibori, involves folding fabric accordion-style and sandwiching it between two wooden boards before clamping the boards tightly together for dyeing. The boards — historically soaked for two weeks before use to ensure pliability — create bold, symmetrical diamond or square patterns with exceptionally clean color boundaries. This technique excels at producing sharp, geometric designs and is ideal for beginners due to its predictability and repeatability.
Arashi (Storm/ Pole Shibori)
Arashi — meaning “storm” — uses a pole around which fabric is wrapped diagonally at a steep 30–45° angle. The fabric is wrapped tightly with thread or rubber bands along the pole, then the entire assembly is compressed by scrunching the fabric down the pole. This creates diagonal parallel lines radiating outward — evoking the appearance of driving rain seen from below. Arashi produces dramatic, linear patterns and is one of the most recognizable shibori forms.
Kumo (Pleated/ Cloud Shibori)
Kumo — meaning “cloud” — is created by accordion-folding fabric into tight pleats and then bunching and securing the fabric at its center. The irregular gathering produces random, cloud-like patterns that are painterly and organic. Kumo is notable because results are never exactly repeatable — each piece is genuinely unique. This unpredictability is considered a virtue, making kumo particularly valued for one-of-a-kind art pieces and garments where organic variation is desired.
Nui (Loose Binding Shibori)
Nui employs hand-stitching with running thread to gather fabric along a design line. The thread is pulled tight and secured before dyeing, creating delicate, flowing lines and organic shapes wherever the stitches gather the fabric. Nui is the most versatile shibori technique, equally capable of producing bold, graphic patterns and the finest, most subtle resist lines. The stitch length, spacing, and tension all influence the final pattern, offering the practitioner precise creative control.
Miura (Loop Shibori)
Miura uses a hooked needle to loop thread through fabric sections twice without knots — the tension holds itself through the doubled loop structure. This technique produces small, circular patterns that resemble the shape of bottle gourds, earning it the alternate name “bottle gourd shibori.” Miura is the quickest of the six techniques to execute, making it popular for larger projects. The results create a dappled, semi-solid appearance that reads as textured solid color at a distance but reveals intricate circular patterning up close.
Deko (Iron Binding Shibori)
Deko — sometimes called “iron binding” — involves placing small objects such as stones, coins, buttons, or seeds onto the fabric and gathering the fabric around them before tying. The objects create small resist spots in their exact shape, adding texture and visual interest to shibori pieces. Deko is most often used in combination with other techniques to add a secondary pattern layer or to introduce unexpected visual elements into a design.
Materials and Equipment Needed
Shibori dyeing requires minimal specialized equipment — the technique was developed by rural Japanese craftspeople using readily available materials. The following supplies cover all six shibori techniques.
Essential Supplies
- Natural fiber fabric — cotton, linen, silk, and rayon are all suitable for indigo. Cellulose fibers (cotton, linen, rayon) and protein fibers (silk) respond well to indigo’s vat dyeing chemistry.
- Synthetic indigo dye powder — the standard choice for home dyers, offering consistent results without the variability of natural indigo plants.
- Sodium carbonate (washing soda) — the alkali agent that raises vat pH to the required 10–11 range for indigo reduction.
- Thiourea dioxide or sodium hydrosulfite — reducing agents that convert insoluble indigo into soluble leuco-indigo, enabling fiber penetration.
- Large stainless steel or glass container — for holding the indigo vat; avoid aluminum, which reacts with the alkaline vat chemistry.
- Heat source or aquarium heater — to maintain the vat at the optimal 20–25°C temperature during extended dyeing sessions.
- Rubber gloves, apron, and drop cloths — indigo stains skin and surfaces permanently and must be handled with protection.
- Wooden boards (for itajime), poles (for arashi), thread, and clips for binding fabric.
Optional but Helpful
- pH test strips — for monitoring vat alkalinity and confirming the 10–11 pH range.
- Rubber bands in various sizes — for securing arashi pole wraps and quick binding work.
- Clothespins and spring clips — for securing bindings during the dyeing process.
- Drying rack or clothesline — for hanging fabric during oxidation between dips.
- Old towels — for handling wet fabric and protecting work surfaces.
Setting Up the Indigo Vat
The indigo vat is the heart of the shibori process. Unlike most other dyes, indigo requires a specific reduction chemistry to become soluble and bond to fibers. The vat must be maintained within narrow temperature and pH ranges for consistent, even color development.
Vat Preparation
- Fill your container with warm water at 20–25°C — not cold, not hot. Cold water prevents proper reduction; water above 30°C causes indigo to oxidize too rapidly.
- Add indigo powder at 5–10g per liter of water. Stir gently to disperse the powder evenly without creating foam or bubbles.
- Add sodium carbonate at 5g per liter of water to raise the pH to 10–11. This alkaline environment is essential for indigo reduction.
- Add the reducing agent — thiourea dioxide at 3–5g per liter — and stir gently. Avoid vigorous stirring that introduces air bubbles.
- Let the vat rest for 30–60 minutes, covered, to allow reduction to complete. The vat is ready when the surface displays a distinctive coppery or bronzy film and the liquid below appears olive-green.
- Avoid introducing water droplets on the surface, which will disturb the coppery film — use a slow, deliberate pour when adding materials.
Maintaining Vat Temperature
Temperature is the most critical variable in indigo vat management. The optimal range is 20–25°C (68–77°F), and this window must be maintained throughout the dyeing session for consistent results.
- Below 15°C: Dye reduction slows dramatically; the vat becomes sluggish and produces uneven, patchy color with poor penetration.
- Above 30°C: Indigo oxidizes too quickly on the fabric surface, preventing deep fiber penetration and limiting color depth. The vat also depletes faster.
- Cover the vat when not in active use to retain heat and prevent airborne contamination from dust and fibers.
- Slow cookers and aquarium heaters are excellent tools for maintaining temperature during extended sessions — set to 22–24°C for optimal results.
Step-by-Step Shibori Dyeing Process
With the indigo vat prepared and at the correct temperature, the shibori dyeing process proceeds through six distinct stages. Each step must be completed carefully, as the quality of each stage directly affects the final result.
Step 1: Prepare Your Fabric (Pre-Wash and Mordant)
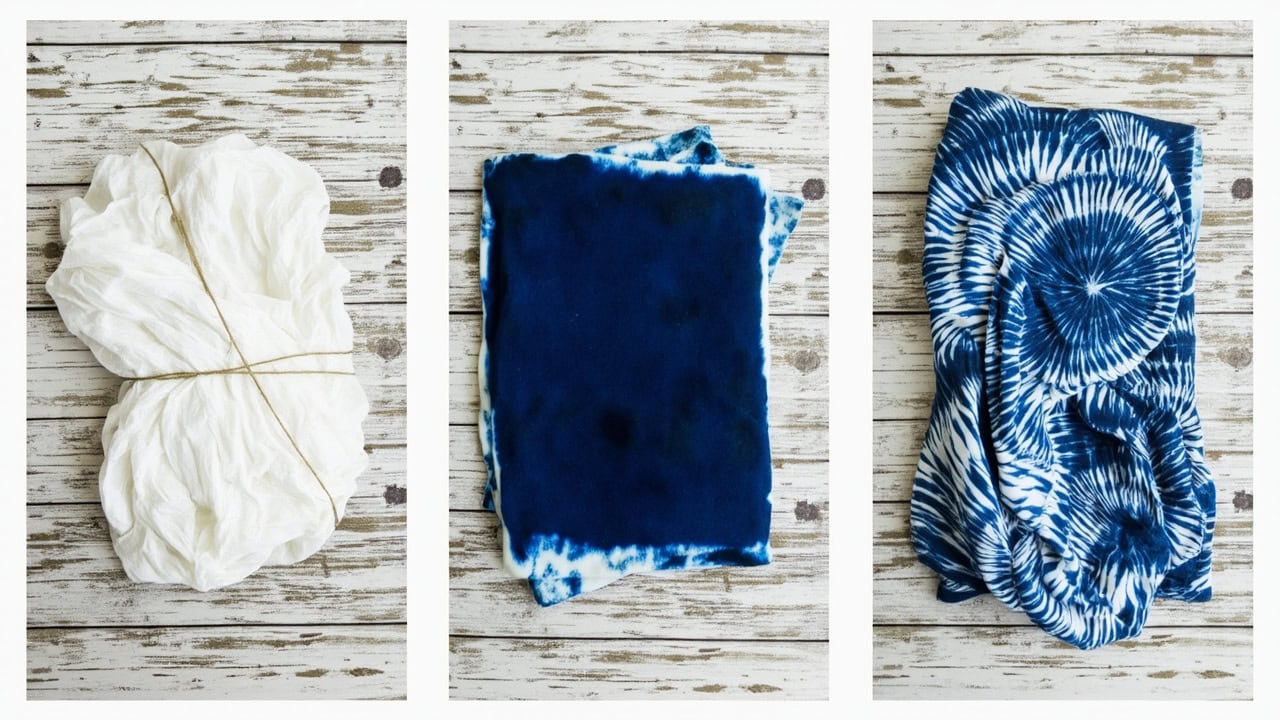
Begin by washing fabric in hot water to remove all sizing agents, machine lubricants, body oils, and any other impurities that would block dye penetration. For cotton and linen, soak the fabric in warm water with soda ash (sodium carbonate) for 30 minutes — this opens the fiber structure and improves dye uptake. For silk, dampen evenly before binding; silk requires less aggressive pretreatment due to its natural affinity for indigo. Always ensure fabric is thoroughly wet before binding — wet fabric takes dye far more evenly than dry fabric, which can result in splotchy, inconsistent patterns. Iron out any remaining wrinkles, as creases can interfere with pattern registration during dyeing.
Step 2: Bind/Fold the Fabric Using Your Chosen Technique
Work quickly during the binding stage to prevent fabric from drying out — a dry fabric will not dye evenly when submerged. Select your technique based on the pattern desired: use itajime for sharp geometric diamonds and squares, arashi for dramatic diagonal rain lines, kumo for organic cloud-like textures, nui for precise flowing curves, miura for dappled circular textures, and deko for scattered accent resist spots. For itajime, accordion-fold the fabric and clamp boards tightly on both sides before submerging. For arashi, wrap fabric diagonally around the pole at the target angle and secure with rubber bands at consistent intervals. Regardless of technique, remember: the tighter the binding, the more white (undyed) areas you will preserve in the final piece. Loose bindings allow dye to seep into resist zones and blur pattern edges.
Step 3: Submerge Fabric in the Indigo Vat
Gently lower the bound fabric into the vat, pushing it beneath the surface with slow, deliberate movements. Never plunge or squeeze fabric aggressively — this traps air bubbles against the fabric surface and creates undyed spots. Ensure the fabric is fully submerged and can move freely in the dye bath. Keep fabric in the vat for 3–5 minutes while agitating gently every 30–60 seconds to maintain dye circulation. Lift the fabric out briefly and let it oxygen-contact for 30–60 seconds — during this exposure, the color will shift visibly from greenish-yellow to blue, a phenomenon dyers call “croaking” that confirms the indigo is bonding to the fiber. Return the fabric to the vat for additional dips to deepen the color progressively.
Step 4: Oxidize Between Dips
After each vat dip, remove the fabric and hang it freely in the air to oxidize. The leuco-indigo (reduced, soluble form) reacts with atmospheric oxygen and converts back to insoluble indigo blue — this is the chemical fixation step that locks color into the fiber. The greenish-yellow fabric will visibly transform to bright blue within minutes; this green-to-blue shift is the definitive indicator that dyeing is occurring correctly. Do not rush oxidation — this is a chemical necessity, not a waiting period to be minimized. Allow 5–10 minutes between each dip for complete color development. Repeat the vat dip and oxidation cycle 3–5 times for a medium indigo blue; 7–10 dips produce a very dark blue. More than 10 dips shows diminishing returns as the fabric approaches saturation.
Step 5: Rinse and Unbind
Once the desired color depth is achieved, rinse the fabric in cold water to remove excess surface dye. The initial rinse water will appear surprisingly bright blue — continue rinsing until the water runs clear, which may require 5–10 minutes of running water. Carefully remove all bindings, clips, boards, poles, and stitches. Handle the fabric gently during unbinding, as the newly dyed material is vulnerable to stress. The revealed pattern will be lighter than the dyed background — the bound areas resisted the dye, creating the characteristic white or pale pattern on the deep indigo ground.
Step 6: Wash and Finish
Hand wash the finished piece in cool water with a mild detergent, working gently to avoid stressing the newly dyed fibers. Do not machine wash for at least 24 hours after dyeing — indigo continues to cure and bond to fibers during this period, and mechanical agitation can disrupt fixation. Line dry in shade to prevent premature fading from UV exposure. If needed, iron the fabric on the wrong side while still slightly damp to further set the dye. With proper care, indigo-dyed shibori pieces develop a beautiful patina over years of use — the graceful fading of indigo is considered characteristic of natural indigo and is not a defect.
Common Mistakes and Troubleshooting
Indigo vat dyeing is more chemistry than art — understanding why problems occur helps prevent them. Most failures trace directly to vat temperature, pH, or binding technique.
Problem: Uneven Color or Patchy Results
Cause: Vat temperature too cold (below 15°C) or inconsistent throughout the session, causing uneven dye reduction and fiber penetration.
Fix: Maintain vat temperature consistently at 20–25°C using an aquarium heater or slow cooker. Stir the vat gently but thoroughly before each dip to ensure even dye distribution. Never use fabric that dried out during the binding stage — re-dampen before submerging.
Problem: Color Not Developing (Fabric Stays Green)
Cause: The vat is exhausted — indigo has been depleted through over-use — or insufficient reduction due to improper pH or temperature.
Fix: Add fresh indigo powder (5–8g/L) and reducing agent (3–5g/L) to recharge the vat. Check that pH remains in the 10–11 range using test strips; add sodium carbonate if needed. Confirm vat temperature is above 18°C before continuing. A healthy vat should show the coppery surface film and olive-green subsurface color.
Problem: Pattern Bleeding (No Crisp Lines)
Cause: Bindings are too loose, allowing dye to seep into resist areas; or fabric dried partially during the multi-dip process.
Fix: Re-tighten all bindings significantly before the next session. Work faster between dips to prevent fabric from drying. Double up on binding layers in areas where crisp pattern edges are critical. Ensure fabric remains consistently damp throughout the entire process — a spray bottle of water can help maintain moisture during pauses.
Problem: White Areas Turning Blue
Cause: Dye penetrated through bindings because bindings were insufficiently tight, fabric was over-compressed in the vat, or clamping pressure was inadequate.
Fix: Double-layer bindings in critical areas — fold fabric over before binding to create a thicker resist zone. For itajime, increase clamping pressure or use a second board layer. For nui, use a tighter stitch pull and add a second row of stitching adjacent to the first for insurance.
Problem: Vat Smells Strongly of Ammonia
Cause: Over-reduction — the reducing agent has been added in excess or the vat has been maintained at too high a temperature, causing ammonia compounds to off-gas.
Fix: Add cool water to the vat to dilute the reducing agent concentration and lower temperature to the 20–25°C range. Do not exceed pH 11 — use test strips to verify. Increase ventilation in the dyeing workspace. The ammonia smell itself is not dangerous at typical concentrations but indicates the vat chemistry has drifted out of the optimal range.
Fiber Compatibility for Shibori
Indigo’s vat dyeing chemistry bonds most effectively with natural cellulosic and protein fibers. Not all fabrics behave equally — understanding fiber compatibility prevents disappointing results and helps match technique to material.
| Fiber Type | Indigo Compatibility | Pre-treatment Needed | Result Quality |
|---|---|---|---|
| Cotton | Excellent | Soda ash soak (30 min) | Bold, even patterns with sharp definition |
| Linen | Excellent | Soda ash soak (30 min) | Similar to cotton; lines may read slightly softer |
| Silk | Good (reduced setting) | None, or mild mordant | Rich, lustrous blue with good depth |
| Rayon/Viscose | Good | Soda ash soak (30 min) | Similar to cotton; absorbs dye readily |
| Wool | Poor — risk of fiber damage | Avoid indigo | Not recommended; alkaline vat damages protein fibers |
| Polyester | None | N/A | Cannot be dyed with indigo; requires disperse dyes |
Cotton and linen are the ideal substrates for shibori — their high cellulose content responds reliably to indigo’s reduction chemistry, producing bold, even patterns with crisp resist lines. Silk offers excellent results with a fraction of the pretreatment, yielding rich, lustrous blues that rayon and viscose approximate closely. Wool must be avoided entirely — the alkaline vat (pH 10–11) chemically damages protein fibers, potentially dissolving the fiber structure over extended exposure. Polyester is chemically incompatible with indigo; its synthetic polymer structure cannot be penetrated by vat dye chemistry and requires disperse dyes applied under high heat and pressure in industrial settings.
Shibori Pattern Gallery and Inspiration
The six shibori techniques can be used individually or layered in combinations to produce an extraordinary range of results, from traditional Japanese aesthetics to contemporary design statements.
Classic Indigo Combinations
The traditional shibori aesthetic centers on white or undyed natural fabric against deep indigo — the stark contrast between the bright ground and the pattern defines the classic Japanese shibori look. White cotton with deep indigo produces the most traditional result, where the white pattern areas read as pure light against the blue field. Silk with indigo creates a luxurious, high-contrast result with an inherent sheen that adds dimension to the pattern. Layering two techniques on the same piece — such as kumo gathering combined with nui stitched lines — creates complex, multi-textured results that reward close inspection.
Modern Shibori Variations
Contemporary dyers have extended shibori beyond its traditional indigo boundaries. Using multiple colors — applying indigo as the foundational layer and then over-dyeing with another color in non-resist areas — creates a two-tone effect where the indigo shows through in the shibori pattern and the second color dominates the background. Combining shibori with dip-dyeing techniques produces gradient effects where color depth transitions from pale to saturated along the fabric’s length. Discharge paste can be applied to already-dyed fabric to selectively remove color and create negative shibori patterns. Over-dyeing existing garments transforms thrifted pieces into original works — a navy polyester jacket becomes a custom shibori piece when over-dyed after绑绑绑绑.
Frequently Asked Questions
Q: Can you do shibori with other dyes besides indigo?
A: Yes — shibori works with most fiber-reactive dyes (Procion MX, Dharma Acid Dyes) and natural dyes. However, indigo produces the most iconic results because it bonds to fibers chemically without requiring a mordant, and its oxidation process creates the characteristic blue color change that signals successful dyeing.
Q: How many times should I dip fabric in indigo for dark blue?
A: Three to five dips produces a medium indigo blue; seven to ten dips produces a very dark blue. Each dip adds color incrementally, and oxidation between dips deepens the shade further. More than ten dips shows diminishing returns as the fabric reaches saturation.
Q: Why does indigo fabric turn green before turning blue?
A: Indigo in the reduced vat is actually yellow-green (indigo white, or leuco-indigo). When fabric absorbs this reduced indigo and is removed from the vat, it reacts with oxygen in the air and oxidizes to blue. This green-to-blue shift is called “croaking” and confirms the dye is working correctly.
Q: How do I care for shibori-dyed items after dyeing?
A: Hand wash in cold water with mild detergent for the first three washes. Indigo continues to cure and may release excess dye during initial washes — this is normal. Avoid prolonged sun exposure when drying; line dry in shade. Do not bleach. Indigo-dyed items will fade gracefully over time, developing a patina characteristic of natural indigo.
References
- Garrett, J. (2025). Indigo Dye: Historical and Technical Overview. Wikipedia. https://en.wikipedia.org/wiki/Indigo_dye
- Shibori: Japanese Tie-Dye Art. (2024). Wikipedia. https://en.wikipedia.org/wiki/Shibori
- CottonWorks Learning Hub. (2024). Indigo Dyeing. Cotton Incorporated. https://www.cottonworks.com/en/topics/fiber/indigo/
- ProChem Equipment & Supply. (2024). Indigo Vat Information. https://www.prochemicalanddye.com/Indigo/indigo.html
- Dharma Trading Co. (2024). Indigo Vat Instructions. https://www.dharmatrading.com/info/indigo-vat.html
- The Dyeing Project. (2024). Synthetic Indigo Vat. https://www.thedyeingproject.com/post/synthetic-indigo-vat
- International Wool Textile Organisation (IWTO). (2024). Fiber Identification and Testing Standards. https://www.iwto.org
- Cotton Incorporated. (2024). Textile Testing Methods. https://www.cottoninc.com


