
Pattern Grading: Size Scaling

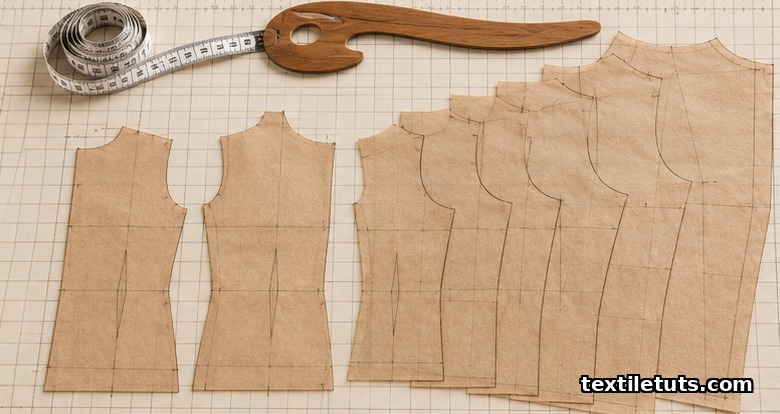
Pattern grading is the engineering process of scaling a single master pattern up and down across a defined size range, using fixed horizontal and vertical grade rules (commonly 5 cm / 2 in between consecutive sizes for adult women’s wear and 4 cm between consecutive sizes for men’s chest and waist), so that every size in the range fits proportionally to the same design block. Done well, grading preserves the silhouette, balance, and ease allowances of the original sample; done carelessly, it distorts the dart positions, throws the shoulder slope off, and produces a size 16 that no longer looks like the size 8 it came from. The article below walks through what grading actually is, the standards that anchor size intervals to body measurements, the two dominant grading methods (manual and computer-aided), the rule tables industry uses, and the failure modes every pattern maker needs to recognise before scaling a block.
What Pattern Grading Does, and Why It Matters
Every garment that ships in more than one size starts life as a single sample size, the master pattern (also called a block or sloper). That block is drafted on a flat surface to fit one body measurement set, usually the median of the target size range. Grading is the act of mathematically producing adjacent sizes from that one block, while keeping every construction line in proportion. Without grading, a brand would have to draft each size by hand, which is neither scalable nor auditable. With grading, the master block becomes a size run: in apparel production, a single style is typically graded across 8 to 14 sizes in women’s wear and 6 to 10 sizes in men’s wear, depending on market and brand standard.
Grading is therefore not the same as pattern making. Pattern making produces one block at one size; grading produces the entire size range from that block. The geometry is governed by two perpendicular vectors: the horizontal grade (around the body, controlling bust, waist, hip, bicep, thigh, and similar circumferences) and the vertical grade (top to bottom, controlling body length, sleeve length, inseam, and rise). These vectors are not arbitrary; they are tied to anthropometric data, the actual distribution of body dimensions in a target population, captured in sizing standards.
The Standards That Anchor Size Intervals
Three standards govern how size intervals are named and numbered, and they are the documents every commercial grader works against:
- ISO 8559 (size designation of clothes). The 2017 revision (ISO 8559-1:2017) defines a list of 44 body measurements for clothing, the reference body type for each population, and how a size label is derived from those measurements. Sizes are not arbitrary letters; they correspond to a specific chest, bust, waist, hip, or stature interval depending on garment type.
- ASTM D5219. The ASTM D5219-09 standard establishes a common vocabulary for body dimensions used in apparel sizing, which is what allows a US domestic grader and an overseas factory to read the same spec sheet without ambiguity.
- EN 13402. The European standard EN 13402 (size designation of clothes) ties a numeric size code to a defined interval of bust and hip circumferences, and it is the basis for the body-size pictograms printed on garment labels in the EU.
These documents do not dictate the grade rule itself (that is brand and pattern maker territory), but they define what the labelled size actually means. A size M in an EU-spec garment corresponds to a bust range of 88 to 92 cm in EN 13402-2, while a US-spec size 8 women’s dress corresponds to a 32 in / 81.3 cm bust in ASTM D5219’s interval table. The grade rule is then constructed so that adjacent size labels move by a defined increment in those reference dimensions.
Grade Rule Tables: The Numbers Behind the Geometry
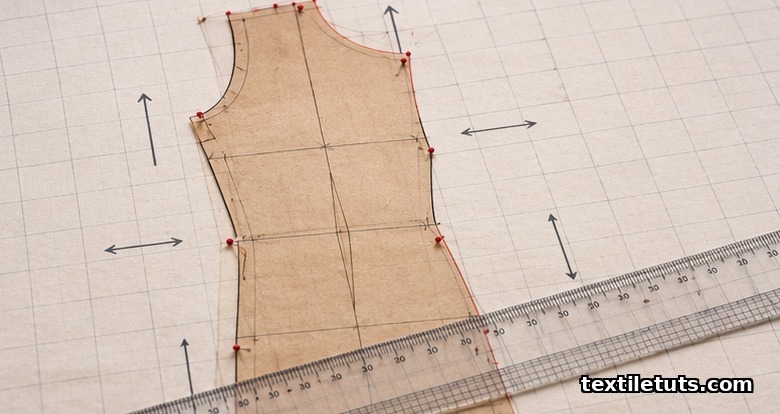
A grade rule table is the heart of any grading system. It lists every key point on the pattern, the amount it moves horizontally (x) and vertically (y) per size increment, and the direction (positive or negative). A simplified women’s bodice grade rule for a 5 cm / 2 in size step looks like this:
| Pattern point | Horizontal grade (per size) | Vertical grade (per size) |
|---|---|---|
| Center front at bust | +1.3 cm (¼ total grade each side) | 0 |
| Side seam at bust | +1.3 cm | 0 |
| Side seam at waist | +1.0 cm | 0 |
| Side seam at hip | +1.3 cm | 0 |
| Shoulder point | +0.5 cm | -0.3 cm |
| Neck point (CF) | 0 | -0.3 cm |
| Armhole / scye depth | 0 | -0.3 cm |
| Waist length (CF) | 0 | +0.5 cm |
The horizontal grade at bust and hip totals 2.6 cm per size (1.3 cm × 2 sides), giving the familiar 5 cm total circumference step, while the waist steps by 2.0 cm. The vertical grades preserve body length differences across the size range, which is why the waist length grows by 0.5 cm per size even when the circumference grows by 2.5 cm. A men’s wear block, where size steps are usually 4 cm at chest and waist, uses roughly two-thirds of these horizontal values and the same vertical structure.
Every grade rule table has a single governing principle: horizontal and vertical grades must be in proportion to actual body change, not to the block itself. If a sample was drafted at bust 88 cm and waist 70 cm, the difference between sizes 38 and 40 in EN 13402 is about 4 cm at bust and 2 cm at waist, not 4 cm at both. Using the same horizontal grade for bust and waist produces a garment that fits at the bust in size 40 but is too loose at the waist, the most common grading error in home sewing.
Manual Grading: Track-and-Trace and Slash-and-Spread
Before computer-aided design (CAD) became standard, two manual methods dominated the pattern room.
Track grading traces the original block onto pattern paper, marks each key construction point, and moves each point along a pre-defined x/y vector using a ruler. The new positions are connected with a pencil, producing the next size up (or down). It is precise and easy to audit, but slow; a single men’s trouser block might take 45 to 60 minutes to grade across one size step, and a full 6-size run across all the components of a jacket can consume two working days for a senior pattern maker.
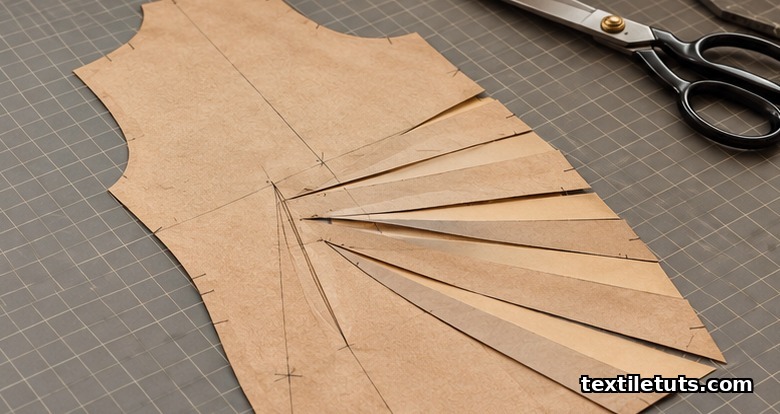
Slash-and-spread cuts the master block along predefined grade lines, spreads the pieces by the required amount, and fills the wedge gaps with paper. It is faster for radical shapes (e.g., grading a flared skirt from size 6 to size 18 in one operation), but it is destructive; the original master is consumed, so it must be copied first if preservation matters. Slash-and-spread is also the method behind the visual nesting technique, where all graded sizes are stacked with their cutting lines visible, used by factory planners to optimise marker layout for fabric utilisation.
Computer-Aided Grading (CAD) and the Master Pattern
CAD grading replaces the ruler and pencil with software that stores the master pattern as a vector file and applies the grade rule table to every control point automatically. Commercial systems used in production include Gerber Accumark, Lectra Modaris, Assyst Smartex, and Optitex. The workflow is consistent: digitise the master block, attach the grade rule table as a spreadsheet, and the system generates every adjacent size in the run in seconds, with full traceability for QA documentation.
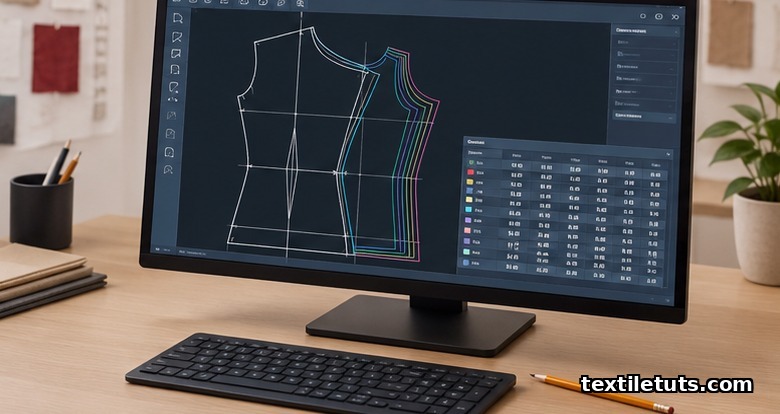
The advantages of CAD grading are reproducibility (the rule table is applied identically every time, eliminating operator drift), auditability (the system logs the grade values used for each batch), and integration with nesting software, which then lays out all graded sizes on the marker to minimise fabric waste. The disadvantage is that the grade rule table must be written correctly in the first place. CAD does not invent sensible numbers; a bad rule table produces a bad grade faster than manual methods ever could.
Common Grading Failures and How to Spot Them
Even with a correct rule table, grading can fail. The pattern maker should check for these issues every time:
- Dart drift. The waist dart migrates inward as sizes go up, throwing the side seam off the body’s natural curve. Caused by horizontal grade being applied equally to dart intake points and the side seam, instead of allowing dart intake to grow slightly.
- Armhole distortion. The scye grows wider but not taller in larger sizes, producing a flattened armhole that restricts sleeve movement. Fix: verify that the vertical grade at the armhole is non-zero (typically -0.3 cm per size for women).
- Shoulder slope loss. Shoulders remain horizontal in larger sizes when they should slope slightly with body length increase. Caused by zero vertical grade at shoulder tip.
- Hip-waist imbalance. Waist grows at the same rate as hip, producing a column instead of an hourglass in misses’ sizes. Fix: enforce a smaller grade at waist (about 60 to 70% of the hip grade).
- Length-only change. Horizontal grade applied at the hem only, length grade applied to the whole pattern, producing a garment that fits at the chest but hangs incorrectly at the hem. This is the classic slash-and-spread mistake when spread amount is not divided by measurement points.
A useful audit step is to print the largest and smallest graded sizes on a single sheet, overlay them on a light box, and inspect whether every construction line (dart legs, side seam, hem, neckline) tracks parallel. Parallel lines mean consistent ease; converging lines mean ease is being lost as the size increases, which is acceptable only at intentional taper points like the waist of an A-line dress.
Frequently Asked Questions
Q1: What is the standard size increment between sizes in women’s wear?
The most common interval is 5 cm (2 in) at the bust and hip for adult women’s wear in US and EU sizing systems, with a smaller 4 cm (1.5 in) interval at the waist and a 0.5 cm vertical interval at waist length. EN 13402 and ASTM D5219 use these intervals to define the size labels, and ISO 8559-1:2017 provides the body measurement list they reference. Men’s wear typically uses 4 cm (1.5 in) at the chest and waist.
Q2: How many sizes does a typical production grade run include?
A standard production grade run spans 8 to 14 sizes for women’s wear and 6 to 10 sizes for men’s wear, depending on the brand’s target market and price point. Mass-market brands run wider ranges to maximise coverage; premium brands often run narrower ranges to focus on fit precision. The total circumferential growth across a 10-size women’s run at 5 cm per size is 25 cm (about 10 in) at the bust, which is roughly the difference between a US size 0 and a US size 16.
Q3: Is pattern grading the same as pattern making?
No. Pattern making produces a single block at one sample size, fitted to a specific body measurement set. Grading takes that single block and scales it across an entire size range using a defined rule table. Pattern making is a design and fitting task; grading is a geometric scaling task. In a commercial pattern room, the two roles are often held by different specialists, with the pattern maker (or designer) producing the master and the grader producing the size set.
Q4: Why do home sewing patterns often fit poorly across the size range?
Most home sewing patterns are graded using simplified rule tables that apply equal horizontal growth at every measurement point. This produces straight side seams instead of shaped ones, and it flattens dart geometry in larger sizes. Commercial grade tables are non-uniform: waist grades are typically 60 to 70% of bust grades, and armhole height grows slightly per size. Home patterns sometimes publish the grade table in the instruction sheet, and experienced sewists adjust it before cutting.
Q5: How does grading interact with fabric stretch and ease allowance?
Stretch fabrics require a smaller grade because the fabric contributes part of the fit, so a horizontal grade of 2.5 cm per size at bust on a 10% weft-stretch knit produces the same fitted ease as a 5 cm grade on a rigid woven. Ease allowance (the difference between body measurement and garment measurement) must be preserved across the size range, not collapsed: a jacket with 10 cm ease at the bust in size 8 must have 10 cm ease in size 18, not 5 cm. The grade rule is applied to the body measurement, then ease is re-added on top, not folded into the grade.
References
- International Organization for Standardization. ISO 8559-1:2017 — Size designation of clothes — Part 1: Anthropometric definitions and measurement procedures. ISO — defines the body measurement list and reference body types used in apparel sizing.
- ASTM International. ASTM D5219-09 — Standard Terminology Relating to Body Dimensions for Apparel Sizing. ASTM — establishes the vocabulary for body dimensions in US apparel specifications.
- European Committee for Standardization. EN 13402 — Size designation of clothes. CEN — defines the EU numeric size system and pictogram labelling rules.
- Apeagyei, P. R., & Otieno, R. (2007). A usability evaluation of a 3D CAD system for apparel design. International Journal of Fashion Design, Technology and Education, 1(2), 57-66. Taylor & Francis — peer-reviewed work on CAD adoption in pattern grading.
- Bye, E., & McKinney, E. (2010). Fit analysis using live and 3D scan data. International Journal of Clothing Science and Technology, 22(4), 281-295. Emerald — peer-reviewed methodology for verifying graded size fit.
- Wikipedia contributors. Pattern grading. Wikipedia, The Free Encyclopedia — encyclopedic overview of grading methods and history.
- LaBat, K. L., & Sokolowski, S. L. (1999). A three-stage design process for mass customization. Clothing and Textiles Research Journal, 17(3), 137-146. SAGE — peer-reviewed work on grading for size-inclusive apparel.
This article is the working reference for pattern grading and size scaling in apparel production. Editorial by Kazi Sifat Muntasir, TextileTuts. Sources: ISO 8559-1:2017, ASTM D5219-09, EN 13402, Apeagyei & Otieno (2007), Bye & McKinney (2010), LaBat & Sokolowski (1999), and Wikipedia as cited.


