
Coverstitch Machine: How It Works and When to Use

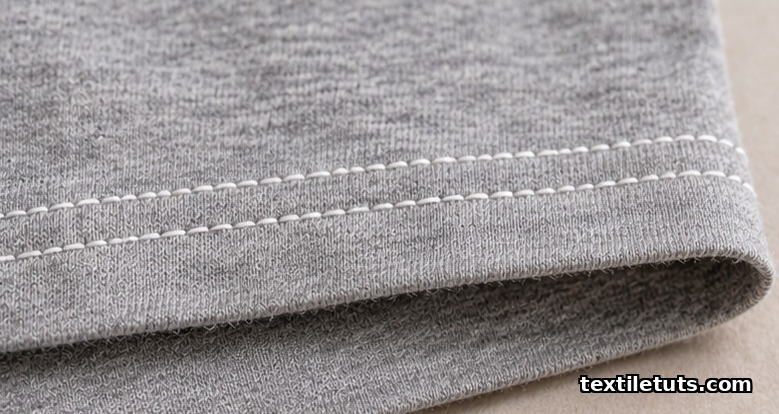
A coverstitch machine forms 2- or 3-needle parallel topstitches on the face of the fabric while a single looper thread binds the underside in a chain, producing the stretchable seam classified as ISO 4915:2015 stitch type 602 (two-needle cover) or 605 (three-needle cover) at industrial speeds of 6,000 to 8,500 stitches per minute. The coverstitch is the dedicated finishing tool for knit garments because a standard lockstitch will snap when the seam stretches by the 15 to 30 percent that a typical jersey, interlock, or fleece panel can put on a hem.
This guide explains how the machine makes that stitch, what each control actually changes, and when the coverstitch is the right tool versus a serger, a lockstitch, or a coverstitch-converter attachment on a home serger.
What a Coverstitch Machine Does That a Serger Cannot
A serger (overlock) trims the seam allowance and encloses the raw edge with 3 or 4 threads of overedge stitching, which is why serger seams lie flat but show loops on the face. A coverstitch does the opposite. It leaves the raw edge visible inside the garment and lays a clean, parallel row of straight stitching on the outside, the kind of twin-needle finish you see on store-bought T-shirt hems, sweatshirts, leggings, and activewear waistbands.
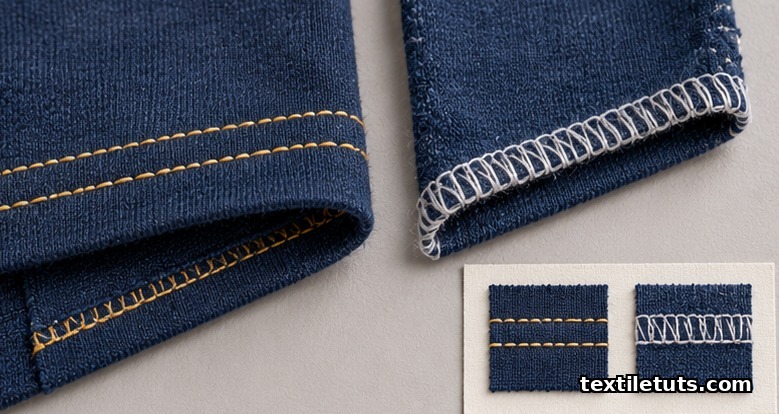
Mechanically the two machines are related. Both use one or more needles plus a looper (or loopers) rather than a bobbin, and both rely on differential feed to push the top and bottom fabric plies at slightly different rates. The coverstitch adds a second looper called the spreader, which is what wraps the underside of the seam and produces the characteristic ladder-like chain on the wrong side.
Some home sergers include a coverstitch conversion mode that swings the spreader into position and replaces the overedge knives with a flat presser foot. Industrial shops usually keep the two machines separate because productivity drops every time you re-thread and re-set the machine.
How the Mechanism Works
The stitch is built in three coordinated motions per cycle:
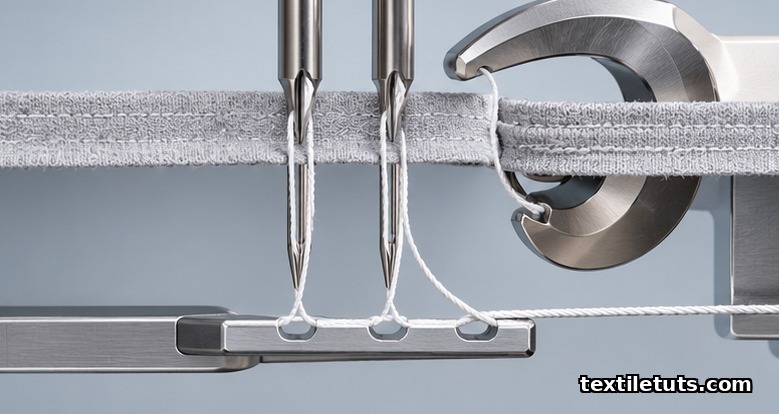
- The two or three needles descend through the fabric and pull a straight needle thread (or threads) into the seam.
- The looper rotates behind the needles, hooks each needle thread, and carries it around to form a chain with the spreader thread below the fabric.
- The spreader, mounted on a separate shaft, lays the single looper/spreader thread across the bottom of the seam so it covers the raw edge and links the needle threads together.
Because the chain on the underside is held by interlooping rather than by a bobbin tension, the seam can elongate with the fabric and recover without breaking a thread. ISO 4915:2015 classifies this construction as stitch type 602 (two-needle cover, around 6 mm wide) or 605 (three-needle cover, around 9 mm wide), both of which sit inside class 600 for cover stitches. The companion standard ISO 14715:2004 assigns the resulting seam to a superimposed seam with a single row of cover stitching, used wherever a garment needs a flexible topstitch on the outside and a chain on the inside.
Differential feed sits underneath the presser foot and uses two separate feed dogs in front of and behind the needles. The ratio, typically adjustable from 0.7 to 2.0, lets you stretch or gather the lower ply as it feeds in. Set the ratio below 1.0 (around 0.7) when hemming a T-shirt to keep lightweight jersey from tunneling; set it above 1.0 (around 1.2 to 1.5) when attaching a binding to a spandex panel that needs to be eased in without ripples.
Stitch Geometry and What the Controls Mean
Three dials do almost all of the work on a coverstitch:
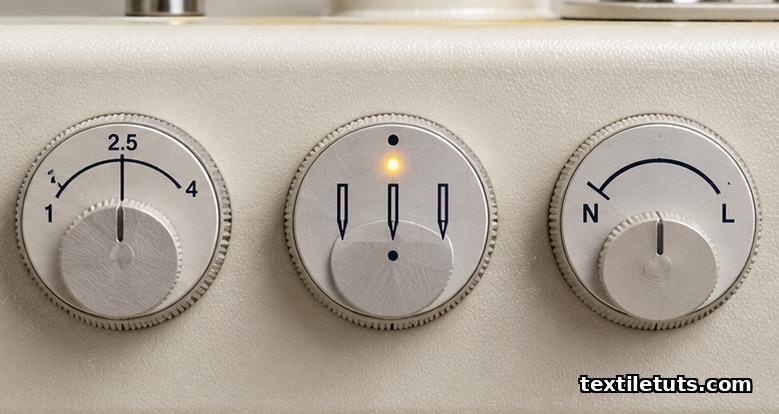
- Stitch length sets the pitch of the chain, normally from 1 mm to 4 mm. A 2.5 to 3 mm pitch is the standard for jersey hems. Shorter pitches lock the chain into a stiff ridge that can saw through Lycra; longer pitches expose more looper thread on the face and weaken recovery.
- Stitch width is fixed by which needle positions you occupy (left/center/right on a 3-needle machine). Common widths are 6 mm (two needles, 4 mm apart) and 9 mm (three needles). A 6 mm two-needle cover reads as the classic twin-needle hem; a 9 mm three-needle cover is reserved for binding and decorative topstitching.
- Tension is balanced separately for the needle threads and the looper/spreader thread. The looper thread usually wants a lighter tension than the needles, because if you can see the looper thread pulled tight on the right side, the seam is over-tensioned and will pucker on the first wash.
AATCC TM88B grades the appearance of seams (including coverstitched seams) after repeated home laundering. The rating penalizes laddering (looper thread showing through on the face), broken needle threads, and distortion at the hem fold, which is why production engineers test coverstitched garments before signing off on a line.
When to Reach for a Coverstitch
Coverstitch is the right tool when the seam sits on the outside of a stretch garment and the raw edge can be hidden inside a hem fold. The clearest use cases:
- T-shirt and sweatshirt hems. A 6 mm two-needle cover with a 2.5 mm stitch length matches the look of mass-produced jersey hems.
- Legging and yoga-pant hems. The 6 mm width is narrow enough to look like a topstitch yet wide enough to recover when the fabric stretches.
- Binding on necklines and armholes. Three needles (9 mm cover) catch a binding strip in one pass and replace the slower two-step “sew, then topstitch” method.
- Decorative topstitching on sweatshirts, hoodies, and sweatpants. Where a lockstitch topstitch would break under wear, the cover chain recovers.
- Elastic attachment on waistbands. The cover chain flexes with elastic recovery, while a lockstitch locks the elastic in place and can snap.
When not to use it:
- Wovens that do not stretch. Use a lockstitch. A coverstitch on a stable cotton shirt is overkill and adds an extra thread change.
- Seams that need to be pressed open. Coverstitched seams cannot be opened because the chain sits on one side of the fabric. Use a lockstitch and fell the seam.
- Load-bearing structural seams. Sarah’s 2020 study in the Autex Research Journal modeled seam strength for cover stitch types 602, 605, and 607 and reported that the cover seam breaks at lower tensile load than a 301 lockstitch of the same thread, because the chain concentrates stress on fewer thread crossings.
Thread and Fabric Choices
The needle threads carry the visible topstitching and want a spun polyester or cotton-wrapped poly, typically Tex 27 to Tex 40 (the same weight used for general serger work). The looper/spreader thread sits on the wrong side of the garment and is rarely seen, so most production lines use a textured polyester, Tex 18 to Tex 24, or a fine nylon, for the chain. A finer looper thread reduces the bulk of the underside and keeps the seam flexible.
Fabric choice matters because the coverstitch has no trimming knife, so the raw edge is still inside the fold. AATCC TM135 dimensional change tests show that a 2×2 rib knit shrinks 5 to 8 percent in the first home wash, while a 100 percent cotton jersey shrinks 3 to 5 percent. The coverstitch tolerates this because the chain stretches with the fabric. A tightly woven shirting will not absorb that shrinkage and will pucker instead, which is one more reason coverstitch belongs on knits.
Coverstitch vs. Serger vs. Lockstitch at a Glance
| Property | Coverstitch (ISO 602 / 605) | Serger (ISO 504 / 505) | Lockstitch (ISO 301) |
|---|---|---|---|
| Visible face | Parallel straight rows | Loops wrapping the edge | Single straight row |
| Raw edge | Enclosed in a fold, not trimmed | Trimmed and overcast | Enclosed in a seam allowance |
| Stretch capacity | High (chain-based) | High (looper-based) | Low (bobbin tension locks stitch) |
| Best use | Hemming and topstitching knits | Seam assembly on knits | Seam assembly on wovens |
| Threads used | 3 or 4 (2/3 needle + 1 looper) | 3 or 4 (2 needles + 2 loopers) | 2 (needle + bobbin) |
Frequently Asked Questions
Can a serger replace a coverstitch machine?
A standard serger (ISO 4915 class 500, overedge stitch types 503 to 505) cannot produce a parallel-row topstitch on the face of the fabric. Some home sergers include a removable coverstitch conversion kit that swings a spreader into place, but the conversion slows the machine and changes the threading path, so most production lines keep a dedicated coverstitch. If you only sew a few T-shirt hems a year, a conversion on a good home serger is a workable substitute.
What stitch length should I use for a jersey hem?
A 2.5 to 3 mm stitch length is the standard for jersey, interlock, and fleece hems. Going shorter than 2 mm risks thread buildup at the hem fold and can cause the looper thread to pierce through to the face under tension. Going longer than 3.5 mm exposes more looper thread on the underside and weakens the chain during repeated laundering cycles.
Can you finish a T-shirt hem without a coverstitch?
Yes. A twin-needle on a lockstitch machine gives a similar twin-row topstitch, but the bobbin thread limits stretch recovery to roughly 5 to 10 percent before the bobbin thread snaps, well below the 15 to 30 percent stretch a typical jersey can demand. For stretch knits, the coverstitch chain recovers much further and survives repeated laundering better, which is why almost every commercially produced jersey garment you own is hemmed on a coverstitch.
Is a coverstitch good for wovens?
Coverstitch is technically usable on wovens, but it adds cost without benefit. A woven panel does not stretch enough to need a chain stitch, and the coverstitch cannot be pressed open, so seam finishing must hide the raw edge inside a fold or facing. Lockstitch (ISO 4915 type 301) is faster and gives a cleaner result on stable woven fabrics.
What is the difference between a 2-needle and a 3-needle coverstitch?
Two needles produce a 6 mm wide cover stitch, the classic T-shirt hem. Three needles produce a 9 mm wide cover stitch, used for binding, decorative topstitching, and applications where you want to catch more fabric in one pass. Most home coverstitch machines let you deactivate one needle position (often by covering an unused needle slot with a blank plate) to switch between the two widths.
References
- ISO 4915:2015, Textiles — Stitch types — Classification and terminology. International Organization for Standardization. Defines stitch types 602 and 605 (cover stitches) and the 100 to 900 class numbering system used throughout the textile industry.
- ISO 14715:2004, Textiles — Seam types — Classification and terminology. International Organization for Standardization. Defines superimposed seam types for cover stitching used on knit garments.
- ASTM D6193, Standard Practice for Stitches and Seams. ASTM International. Reference practice for stitch geometry and seam classification in sewn products.
- AATCC TM88B, Test Method for Appearance of Seams in Garments after Repeated Home Laundering. American Association of Textile Chemists and Colorists. Used to grade coverstitch laddering, broken threads, and distortion.
- AATCC TM135, Test Method for Dimensional Changes of Fabrics after Home Laundering. American Association of Textile Chemists and Colorists. Shrinkage reference for jersey and rib knits finished on a coverstitch.
- Sarah, M. (2020). “Determination of Sewing Thread Consumption for 602, 605, and 607 Cover Stitches Using an Artificial Neural Network,” Autex Research Journal, 20(4). Peer-reviewed study modeling seam strength and thread consumption for ISO class 600 cover stitches.
Editorial by Mohammad Yousuf (Anik), TextileTuts. Sources: ISO 4915:2015, ISO 14715:2004, ASTM D6193, AATCC TM88B, AATCC TM135, and Sarah (2020) as cited above.


