How to Knit a Buttonhole in Rib?
To knit a buttonhole in rib, work 5 rib stitches, then bind off 3 stitches (for buttons 10–15 mm) or 4 stitches (for buttons 18–25 mm) to create the opening, and immediately cast 3–4 replacement stitches back on using the cable cast-on method before continuing. This bind-off-then-cast-on technique maintains the rib pattern’s continuity while creating a clean, reinforced buttonhole that resists stretching. The cable cast-on produces a firm, non-elastic edge ideal for button band boundaries.
Ribbing creates a stretchy, reversible fabric that lies flat—making it ideal for button bands, cuffs, and collars. The 1×1 rib (alternating one knit stitch, one purl stitch) and 2×2 rib (two knits, two purls) are the most common patterns for button bands, with the technique described here working on both, though the visual result is most pronounced on 1×1 rib.
Buttonhole Size Reference
| Button Diameter | Stitches to Bind Off | Casts On to Replace | Best Used For |
|---|---|---|---|
| 10–15 mm (small) | 3 stitches | 3 stitches | Children’s garments, lightweight fabrics |
| 15–18 mm (medium) | 3 stitches | 3 stitches | Standard women’s cardigans, pullovers |
| 18–25 mm (large) | 4 stitches | 4 stitches | Men’s garments, heavy winter cardigans |
| 25–30 mm (extra-large) | 5 stitches | 5 stitches | Oversized coats, heavy outerwear |
Knitting a Buttonhole in Rib: Step-by-Step
Before beginning, check your yarn weight and needle size against the Craft Yarn Council’s Standard Yarn Weight System. For worsted weight yarn (Medium weight, Category 4), the recommended gauge is 16–20 stitches per 4 inches (10 cm) on needles sized 4.5–5.5 mm (U.S. 7–9). For DK or light worsted (Category 3), the gauge is 23–26 stitches per 4 inches on 3.25–3.75 mm needles (U.S. 3–5). Matching your yarn weight to the correct needle size ensures consistent stitch tension across the button band.
Step 1: Create the Primary Buttonhole Opening
Begin at row 5 of your button band. Work across 5 individual rib stitches (knit the knits, purl the purls) using the 1×1 rib method. At this point, you will create the buttonhole opening by binding off a specific number of stitches. For a standard small-to-medium button (10–15 mm diameter), bind off 3 stitches on this row. For larger buttons (18–25 mm), bind off 4 stitches instead.
There are several types of knitted button bands, and each requires slightly different placement of the buttonhole. For a vertical buttonhole on a ribbed band, the horizontal bind-off method described here creates a clean, reinforced opening that resists stretching out with wear.
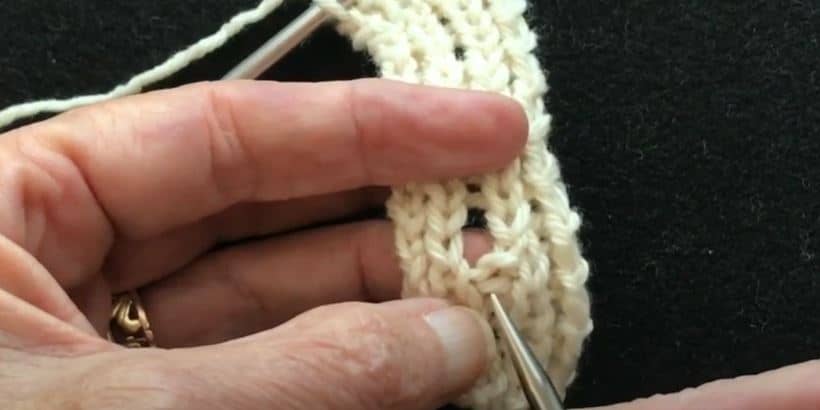
Step 2: Cast On Three Stitches to Replace the Bound-Off Stitches
After binding off 3 stitches, you must immediately replace them so the rib pattern continues uninterrupted. Using the cable cast-on method (also called the “purlish” method when worked knitwise), cast 3 stitches onto the right-hand needle. This method is preferable to the long-tail cast-on here because it produces a firm, non-elastic edge that holds its shape at the buttonhole boundary.
To work the cable cast-on knitwise: insert the right needle between the first two stitches on the left needle, wrap the yarn, and pull through. Repeat until you have 3 new stitches. Work across the remaining stitches on the left needle, beginning with a knit stitch in the correct rib sequence.
Step 3: Knit Across the Remaining Five Stitches
Continue knitting across the left-hand needle. You now have 5 stitches to work on this row—knit the knit stitches and purl the purl stitches in their established rib pattern. Cast 3 more stitches onto the right needle as you reach the end of this row to maintain stitch count and prepare for the next section.
Avoid casting on too loosely. Loose stitches at the buttonhole edge create a gaping, unprofessional result. The tension of your cast-on stitches directly affects how cleanly the buttonhole holds its shape. If your stitches tend to be loose, go down one needle size for the cast-on rows.
Step 4: Work the Rows Between Buttonholes
After completing the first buttonhole, continue working in 1×1 rib for 18 rows before creating the next buttonhole. This spacing of approximately 18 rows (roughly 3–4 inches depending on your row gauge) works well for most standard button placements. For a child’s garment, reduce this to 12–14 rows. For an oversized adult cardigan, increase to 20–22 rows.
To calculate row spacing precisely: measure the button diameter plus 2–3 mm for ease, then divide by your row gauge (rows per inch). A 15 mm button needs approximately 18–20 rows of spacing on a fabric with a row gauge of 5 rows per inch (20 rows per 4 inches).
Repeat the buttonhole process from Steps 1–3 for each subsequent buttonhole. The width of your rib band determines the overall number of buttonholes. Standard spacing follows the rule: space buttonholes evenly across the band, with the topmost button positioned 1–2 inches below the neckline and the bottommost button positioned 1–2 inches above the hem.
Step 5: Finish by Casting Off All Stitches
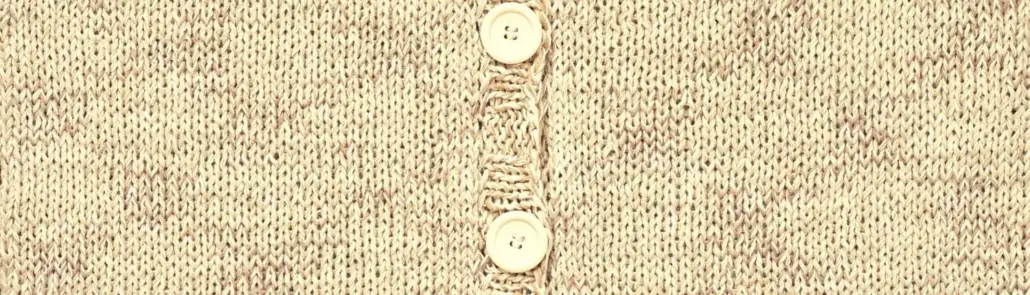
After completing the final buttonhole and working the required rows below it, cast off all stitches loosely. Like the process of knitting a vertical buttonhole, the buttonholes you create here will appear vertical in orientation. Slight variation in shape is normal and results from the natural elasticity of the rib fabric.
If any buttonhole edges appear uneven, use a buttonhole scissor to trim any protruding yarn tails flush with the surrounding fabric. Always learn the proper method for using buttonhole scissors before cutting, as improper use can damage the surrounding rib structure.
Common Mistakes to Avoid
- Loose cast-on stitches at the buttonhole edge: Creates a gaping, unprofessional opening. Use a needle one size smaller for the cable cast-on rows if your tension tends to be loose.
- Binding off too many stitches: Results in a buttonhole too large for your button. Match bind-off stitch count to button diameter using the reference table above.
- Skipping the cable cast-on replacement: Simply leaving an opening without casting replacement stitches breaks the rib continuity and creates an irregular, floppy edge.
- Inconsistent row spacing between buttonholes: Causes uneven button placement. Mark your spacing intervals before beginning, especially on longer button bands.
- Positioning buttons too close to the neckline or hem: The topmost button should sit 1–2 inches below the neckline; the bottommost should sit 1–2 inches above the hem for a balanced, functional closure.
- Using buttonhole scissors on the wrong yarn type: Synthetic or novelty yarns may fray or melt under the scissor tension. Test on a swatch first if working with non-standard materials.
Yarn Weight and Gauge Reference for Button Bands
Choosing the correct yarn weight for your button band is critical to achieving a professional result. The Craft Yarn Council defines 8 standard yarn weight categories, and most button band applications use Medium (Worsted), Fine (Sport), or Light (DK) weights.
A button band knit in a heavier yarn weight (bulky or super bulky) produces a chunky, prominent border ideal for winter cardigans. A lighter yarn weight produces a delicate, refined edge suitable for baby garments or lightweight pullovers. Match your button band yarn to your garment body yarn for a cohesive finished appearance.
Knitting a buttonhole in rib is a straightforward technique once you understand the cast-on and bind-off relationship at each opening. The key to success is maintaining consistent tension, following the rib pattern without interruption, and spacing buttonholes evenly across the band. Whether you are working on a hand-knitted garment or preparing to pair it with a machine-stitched component, properly executed buttonholes elevate the overall quality of the finished piece.
For additional comfort during extended knitting sessions, invest in a supportive chair designed for crafters. Proper posture reduces fatigue and allows for the consistent stitch tension that clean buttonholes require.
REFERENCES:
- Craft Yarn Council. (2018). Standard Yarn Weight System. Craft Yarn Council.
- TextileTuts. (2021). How to Knit a Buttonhole Band. TextileTuts.
- TextileTuts. (2021). How to Knit a Vertical Buttonhole. TextileTuts.
- TextileTuts. (2021). How to Tidy Up Knitted Buttonholes. TextileTuts.
- TextileTuts. (2021). Types of Knitted Button Bands. TextileTuts.
- TextileTuts. (2021). How to Use Buttonhole Scissors. TextileTuts.
- TextileTuts. (2021). Hand-Sewn Buttonholes vs. Machine Buttonholes. TextileTuts.


