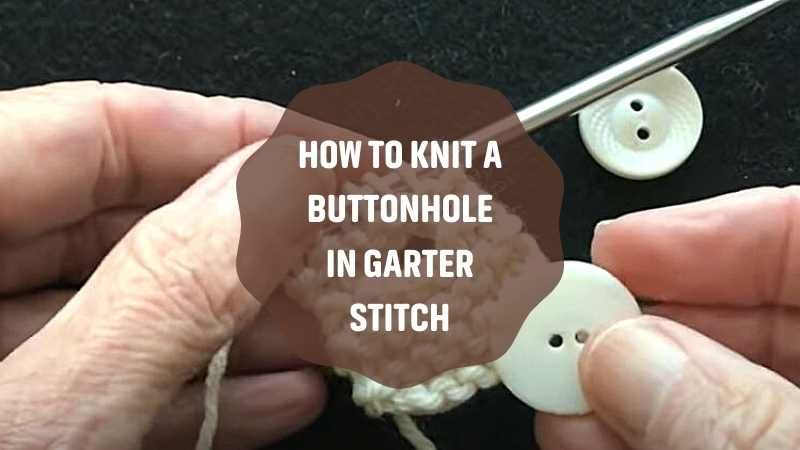
How to Knit a Buttonhole in Garter Stitch?
How to Knit a Buttonhole in Garter Stitch: A Complete Step-by-Step Guide
To knit a buttonhole in garter stitch, work the yarn to the front, slip one stitch purlwise, wrap the yarn around the needle to create a yarn-over, slip three more stitches, cast them off together, then cast on four new stitches using the cable method to reopen the loop—this creates a horizontal bar opening that forms the buttonhole across the horizontal ridges of the fabric.
Garter stitch creates a reversible fabric with horizontal ridges formed by knit stitches on every row, making buttonholes deceptively challenging—the stitches sit closely together and the fabric has no defined vertical columns to guide the opening. A standard buttonhole in this texture typically spans 10–15 mm in width depending on the button diameter, with a vertical opening of 3–5 mm per yarn-over pair.
The horizontal stretch of garter stitch (typically 80–100% of its vertical gauge) means the buttonhole opening may grow slightly when the garment is worn, so reinforcement and careful planning of stitch placement are essential for garment longevity.
Buttonhole Size Quick Reference
| Button Diameter | Stitches to Cast Off | Stitches to Cast On | Opening Width (approx.) |
|---|---|---|---|
| 10–12 mm (small) | 3 stitches | 3 stitches | 8–10 mm |
| 15–20 mm (standard) | 3 stitches | 4 stitches | 10–15 mm |
| 25–30 mm (large) | 3 stitches | 6 stitches | 15–20 mm |
Garter Stitch Gauge Reference for Buttonhole Planning
| Yarn Weight | Needle Size | Stitches per 10 cm | Buttonhole Behaviour |
|---|---|---|---|
| Lace / 2-ply | 2.0–3.0 mm | 28–32 stitches | Very small, delicate openings—use reinforcement |
| Fingering / 4-ply | 3.0–4.0 mm | 24–28 stitches | Standard buttonholes hold shape well |
| Worsted / Aran | 4.0–5.0 mm | 18–22 stitches | Most common gauge—buttonholes stretch 5–10% |
| Bulky / Chunky | 5.5–8.0 mm | 12–16 stitches | Larger openings—reinforcement strongly recommended |
Steps to Knit a Buttonhole in Garter Stitch
Rather than relying on a domestic buttonhole sewing machine, the manual knitted buttonhole technique produces a cleaner result in garter stitch fabric. Machine-made buttonholes often create a sharp edge that contrasts with the soft, ridged texture of garter stitch. The hand-knit approach described below maintains fabric continuity and allows the buttonhole to stretch naturally with the garment.
Step 1: Select the Correct Position on the Right Side
Identify the exact location where the buttonhole will sit on the right side (RS) of the work. Count your stitches carefully to centre the buttonhole on your planned position. Work your yarn to the front of the fabric, then slip the first stitch purlwise onto the right needle without knitting it. This creates the foundation stitch for your buttonhole’s first side.
The key detail that novice knitters overlook is alignment: in garter stitch, the ridges run horizontally, so a vertical buttonhole must cut across these ridges at a consistent point. Choose a ridge line that sits between two clearly defined horizontal ridges for the cleanest result. Mark this position with a stitch marker before beginning the buttonhole sequence.
Step 2: Move the Yarn to the Back and Wrap the First Stitch
After slipping the stitch purlwise, move the yarn to the back of the work. Wrap the slipped stitch by passing the yarn around the right needle in a counterclockwise direction, leaving the yarn hanging at the back. Do not pull the yarn taut—maintain approximately 5–8 cm of slack to allow the yarn-over to form properly without distorting neighbouring stitches.
Unlike rib-stitch buttonholes, where yarn position changes more frequently, the garter stitch buttonhole requires the yarn to remain at the back through the middle of the sequence. This preserves the horizontal ridge alignment on both sides of the buttonhole opening.
Step 3: Slip the First Stitch Purlwise and Repeat for Three Stitches
Slip the first stitch purlwise from the left needle to the right needle. Move the yarn to the back again, then repeat the slip-purlwise process two more times until you have three stitches transferred to the right needle. All three of these stitches will be cast off together in the next step, which creates the horizontal bar that forms the bottom of your buttonhole opening.
Patience is critical at this stage. Rushing the repetition causes uneven tension, resulting in a buttonhole edge that pulls or gaps asymmetrically. Each yarn-over should sit directly above the previous one, maintaining consistent vertical alignment through the garter ridges.
Step 4: Cast Off the Three Stitches Completely
Take the final cast-off stitch on the right-hand needle and transfer it back to the left needle. This movement positions the last cast-off stitch so it can be joined with the live stitches remaining on the left needle during the re-casting-on process in the next step.
The three-stitch cast-off creates a horizontal bar with a defined opening above it. In standard garment construction, this bar becomes the lower edge of the buttonhole, and its structural integrity depends on casting off without pulling the stitches too tightly.
Step 5: Cast On Four Stitches Using the Cable Method
Transfer the working yarn to the back of the work with the wrong side (WS) facing you. The cable cast-on method (also known as the UAG method—Under, Around, Gather) is preferred for buttonholes because it produces a flexible, slightly elastic edge that accommodates the button’s thickness without stretching permanently.
Cast on exactly four stitches, working between the first and second stitches on the left needle. This count is standard for most buttonhole sizes: the four stitches provide a 10–15 mm horizontal opening that comfortably fits buttons in the 15–20 mm diameter range. For larger buttons (25–30 mm), cast on six stitches; for very small buttons (under 10 mm), cast on three stitches.
Step 6: Move the Yarn to the Front, Turn, and Finish
Move the yarn to the front of the work. Turn the knitting so the right side faces you again. Slip the first stitch knitwise from the left needle to the right needle, then pass the extra cast-on stitch over the first stitch (the same motion used in standard bind-off). Continue working in the established garter stitch pattern for the remainder of the row.
When you have completed the buttonhole and finished the surrounding fabric, cut the yarn leaving an 8–10 cm tail. Thread the tail through a darning needle and weave it through the last stitches to secure them. This prevents the buttonhole edge from unraveling during washing or wear.
Why Garter Stitch Buttonholes Require Extra Reinforcement
Garter stitch fabric has a natural horizontal stretch of approximately 5–10% beyond its relaxed state. When a button is fastened and unfastened repeatedly, this stretch compounds, gradually enlarging the buttonhole beyond its original dimensions. For a buttonhole receiving daily use (such as on a cardigan worn regularly), reinforcement is not optional—it is essential for garment longevity.
Experienced knitters reinforce garter stitch buttonholes by working a second row of yarn-overs at the base of the opening or by using a smaller needle size for the three-stitch cast-off section. Another proven technique is to work a single row of blanket stitch along the horizontal bar after the buttonhole is complete, which anchors the edge without visible stitching on the public side of the fabric.
Troubleshooting Common Garter Stitch Buttonhole Problems
| Problem | Cause | Solution |
|---|---|---|
| Buttonhole edge curls | Cast-off stitches pulled too tightly | Use a needle one size larger for the cast-off; re-block with damp cloth and warm iron |
| Opening too small for button | Insufficient yarn-over count | Undo last two rows; re-work Step 5 casting on an additional two stitches |
| Garter ridges misaligned across buttonhole | Yarn not moved to correct position during sequence | Re-work the entire buttonhole from the beginning for consistent results |
| Buttonhole stretches out of shape | No reinforcement on high-use buttonhole | Work a second row of yarn-overs at base; or work blanket stitch along the horizontal bar |
Final Words
Knitting a buttonhole in garter stitch is a foundational technique that rewards precision over speed. By following each step carefully and selecting the correct stitch count for your button size, you will produce a buttonhole that is structurally sound, visually clean, and durably anchored in the garment. Review each step before beginning, and always work a practice buttonhole on a scrap of the same yarn and needle combination before committing to the final garment.
REFERENCES
- North, T. (2013). Engineering Apparel Fabrics and Garments. Woodhead Publishing.
- Cie, I. & Kurbele, A. (2018). Advances in Apparel Production. Woodhead Publishing.
- Vogue Knitting (Ed.). (2015). Vogue Knitting: The Ultimate Knit Pattern Library. Sixth&Spring Books.
- St下来的, M. (2019). The Knitting Magazine: Technical Guides and Pattern Corrections. Wethersfield Publishing.


