

How to Sew a Buttonhole on an Old Machine?

You can sew a professional-quality buttonhole on an old sewing machine using a simple zigzag stitch and a four-sided rectangular construction sequence. This technique—manually controlling the zigzag mechanism to build the classic buttonhole shape—works on most vintage machines from the 1940s through the 1970s and produces durable, balanced results identical to commercial garment manufacturing.
Old machines lack built-in buttonhole stitching options or automated stitch patterns. This forces operators to manually control the zigzag mechanism, following a deliberate four-side sequence to build the classic rectangular buttonhole. The technique requires patience but produces professional-quality results on light to medium-weight fabrics.

Quick-Reference: Zigzag Stitch Settings
| Stitch Phase | Width (mm) | Length (mm) | Purpose |
|---|---|---|---|
| Side stitching (left/right) | 2.0 | 0.5 | Standard zigzag for buttonhole sides |
| Bar tacks (top/bottom) | 5.0 | 0 | Dense reinforcement stitches |
| Securing/backstitch area | 2.0 | 0.5 | Reinforcement at starting point |
Key formula: Buttonhole length = button diameter (mm) + button height (mm). For a standard 16-ligne shirt button (10.16mm diameter), the buttonhole measures approximately 12–14mm.
Alternatives to Machine Buttonholes: Why Knitting Is More Complex
Some sewists wonder whether knitted buttonholes are a viable alternative when working without a modern machine. This involves returning to the hand sewn buttonholes vs machine sewn holes debate.
Knitted buttonholes require mastering types of knitted button bands, then progressing to how to knit a buttonhole band. The learning curve is steep, and results depend heavily on yarn tension and stitch uniformity.
Further complexity arises when you need to knit a buttonhole in garter stitch or knit a buttonhole in moss stitch. Unless you have a specific interest in knitted garment construction, machine-sewn buttonholes on old equipment remain the more efficient path.
Assessing Your Old Sewing Machine’s Capabilities
Before beginning, confirm your machine’s basic functions operate correctly. Check the zigzag mechanism by manually turning the handwheel through one complete cycle—the needle should trace a smooth side-to-side arc. Test fabric feed by running a scrap piece through with the feed dogs raised and lowered.
Most vintage machines from the 1940s through the 1970s feature a zigzag stitch as a standard capability. According to ISO 4915:1991, over three dozen distinct stitch formations exist across several thread-count configurations, but the simple two-thread zigzag forms the backbone of manual buttonhole construction.
Using a vintage machine with a zigzag stitch remains faster than learning how to use buttonhole scissors, which require precise cutting along a marked guide—and one slip ruins the fabric.
Step-by-Step: Sewing a Buttonhole on an Old Machine
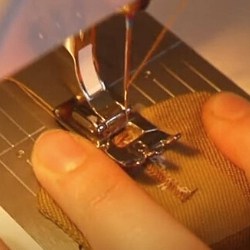
Unlike knitting a vertical buttonhole, which demands multiple cable needle transitions and careful row counting, machine-sewn buttonholes on old equipment follow a straightforward four-sided rectangle. The steps below produce a secure, professional result.
- Mark the buttonhole position. Measure the button diameter in millimetres, then add the button’s height—this sum equals the required buttonhole length. Use a water-soluble fabric marker or tailor’s chalk to draw a rectangle matching these exact measurements. For a standard 16-ligne shirt button (10.16mm diameter), the buttonhole measures approximately 12–14mm in length. Place the marks on the fabric’s right side, aligning with your planned button placement.
If you have a specialized buttonhole foot, it provides built-in fabric guides—you only need to mark the start and end points. Without the foot, mark the complete rectangle as your cutting and stitching reference.
- Align the presser foot. Raise the needle to its highest position using the handwheel. Position the fabric under the presser foot so the needle will descend at the starting mark—typically the top-left corner of your rectangle. Lower the presser foot but do not yet lower the needle into the fabric.
- Sew the left side (first bar tack). Set your zigzag width to 2.0mm and stitch length to 0.5mm—the standard starting point for buttonhole stitching per established sewing references. Sew downward along the left edge of your marked rectangle, ending at the bottom-left corner. If your machine has a buttonhole foot, the built-in guide rail keeps the stitch path straight. Without it, manually steer the fabric to maintain alignment with your chalk marks. Keep the feed dogs raised during this step.
- Prepare the bottom end. At the bottom-left corner, raise the needle to its highest position. Set your machine’s zigzag width to 5.0mm and length to 0 for a dense bar tack stitch. Reposition the needle to center. If your machine has droppable feed dogs, lower them now to prevent fabric shifting during the dense stitching phase.
- Sew the bottom bar tack. Sew several dense zigzag stitches (width 5.0mm, length 0) across the bottom of the rectangle. This reinforced bar tack prevents the buttonhole from tearing under stress—a critical structural element for durability.
- Sew the right side. Reset the zigzag to width 2.0mm and length 0.5mm. Sew upward along the right edge of the rectangle, ending at the top-right corner. Maintain consistent fabric tension and keep the stitch path aligned with your marks.
- Sew the top bar tack. Repeat the dense zigzag (width 5.0mm, length 0) across the top of the rectangle, mirroring the bottom bar tack for structural symmetry.
- Secure and finish. Reset to normal zigzag settings and sew a short section of narrow zigzag (width 2.0mm, length 0.5mm) backward over the top-left starting area. This backstitch reinforcement locks the stitching in place. Raise the needle and presser foot, then remove the fabric.
The completed buttonhole consists of four sides of balanced zigzag stitching with dense bar tacks at both horizontal ends—exactly the construction method used in commercial garment manufacturing.
This method requires far less time than knitting a buttonhole in rib stitch, which demands multiple needle manipulations and careful tension management across dozens of rows.
Old Machine vs Modern Machine: Which Should You Use?
| Factor | Old Sewing Machine | Modern Machine with Buttonhole Foot |
|---|---|---|
| Buttonhole quality | Professional, durable results | Consistent, automated results |
| Skill required | Manual fabric guidance and marking | Minimal—machine guides the path |
| Time per buttonhole | 2–3 minutes with practice | Under 1 minute automated |
| Best fabrics | Light to medium weight (cottons, shirtings) | All fabric weights including heavy denim |
| Maximum zigzag width | 4–5mm (may limit large button accommodation) | Wider range, typically 5–7mm+ |
| Equipment cost | Vintage machines often $50–$200 secondhand | $200–$1,000+ for computerized models |
| Learning curve | Steeper—requires practice to master guidance | Minimal setup and calibration |
Limitations of Manual Buttonhole Construction
Zigzag Width Constraints
The width of the buttonhole opening equals the zigzag stitch width. Most vintage machines produce a zigzag width of 4–5mm at maximum setting. This is suitable for light to medium-weight cottons, shirtings, and blouse fabrics.
For heavyweight fabrics like denim or canvas, the 4–5mm maximum width produces a proportionally narrower buttonhole that may not accommodate large buttons. In these cases, professional buttonhole techniques using industrial equipment with wider zigzag capacity are preferable.
Buttonhole Feet: With and Without
Many old machines include a buttonhole foot as an accessory—a metal guide that clamps over the fabric and constrains the stitching path to a fixed rectangle. If your machine has one, attach it before beginning and rely on its built-in guides rather than chalk marks.
Without a buttonhole foot, you guide the fabric manually throughout the entire four-side sequence. The process demands more concentration, but it produces identical results—and builds valuable hand-eye coordination with your machine. Either approach eliminates the need to tidy up knitted buttonholes, which requires duplicate labor after the knitting is complete.
Conclusion
Old sewing machines without automated buttonhole features can produce professional-quality buttonholes using a simple zigzag stitch. The four-side construction sequence—left bar tack, bottom reinforcement, right bar tack, top reinforcement—mirrors industrial buttonhole manufacturing and creates a durable, balanced result.
For occasional buttonholes on light to medium fabrics, no additional equipment is necessary beyond basic presser feet and marking tools. The technique requires patience and precision, but it eliminates the cost of modern computerized machines for sewists who value their vintage equipment.
References
- REFERENCES:
- International Organization for Standardization. (1991). ISO 4915:1991 — Textiles: Stitch Types — Classification and Terminology. ISO.
- MasterClass. (2024). How to Sew a Buttonhole: The Complete Guide. MasterClass.
- The Spruce Crafts. (2024). How to Sew a Buttonhole. The Spruce.
- Wikipedia. (2024). Sewing Machine — Wikipedia. Wikimedia Foundation.
- Wikipedia. (2024). Button (Clothing) — Wikipedia. Wikimedia Foundation.


