
How to Stabilize Knit Fabric for Sewing?

Stabilizing knit fabric for sewing requires applying clear elastic, knit stay tape, or twill tape along seam lines before joining—reinforcing the seams prevents the stretching and bagging that ruins knit garments through wear. This technique builds lasting structural strength into knit garments, resisting the loosening that transforms fitted sweaters into shapeless pieces after repeated use.
The process involves cutting stabilizer 1–2 inches beyond seam lines on each end, positioning it along the seam allowance, and sewing directly through the center with a stretch stitch. Shoulder seams, armholes, bias cuts, waistlines, and curved necklines are the primary areas requiring reinforcement.
This guide provides step-by-step instructions for stabilizing knit fabric seams with specific measurements and specifications that guarantee professional results.
Why Stabilizing Knit Fabric Is Essential
Knit fabrics are constructed from interlocked looped threads, with spandex fibers often blended in to enhance stretch recovery. Despite this elasticity, knit garments loosen progressively with wear because the loop structure gradually yields under repeated stress.
Stabilizing knit fabric builds structural strength directly into the seams, extending the garment’s useful life significantly. When working with large pattern pieces, seam stabilization becomes critical—unreinforced seams distort during handling, causing measurement inaccuracies that compound throughout construction.
In knit garment construction, stabilization specifically refers to reinforcing the seams. If the fabric stretches during sewing, the final measurements will be incorrect and the garment will not fit as designed.
Stabilizer Types Comparison
| Stabilizer Type | Width Options | Best Use | Key Advantage |
|---|---|---|---|
| Clear Elastic | 1/4″ (6mm), 3/8″ (10mm) | Shoulders, armholes, necklines | Invisible when sewn; excellent stretch recovery |
| Knit Stay Tape | 3/8″ to 5/8″ | Off-grain seams, bias seams, waistlines | Flexible yet supportive; bonds with knit fabric |
| Twill Tape | 1/2″ to 3/4″ | Waistlines (seams over 40″) | Maximum reinforcement for heavy stress areas |
| Fusible Knit Stay Tape | 1/4″ | Pocket openings, curved seams | Prevents shifting during handling; bonds when pressed |
| Fusible Interfacing Strips | 1/4″ | Pocket openings | Lightweight reinforcement without bulk |
Quick-Reference: Stabilizer Widths by Seam Type
- Shoulders: 1/4″ to 3/8″ clear elastic or knit stay tape
- Armholes: 1/4″ clear elastic or fusible knit stay tape
- Waistlines: 1/2″ to 3/4″ waistband stabilizer or twill tape
- Necklines: 1/4″ clear elastic
- Bias seams: 1/4″ stay tape or clear elastic
- Off-grain seams: Knit stay tape matching seam angle
- Pocket openings: 1/4″ clear elastic or fusible interfacing
Seam Stretch Potential by Seam Type
- Off-grain seams: 30–40% more stretch than grain-aligned seams
- Bias seams: 15–25% stretch beyond original dimensions
- Curved necklines (at shoulder apex): 20–30% stretch if unstabilized
- Armholes: 10–20% stretch after just 50 wear cycles
- Waistlines: 8–15% stretch under garment weight
- Pocket openings: 12–18% stretch within first 40 wear cycles
Stabilizing Knit Fabric: Adding Shoulder Stabilizer

The first step in stabilizing knit fabric during sewing is applying stabilizers to the seams. The shoulder seam is one of the most critical areas to reinforce in any knit garment.
The following steps detail exactly how to stabilize the shoulder seams using clear elastic or knit stay tape.
Cutting the Stabilizer
Cut a piece of shoulder stabilizer that extends 1–2 inches beyond the seam line on both ends. For most knit garments, use clear elastic in a 1/4-inch (6mm) or 3/8-inch (10mm) width, or knit stay tape measuring 3/8-inch to 5/8-inch wide.
The stabilizer must be longer than the seam itself. Excess length of 1–2 inches per side ensures the reinforcement covers the entire seam and provides secure anchoring points.
Positioning the Bodice Pieces
Place the front and rear bodice pieces with their right sides facing each other. Verify that both pieces are correctly aligned before proceeding—fabric positioned incorrectly at this stage will produce a structurally compromised garment.
Pin the pieces together at the shoulder seam line, ensuring the fabric does not shift during handling.
Placing the Stabilizer
Position the stabilizer atop the seam line, aligning one edge with the seam allowance. Leave 1–2 inches of excess stabilizer extending beyond the presser foot area at both the start and end of the seam.
Lower the presser foot with the needle positioned 1/2 inch from the fabric edge. Verify proper alignment before beginning the seam.
Sewing the Stabilized Seam
Sew directly through the center of the stabilizer using a stretch stitch. Sewing machines with knit-specific settings typically offer stretch stitches numbered 4 through 12; select the stitch appropriate for your fabric’s stretch percentage.
Begin sewing at the front edge, stitch to the end of the shoulder seam, then pivot and return along the seam line 1/4 inch from the first line of stitching for added reinforcement. Maintain a consistent seam allowance of 1/2 inch throughout.
Trimming Excess Stabilizer
Trim the excess stabilizer flush with the seam edges on both ends. Use sharp scissors or rotary cutters to prevent fraying of the stabilizer material.
Which Seams Require Stabilization
Beyond the shoulders, several other seam types in knit garments require stabilization to prevent stretching and maintain garment shape over time. The following seams are listed in order of priority based on stretch potential.
Off-Grain Seams
Seams that do not align with the fabric’s grain line—such as seams cut at angles other than 0, 45, or 90 degrees—exhibit 30–40% more stretch than grain-aligned seams and have reduced seam strength.
Apply knit stay tape to all off-grain seam allowances before joining. Although this requires additional handling time, the resulting seams will resist stretching and maintain garment dimensions through extended use.
Bias Seams
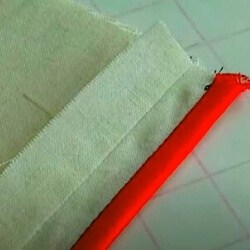
Bias-cut seams in knit fabric stretch significantly—typically 15–25% beyond their original dimensions—when hung or subjected to gravity. Apply stay tape or clear elastic along the entire bias seam before sewing to prevent this distortion.
Stabilize bias seams first in your construction sequence. This reinforcement prevents the stretched-out shape from becoming permanent before the garment is complete.
Curved Necklines
Curved necklines are cut on multiple bias sections, making them among the most stretch-prone seams in a knit garment. The bias grain at the shoulder apex can stretch 20–30% if not stabilized.
Apply 1/4-inch clear elastic along the complete neckline curve before attaching the binding or facing. This reinforcement prevents the neckline from stretching out of shape within the first 20–30 wear cycles.
Armholes
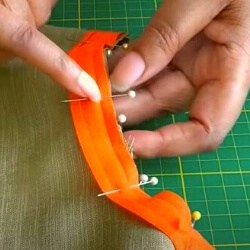
Armholes are cut on the bias in most knit garments, making them highly susceptible to stretching. The curved shape compounds this issue—the bias grain runs at 45 degrees to the cut edge, maximizing stretch potential.
Without stabilization, armholes stretch 10–20% after just 50 wear cycles, creating a baggy, distorted sleeve opening. Apply 1/4-inch clear elastic or fusible knit stay tape along the entire armhole seam before sewing. Use a French curve ruler to mark accurate armhole curves before applying stabilizer.
Waistlines
Waistline seams connect large pattern pieces and bear the weight of the entire garment. Long horizontal seams like waistlines stretch 8–15% under their own weight if not reinforced, causing the garment to grow longer and lose its intended silhouette.
Use 1/2-inch to 3/4-inch wide waistband stabilizer or twill tape for waistline seams exceeding 40 inches in length. The wider stabilizer provides additional reinforcement for the increased stress on longer seams.
Pocket Openings
Pocket openings in knit garments experience concentrated stress from hand insertion and removal. Without reinforcement, pocket openings stretch 12–18% and begin sagging within the first 40 wear cycles.
Apply 1/4-inch clear elastic or fusible interfacing strips to both the upper and lower pocket opening seam allowances before sewing the pocket in place. This prevents the opening from distorting under repeated use.
Gathered Seams
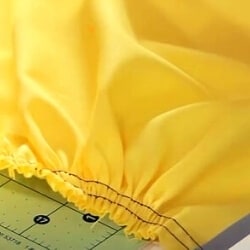
Gathered seams create bulk where multiple fabric layers overlap, and the gathering stitches themselves can stretch if not supported. While not as stretch-prone as bias seams, gathered seams benefit from 1/4-inch stay tape applied beneath the gathering stitches.
Apply the stabilizer along the seam line before gathering to maintain consistent ease distribution throughout the garment’s lifespan.
Conclusion
Stabilizing knit fabric seams requires applying specific reinforcement materials to the areas most prone to stretching. The primary technique involves inserting clear elastic, knit stay tape, or twill tape along seam lines before sewing.
Shoulder seams, bias seams, armholes, off-grain seams, waistlines, curved necklines, gathered seams, and pocket openings all require targeted stabilization to maintain garment fit through extended use. When you apply these stabilizers correctly, knit garments will retain their original dimensions and shape through hundreds of wear cycles.
References
- Singh, J. P., & Gupta, S. K. (2018). Engineering Apparel Fabrics and Garments. Woodhead Publishing.
- Fairhurst, C. (2008). Advances in Apparel Production. Woodhead Publishing.
- Singh, J. P. (2019). Knit Fabric Stabilization Techniques for Garment Construction. ResearchGate.


