Different Type of Knitting Stitches – A Beginners Journey into Knitting
This guide covers 14 essential knitting stitches—the most widely used techniques in modern knitting, from basic ribbing to complex cable patterns. Every knitting pattern emerges from just two foundation stitches (knit and purl), but combining them in different ways produces the rich variety of textures and fabrics that knitters use today.
Knitting is one of the oldest methods of textile construction. It interlinks or knots a series of loops of yarn using needles. New loops intermesh into previous loop structures. The knitting process works by hand or using a machine, and it creates fabrics with significant stretchability—knitted garments can stretch up to 500% in some configurations.
Quick-Reference: Choosing the Right Stitch
Use this guide to select the best stitch for your project based on difficulty level and ideal applications.
| Stitch Name | Difficulty | Best For | Key Characteristic |
|---|---|---|---|
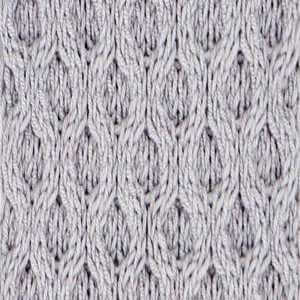
| 1. Sidecurl Pattern | Intermediate | Blankets, scarves, sweaters | Curvy cabled design |
| 2. Wicker Stitch | Intermediate | Blankets, scarves | Dense, rigid fabric |
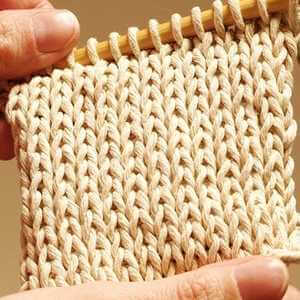
| 3. Rib Stitch (1×1) | Beginner | Collars, cuffs, bands | Highly stretchy, reversible |
| 4. Russian Stitch | Beginner | Colorwork projects | Zigzag mosaic columns |
| 5. Cable Stitch | Advanced | Sweaters, accessories | Crossed stitch patterns |
| 6. Seed Stitch | Beginner | Scarves, cowls, décor | Bumpy, seed-like texture |
| 7. Double Herringbone | Intermediate | Shawls, light sweaters | Geometric eyelet mesh |
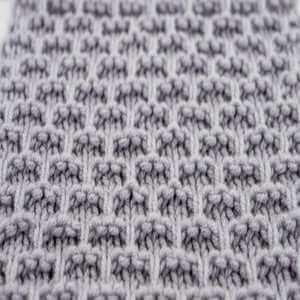
| 8. Deep Waffle | Intermediate | Hats, blankets, scarves | Waffle-like dimpled surface |
| 9. Little Bird | Advanced | Market bags, pillows, hats | Bird motif cable pattern |
| 10. Woven Stitch | Beginner | Hats, bags, washcloths | Basketweave pattern |
| 11. Honeycomb Cable | Intermediate | Pillows, blankets, home décor | Hexagonal honeycomb cells |
| 12. Stockinette | Beginner | General knitting, garments | Smooth “V” on front |
| 13. Brick Stitch | Intermediate | Pillows, blankets, home décor | Running bond brick layout |
| 14. Garter Slip | Beginner | Cowls, hats, baby booties | Textured garter variation |
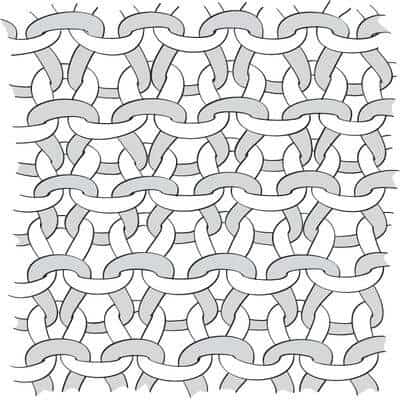
Fundamental Knitting Stitch
All knitting emerges from just two basic stitches: the knit stitch and the purl stitch. These two techniques create every other knitting pattern. To become a skilled knitter, you must differentiate between them instantly.
Let us examine a single stitch closely.
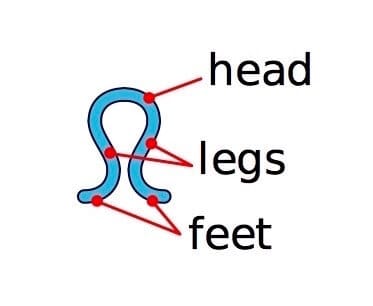 | A single stitch has three distinctive parts. The bottom portion is the feet, the middle portion are the legs, and the top portion is the head. |
A knit stitch forms when two stitches interlock—the feet of the new stitch interlock with the head of the previous stitch. Therefore:
Your knitting needle always holds the top portion or row of active stitches.
Identifying Knit Stitches
- A visible “V” shape appears on the front, formed by the legs of the stitch
- Both the bottom (feet) and top (head) portions sit behind the front-facing “V”

Identifying Purl Stitches
- Purl is the exact opposite of a knit stitch
- Both the bottom (feet) and top (head) portions sit at the front of the fabric

Purl stitches appear on the backside when you create a knit stitch, and vice versa. The following illustrations clarify this relationship.


Different Type of Knitting Stitch
This guide covers 14 essential knitting stitches. These patterns represent the most widely used techniques in modern knitting, from basic ribbing to complex cable patterns.
 | 1. Sidecurl Pattern Stitch This pattern creates a curvy cabled design. The sidecurl pattern produces a fabric ideal for blankets, scarves, and sweaters. Learn to Knit Sidecurl Stitch |
 | 2. Wicker Stitch Also called the crisscross stitch, this is a hybrid between the cross stitch and a 2-stitch cable. The wicker pattern produces a dense, rigid fabric suited for blankets or scarves. Learn to Knit Wicker Stitch |
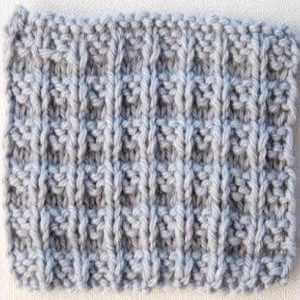
 | 3. Rib Stitch The 1×1 rib is a classic, highly stretchy pattern primarily used for garment collars, sweater bands, and cuffs. One purl and one knit stitch create this reversible pattern. Learn to Knit Rib Stitch |
 | 4. Russian Stitch This stitch generates zigzag columns as a mosaic colorwork pattern. The graphical design is straightforward to execute. Learn to Knit Russian Stitch |
 | 5. Cable Stitch Cables use the same knit and purl stitches but require a cable needle to cross stitches. While intimidating initially, breaking down the steps makes each stage manageable. Learn to Knit Cable Stitch |
 | 6. Seed Stitch The seed stitch is simple yet highly popular for its texture and versatility. From knitted décor to scarves, cowls, and sweaters, this stitch is one of the most universal patterns. The stitch creates a bumpy surface resembling little seeds. Learn to Knit Seed Stitch |
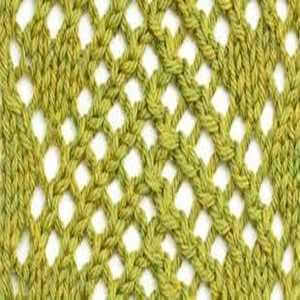 | 7. Double Herringbone Mesh Stitch This pattern creates a geometric design with zigzag lines of stitches. It serves as an accessible lace panel stitch leading to more complex lace patterns. This stitch works well for long fabrics such as light sweaters, blankets, and shawls. Learn to Knit Double Herringbone Mesh Stitch |
 | 8. Deep Waffle Stitch This pattern creates a lattice with a heavy textured surface resembling a waffle with dimples. Combined with mock cables, this pattern is well-suited for hats, blankets, and bulky scarves. Learn to Knit Deep Waffle Stitch |
 | 9. Little Bird Stitch This cable pattern stitch resembles little birds perching across the fabric surface. It is used for market bags, pillows, and hats. Learn to Knit Little Bird Stitch |
 | 10. Woven Stitch This stitch pattern is excellent for hats, bags, blankets, or washcloths. It uses knit and purl stitches to create basketweave-style patterns. Learn to Knit Woven Stitch |
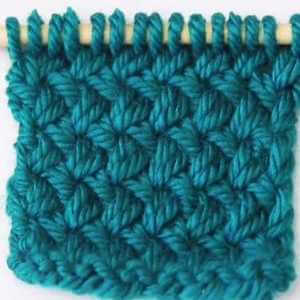
 | 11. Honeycomb Cable Stitch This cable pattern mimics the hexagonal cells of a honeycomb. The resulting dense fabric is ideal for pillows, blankets, and home décor projects. Learn to Knit Honeycomb Cable Stitch |
 | 12. Stockinette StitchStockinette (or stocking) stitch is one of the most common knitting techniques. Alternating rows of knit and purl stitches create this recognizable pattern.Learn to Knit Stockinette Stitch |
 | 13. Brick Knitting Stitch This textured pattern simulates a running bond brick layout. Using slipped stitches, the heavily textured fabric is excellent for pillows, blankets, and home décor. The stitch features a geometric appearance. Learn to Knit Brick Knitting Stitch |
 | 14. Garter Slip Stitch This stitch combines garter stitch with slipped stitches to create a textured pattern suitable for cowls, hats, and baby booties. It is a straightforward technique for beginners. Learn to Knit Garter Slip Stitch |
1. Sidecurl Pattern Stitch
Features
- Allover pattern
- Textured
Techniques Used
- Knit (k)
- Purl (p)
- Cable 4 Front (c4f)
How to Knit Sidecurl Pattern Stitch
Cast on in multiples of 6 stitches plus 2 extra stitches (e.g., 14, 20, 26 stitches).
Row 1 (Wrong Side): Purl all stitches.
Row 2: Knit all stitches.
Row 3: Purl all stitches.
Row 4: Knit all stitches.
Row 5: Knit 2 stitches, then purl 4 and knit 2 repeatedly until the end of the row.
Row 6: Purl 2 stitches, then slip the next 2 stitches onto a cable needle and hold them in front. Knit 2 stitches from the main needle, then knit 2 from the cable needle. Repeat purl 2 and the cable sequence until the row is complete.
Repeat Rows 1 through 6 until reaching the desired length.
2. Wicker Stitch
- Mock cable
- Column
- Slipped stitch
- Woven
Techniques Used
- Knit (k)
- Purl (p)
- Cable 2 Forward (c2f)
- Cable 2 Back (c2b)
- Left twist (LT)
- Right twist (RT)
How to Knit Wicker Stitch
Cast on in multiples of 13 stitches plus 4 extra stitches.
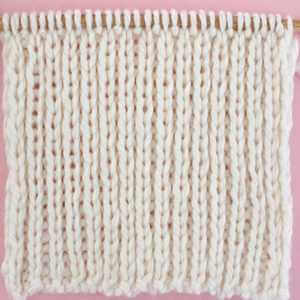
3. Rib Stitch
Features
- Fascinating wrong side
- Ribbing
- Reversible
Techniques Used
- Knit (k)
- Purl (p)
How to Knit Rib Stitch
Cast on an even number of stitches. The first stitch is a knit stitch—knit one stitch, then bring the yarn to the front between the needles to purl. Continue alternating knit and purl stitches across the row.
Purl one stitch, then knit one. Continue this alternating pattern on every row. The technique remains consistent: knit one, bring yarn forward, purl one, bring yarn back.
Quick-Reference: 1×1 Rib Pattern
- Knit 1 stitch
- Bring working yarn forward between needles
- Purl 1 stitch
- Bring working yarn backward between needles
- Repeat until the row is complete
Follow the visual cue of each stitch: if the stitch below resembles a “V,” knit it. If it resembles a horizontal bar, purl it. Always bring the working yarn backward for knit stitches and forward for purl stitches to avoid tangling.
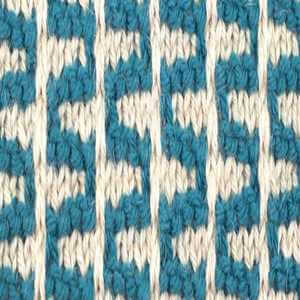
4. Russian Stitch
Features
- Columns
- Geometric
- Mosaic colorwork
- Slipped stitches
- Zigzag
Techniques Used
- Knit (k)
- Purl (p)
- Yarn in front (yif)
- Yarn in back (yib)
How to Knit Russian Stitch
Using Color A, cast on in multiples of 5 stitches plus 1 extra stitch. Continue with Color A and knit one row.
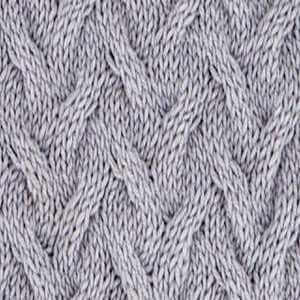
5. Cable Stitch
Features
- Versatile
- Cubic
- Engaging surface pattern
- Superior elasticity
Techniques Used
- Purl (p)
- Knit (k)
- Cable needle
How to Knit a Cable Stitch
Work the first two rows of the pattern: Purl 2, Knit 6, Purl 2 on the right side, then Knit 2, Purl 6, Knit 2 on the wrong side. Row 1 is the right side row; Row 2 is the wrong side row.
Row 3 (Cable Row): Purl the first two stitches. Slip the next two stitches onto the cable needle and hold the needle in front of the workpiece—this determines the direction of the twist. Knit the next 2 stitches from the left needle, then knit the 2 stitches from the cable needle.
Rows 4–6 follow: Row 4 is Knit 2, Purl 6, Knit 2. Row 5 is Purl 2, Knit 6, Purl 2. Row 6 is Knit 2, Purl 6, Knit 2. These rows separate the cable rows.
For the second cable row: Purl the first two stitches, knit the next 2 stitches. Slip the next two stitches onto the cable needle but hold the cable to the back of the work. Using the left needle, knit the next 2 stitches, leaving the needle inclined at the back. Then knit the 2 stitches from the cable needle. Finish by purling 2. Row 8 (Knit 2, Purl 6, Knit 2) completes the cable section.
Repeat this sequence until reaching the desired length.
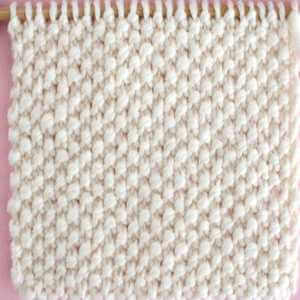
6. Seed Stitch
Features
- Reversible
- Bumpy texture
- Textured
Techniques Used
- Knit (k)
- Purl (p)
7. Double Herringbone Mesh Stitch
Techniques Used
- Knit (k)
- Purl (p)
- Yarn Over (yo)
- Slip Slip Knit (ssk)
- Slip Stitch (sl st)
- Pass Slipped Stitch Over (psso)
- Knit 2 Together (k2tog)
How to Knit Double Herringbone Stitch
This stitch pattern works over a panel of 21 stitches.
8. Deep Waffle Stitch
Features
- Allover pattern
- Mock cable
- Lattice
- Waffle texture
Techniques Used
- Knit (k)
- Purl (p)
- Knit 2 Together (k2tog)
- Yarn Over (yo)
- Slip Slip Knit (ssk)
- Right Twist (RT)
- Left Twist (LT)
9. Little Bird Stitch
Features
- Allover pattern
- Bird motif
- Minimal
- Textured
Techniques Used
- Knit (k)
- Purl (p)
- Slip Stitch (sl)
- Cable 3 Right (c3r)
- Cable 3 Left (c3l)
10. Woven Stitch
Features
- Allover pattern
- Woven texture
- Textured
Techniques Used
- Knit (k)
- Purl (p)
11. Honeycomb Cable Stitch
Features
- Allover pattern
- Hexagonal cells
- Honeycomb
Techniques Used
- Knit (k)
- Purl (p)
- Cable Four Back (C4B)
- Cable Four Forward (C4F)
12. Stockinette Stitch
Features
- Row 1: knit
- Row 2: purl
- Front side: “V” stitches
- Back side: garter bumps
Techniques Used
- Slip knot
- Long-tail cast on (CO)
- Knit (k)
- Purl (p)
- Bind off (BO)
- Weave in ends
13. Brick Knitting Stitch
Features
- Geometric
- Slipped stitches
- Textured
Techniques Used
- Knit (k)
- Purl (p)
- Slip stitch (sl st)
- Yarn Forward (yf)
- Yarn Back (yb)
14. Garter Slip Stitch
Features
- Garter stitch
- Slipped stitch
- Textured
Techniques Used
- Knit (k)
- Slip stitch (sl st)
- Yarn forward (yf)
- Yarn back (yb)
Quick-Reference: Yarn Weight and Needle Size Guide
The Craft Yarn Council defines eight standardized yarn weight categories. The following table provides gauge ranges and recommended needle sizes for each category.
| Weight Category | Yarn Names | Knit Gauge (sts per 4″) | Recommended Needle Size (mm) |
|---|---|---|---|
| 0 – Lace | Fingering, 10-count thread | 33–40 | 1.5–2.25 |
| 1 – Super Fine | Sock, Fingering, Baby | 27–32 | 2.25–3.25 |
| 2 – Fine | Sport, Baby | 23–26 | 3.25–3.75 |
| 3 – Light | DK, Light Worsted | 21–24 | 3.75–4.5 |
| 4 – Medium | Worsted, Afghan, Aran | 16–20 | 4.5–5.5 |
| 5 – Bulky | Chunky, Craft, Rug | 12–15 | 5.5–8 |
| 6 – Super Bulky | Super Bulky, Roving | 7–11 | 8–12.75 |
| 7 – Jumbo | Jumbo, Roving | 6 or fewer | 12.75+ |
Source: Craft Yarn Council Yarn Standards (2018). Yarn Weight System.
Common Knitting Questions
What are rows and stitches in knitting?
Each knit stitch forms a “V” shape on the front of the fabric. One “V” represents one stitch. A row consists of all stitches worked in a single pass across the needle. Counting V-shaped rows from bottom to top determines the total number of rows in your project.
Easiest knitting stitches for beginners
- Garter stitch (all knit)
- 1×1 Rib stitch (alternating knit and purl)
- Moss stitch (seed stitch variation)
- Purl ridge stitch
Easiest projects for new knitters
- Simple knit baby hat
- Cozy ribbed scarf
- Garter stitch knit bag
- Knit hedgehog toys
- Easy chunky knit baby blanket
Purl versus knit: understanding the difference
Knit stitches and purl stitches are mirror opposites. Knitting one row and purling the next creates stockinette stitch—the recognizable smooth “V” surface. The front of a knit stitch and the back of a purl stitch appear identical, which is why reading your knitting row-by-row is essential for maintaining pattern consistency.
Can Different Knitting Stitches Help Avoid Holes When Changing Colors?
Different knitting stitches prevent holes when changing colors. The slip stitch technique is particularly effective for seamless color transitions. By incorporating this method, you achieve clean, professional-looking color changes without gaps.
Final Words
The choice of stitch pattern significantly affects the final fabric’s properties. While appearance is the most obvious impact, the GSM (grams per square meter) of the resulting fabric determines its weight, drape, and seasonal suitability. Different knitting structures produce varying GSM values, which define a fabric’s appropriateness for specific seasons and end uses.
After reading this guide, you now have knowledge of 14 essential knitting stitch types and their techniques. Use this reference to select the appropriate stitch pattern for your next project.
Happy Knitting!
References
- Craft Yarn Council. (2018). Yarn Weight System. Craft Yarn Council.
- Craft Yarn Council. (2018). Hooks & Needles Size Chart. Craft Yarn Council.
- Wikipedia. (2024). Knitting. Wikimedia Foundation.
- 50 Knit Stitch Patterns for Beginning Knitters. Plain text citation.


