How to Hem Stretch Fabric?
Before you started working on your knit sweater, you must have asked yourself a few questions. And we bet one of those questions was – how to hem stretch fabric?
Now, knits are one of the stretchiest fabrics out there – but it surely has its relative that should be considered as well, such as woven fabrics.
So if you are working on any one of them, knowing how to hem them is absolutely essential. And if you are not looking to do a lengthy course on the process, then you are knocking on the right door.
We have provided details regarding all the techniques that you can apply using your sewing machine or your serger. Therefore, you will be able to accomplish the task without any hassle!
So what are you waiting for? Get to know the drill already!
How to Hem Stretch Fabric

Hemming stretch fabric is no rocket science, and hence, it definitely won’t take you more than a few minutes to get the gist of it.
Not to mention, we have provided all the necessary steps that you will have to take to hem stretch fabric successfully, and once you follow them, the task will seem like a breeze to you.
So, sit tight, and go through all the details!
Pick the Correct Needle and Thread
One of the most crucial steps of hemming a stretch fabric is picking the correct needle and sewing thread.
If you end up choosing the wrong one, then that can potentially ruin the garment, and you wouldn’t want that. Hence, take your time, and think about the kind of needle and thread that would be ideal for it.
In our opinion, using a fine needle and a polyester thread should do the trick – however, if you have different plans, then that’s alright as well!
Check the Pattern
After you have chosen the right needle and thread, you need to check the pattern and determine the seam allowances.
Now, seams are usually 1-3 inches longer than the hem itself, which leaves for plenty of allowances.
But do keep in mind that this length should be based on the stretch factor of the material itself. If your material does not stretch much, then there’s no point in keeping too much allowance and vice versa.
Pick the Correct Technique/Stitch for Hemming Stretch Fabric
Once you have made it through the first two steps, you need to pick the right technique for hemming.
Below, you will find five different methods of hemming stretch fabric, and you can choose any according to your requirements and preferences.
The most preferred hem, however, is a zigzag stitch, which is also the easiest to learn and execute. The methods also include details of how you should do them, so you won’t face any hassle in that regard.
Use Hemming Tape

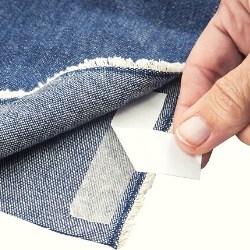
If you want a non-puckered hem on the bottom of the dress along with the sleeves, then you should use hemming tape. Not only does it stabilize the hem, but it also ensures little to no puckering of the stitches.
At first, you need to press the tape at the wrong side of the garment across the hem. Afterward, you need to peel up the paper on the back of the tape and fold the hem by half an inch while pressing it in place.
Then on the wrong side of the garment, you should stitch across the hem while making sure you are catching in the raw edge. Once you make it this far, give your hem a final press for the finish.
5 Different Techniques of Hemming Stretch Fabric
Hemming stretch fabric might sound intimidating, but with the knowledge of different methods, you will be able to pick the most convenient one for yourself and start the process easily.
That is why we will be talking about the 5 different ways in which you can hem stretch fabric in this section of the article.
The Zigzag Stitch

One of the simplest methods with the best results is the zigzag stitch, which gets its popularity from being effortless to apply. Most sewers turn up to this technique when working with stretch fabrics.
All you will have to do is stitch in a zigzag way after turning up the hem as required. Then you should stitch while making sure it’s narrow, while the color of the thread matches that of the fabric – to make it as unnoticeable as possible.
However, there are two factors that you need to keep in mind. First of all, you need to stabilize the fabric before use, and secondly, you should use a walking foot if you want the stitch to be successful.
The Double Needle

Of course, to get a professional-looking hem, you will need an equipment that is equally professional as well. But what if you were to achieve it without spending all that much money on a machine? – That is the entire purpose of this technique.
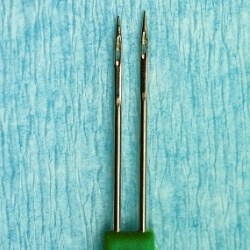
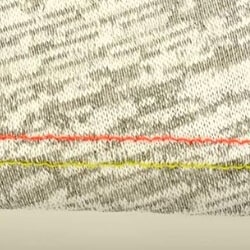
Start sewing with a double-needle from the right side of the material after turning up the hem. Make the bobbin thread zigzag, which should be between the parallel stitches.
Now, if you use a headvy-duty serger, then you need to serge along the raw edge to give it a more professional look. In both ways, you will be getting that attractive finish that you can expect from professional sewers or which you get to see in store-bought products.
Zigzag Blind Stitch
Mostly popular for being used on woven fabrics, this method is quite ideal for knit (stretchy) fabrics as well. This function, stretch stitch a blind hem, is available in many innovative sewing machines nowadays.
Press up the hem at first and then fold it towards the right side, which will leave a narrow edge. That edge will be sewn on – after which you should test on a scrap regarding the width and the position of the stitch.
Then sew on the opposite side of the exposed hem edge, after which you should press the hem down. This method will make stitches less visible, especially if you use a thread of the same color.
Separate Folded Band of Fabric
If you want to hide the sewing stitches from plain sight, then this is the right technique for you. The necessary parts are usually finished with a separate folded band of fabric, which doesn’t require stabilization.
Pick a band with the same stretch as that of your material, and then cut it while making sure it’s smaller than the opening of the garment. This aspect will make sure the band will not get baggy due to usage.
Now you need to serge the short edges of the band together and fold the wrong sides of the long edges. Then match the seams and zigzag stitch the layers to the right side – after which, you need to press the band down.
Cover-Stitch

Most store-bought knitwear nowadays contains cover-stitch hemming. And that is because this technique is one of the most ideal ones. It is quite similar to that of double needle stitch, but it will allow you to adjust the differential feed.
On the right side, there will be parallel rows of straight stitching, and the underside will be on a loop of thread – which will ensure maximum stretch. Therefore, this mechanism will be pretty easy for the beginners.
Although high-end sergers, like a serger for sewing denim, do contain a function for cover-stitching, in most cases, you will need a certain machine for it. This aspect makes it the least desirable method for many sewers.
Final Words
We hope this article was able to answer all your queries regarding how to hem stretch fabric. This comprehensive article contains all the methods that are popularly used, and you can find the most suitable one for yourself within no time once you go through it. And if you want to achieve the same result without a sewing machine, we have a guide on how to hem stretch fabric by hand as well.
REFERENCES:

