
How to Shorten Jeans: DIY Hemming with Original Hem Preserved
You can shorten jeans at home while preserving the original hem by cutting the pant leg to your desired length, then folding the original hem up and stitching it back down over the new cut edge. This technique uses the original hem as a finished edge, eliminating the need for a sewing machine in most cases — you can complete this with fabric glue or iron-on hem tape for a no-sew alternative. The result is indistinguishable from a professional factory hem, maintaining both the aesthetics and the slight elasticity that chain-stitch hems provide.
Whether your favorite pair of jeans is slightly too long, you’ve experienced fabric shrinkage that changed the fit, or you want to convert a full-length style into a cropped look, this method delivers professional results without the $10–$20 tailor fee. Best of all, you preserve the original factory finishing that makes quality denim look polished.
Why Preserve the Original Hem?
The original hem contains the factory stitching and finishing that gives jeans their clean, professional look. When you buy a pair of jeans, the hem is created during manufacturing using industrial equipment that folds, presses, and stitches the fabric edge with precision difficult to replicate at home.
Original hems are typically 1–2 inches wide and are already serged or overlocked to prevent fraying. This overlock stitching wraps around the fabric edge, binding the threads together and creating a durable finish that withstands repeated washing and wear. Removing this factory finish and replacing it with a standard hand-sewn hem often results in a visible, bulky second seam line that disrupts the clean silhouette of the jeans.
Chain-stitch hems, common on quality denim from brands like Levi’s, Wrangler, and Lee, are particularly valuable to preserve. A chain-stitch uses one needle thread and one looper thread in an interlocking pattern that creates slight elasticity — the hem can flex slightly with the fabric rather than fighting against it. This elasticity prevents the hem from becoming rigid and provides better drape, especially in heavier denim weights of 12–16 oz per square yard.
The original hem method keeps your jeans looking store-bought even after shortening. When executed correctly, the new hem sits identically to the original — same width, same stitching pattern, same clean finish. Only you will know the alteration was done at home.
Tools and Materials Needed
- Measuring tape or ruler
- Chalk or fabric marker
- Sharp fabric scissors or rotary cutter
- Seam ripper (to remove original stitching)
- Pins or clips
- Sewing needle and thread (matched color) OR fabric glue OR iron-on hem tape
- Iron (for pressing seams)
- Seam gauge (optional but helpful)
If you already own basic sewing supplies, the only additional cost is thread (typically under $2) or fabric glue ($5–$8). A seam ripper costs $3–$5 and is the one specialized tool required for this project. The total investment for this DIY alteration is under $5 in materials, compared to the $10–$20 charged by most professional tailors for hemming.
Measuring and Marking Your New Hem Length
Proper measurement is the most critical step in shortening jeans. A miscalculation here results in uneven legs or an incorrect final length. Take your time during this phase — measure twice, cut once — this principle prevents irreversible mistakes.
Put on the jeans and fold up the leg to your preferred break point. Standard options include:
- Above ankle: Creates a relaxed, casual look with 2–3 inches of visible ankle
- At ankle: The most common alteration, ending precisely at the ankle bone
- Cropped: Shortens to mid-calf or higher for a fashion-forward cropped style
Use a mirror to check the length from all angles while standing. What looks correct from the front may appear different from the side or back. If possible, have someone else mark the length for you — a second perspective eliminates the blind spots inherent in self-marking.
Mark the fold with pins on both legs at the exact same height. Then measure from the pins to the original hem bottom — this is your “cut length.” Important: account for the original hem width (typically 1–1.5 inches) when measuring. If your original hem is 1.5 inches wide and you want a 1-inch finished hem, you’ll need to cut at a point that allows the 1.5-inch original hem to fold up and meet your desired finished length.
Always measure twice and check symmetry before cutting. A helpful technique: measure from the crotch seam (the inner junction where both legs meet) down to your pin on each leg. Both measurements should match within 1/8 inch. If they differ, recheck your pin placement.
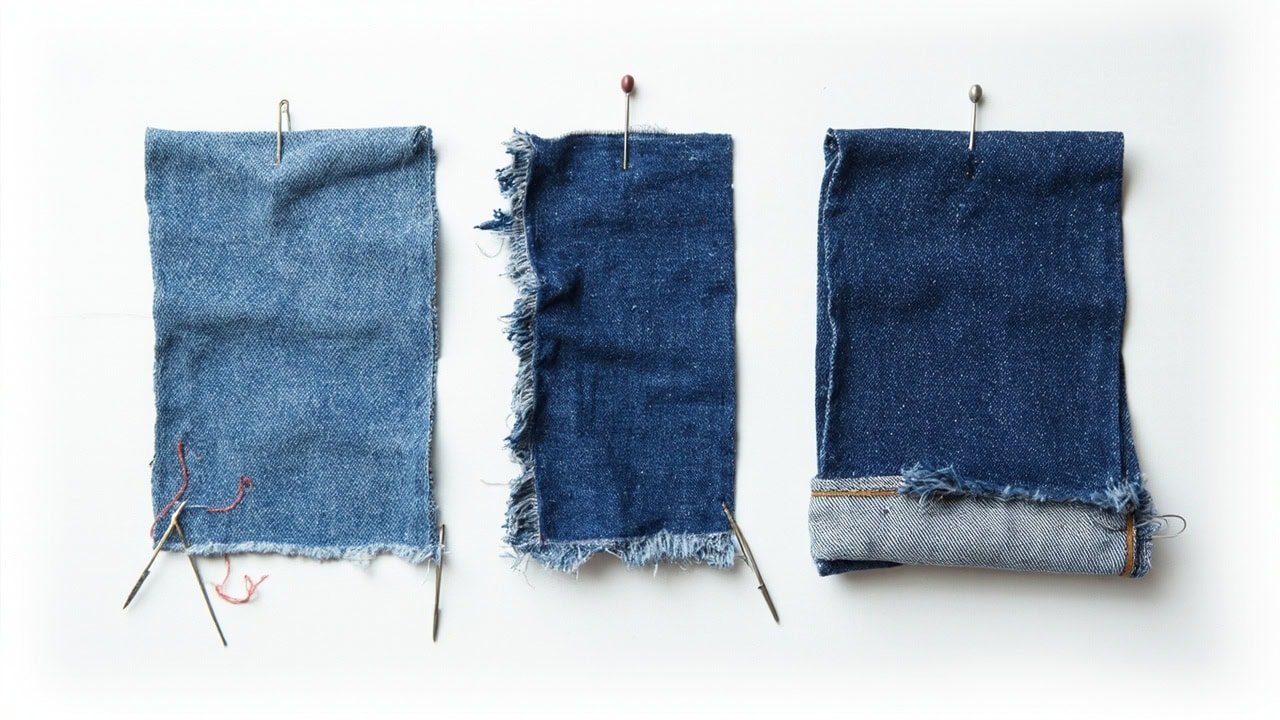
Step 1: Remove the Original Hem Stitching
Turn the jeans inside out. Locate the original hem seam — this is the stitching line where the factory attached the hem to the pant leg. You’ll typically see one or two rows of stitching running parallel to the cut edge of the hem.
Use a seam ripper to carefully remove the stitching along the original hem line. Work slowly and deliberately — you only need to remove one row of stitching, not the entire hem construction. The seam ripper’s small hook catches each stitch and pulls it through. Start at an inconspicuous area (like the inner leg seam) where any accidental fabric catching won’t be visible.
Leave the original hem intact and attached to the jeans at the sides. The hem will now be loose from the pant leg but still connected at the side seams. Keeping the hem attached at the side seams preserves the hem orientation identical to the original — critical for maintaining the selvage alignment on selvage denim where the fabric weave runs parallel to the leg.
If your jeans have a chain-stitch hem (identifiable by the slight stretch and the looping pattern on the underside), you’ll notice the stitches pull out easily in one continuous thread length. Lockstitch hems (more common in mass-market denim) require cutting each stitch individually as they don’t chain together.
Step 2: Cut the Pant Leg to Length
Measure down from the original hem seam line to your desired length plus 1 inch for seam allowance. The extra inch provides fabric to fold and secure within the hem. Mark with chalk or fabric marker around the entire leg — use a flexible measuring tape held horizontal around the leg to ensure an even line.
Cut straight across using sharp fabric scissors or a rotary cutter. Sharp cutting tools are essential — fabric dulled by repeated use or cheap construction will crush the denim fibers at the cut line, potentially causing unraveling even after the hem is secured. Rotary cutters provide the most precise straight line on heavy fabrics like denim, while sharp scissors work well for curves and complex angles.
For example: if you want a 1-inch finished hem and your original hem is 1.5 inches wide, cut 0.5 inch below the original hem seam line so the 1.5-inch original hem will fold up to cover the raw edge and meet the seam line, creating a clean 1-inch finished hem. This calculation ensures the new hem width matches your target and sits at the correct position on the leg.
Step 3: Fold Up the Original Hem
Turn the jeans right-side out. Fold the original hem up so it covers the raw cut edge. The original hem should meet the stitching line of the original hem — you should see a slight indentation where the original seam was, and the folded hem edge should align with this line.
Adjust so the hem is even and flat all the way around the leg. Any twisting or puckering at this stage will show in the finished garment. On selvage denim, pay special attention to keeping the decorative border parallel to the new hem line — this visual alignment is part of what makes selvage jeans distinctive.
Use pins or clips to hold the hem in place, spacing every 1–2 inches. Clips (like Kclamps or Wonder Clips) work better than pins on heavy denim as they don’t leave holes and provide stronger holding power during the securing process. If using pins, insert them perpendicular to the hem edge rather than parallel to minimize fabric stress.
Step 4: Secure and Finish the Hem
With the hem positioned and secured, you now have three options for permanently attaching it. Each method has distinct advantages in terms of durability, permanence, and skill requirements. Choose the option that best matches your available tools and intended use of the jeans.
Option A — Hand Stitching (Most Secure)
Hand stitching provides the strongest, most durable bond and is the closest to factory construction. Use a needle and thread in a color matched to the original stitching — examine the existing hem stitches under good lighting to identify the exact shade.
Stitch through all layers using a blind hem stitch or whip stitch. The blind hem stitch (also called an invisible hem) catches only a few threads of the main fabric on each side while stitching through the hem fold, creating a nearly invisible line from the front. Work in 2–3 inch sections, keeping stitches small (2–3mm) and evenly spaced. Knot securely at the beginning and end with multiple knots or a backstitch anchor.
This method produces a permanent, machine-quality result that withstands hundreds of washes. The slight elasticity of the thread allows the hem to move naturally with the fabric stress of daily wear.
Option B — Fabric Glue
Fabric glue provides a no-sew alternative suitable for those without hand-stitching experience or as a temporary solution while you decide if you want to commit to the alteration. Apply fabric glue in a thin line along the inside edge of the hem, approximately 1/4 inch from the fold edge.
Press firmly and hold for 30–60 seconds to initiate the bond. Let dry completely — most fabric glues require 24 hours of curing time before the garment can be worn or washed. Do not wear or wash for the full curing time as specified on the product instructions, as premature stress will break the bond.
Fabric glue bonds work best on cotton and cotton-blend denim. The bond may degrade over time with repeated washing, making this a semi-permanent solution. For best results, clean the fabric surface with rubbing alcohol before application to remove oils and residues that reduce adhesion.
Option C — Iron-On Hem Tape
Iron-on hem tape activates with heat and bonds the fold in place. Insert the hem tape between the fold and the leg, positioning it where you want the bond to form. Iron on medium heat without steam for 10–15 seconds per section.
Press firmly and let cool before moving to the next section. The cooling time allows the adhesive to fully set. May need reinforcement stitching in high-stress areas — the inside of the knee and the back of the ankle experience the most fabric stress during wear.
Iron-on tape is heat-sensitive: if you later wash the jeans in hot water or dry them in a high-heat dryer, the bond may soften and release. Check the product specifications for the maximum safe washing temperature. For dark denim that shouldn’t be washed frequently at high heat, this method works well since cold-water washing won’t affect the bond.
How to Shorten Jeans Without Sewing: The No-Sew Method
If you don’t want to sew at all, combining iron-on hem tape and fabric glue provides a stronger bond than either product alone. This hybrid approach creates a semi-permanent alteration that can last through 20–30 washes with proper application.
Clean the leg area with rubbing alcohol before applying any adhesive — this removes body oils, fabric finishes, and accumulated grime that prevent strong adhesion. Allow the alcohol to fully evaporate before proceeding.
Fold the hem up to your desired length and clip or pin it in place. Insert iron-on tape inside the fold and iron to activate the bond. Apply fabric glue along the inside edge for additional security, especially at the corners where the side seams meet the hem.
This no-sew method works best with straight-leg or relaxed-fit jeans where the hem lies flat without tension. Skinny jeans and highly tapered styles create significant stress on the hem fold that glues alone may not withstand long-term. If you have very tapered jeans that need shortening, consider a standard hem with hand stitching instead, or work carefully with binder clips rather than pins to distribute stress more evenly.
The no-sew method is reversible — you can remove the hem tape and glue with heat and solvent if you later decide to restore the original length. This makes it ideal for temporary alterations or rental clothing where permanent modifications aren’t allowed.
Pressing and Finishing
Iron the new hem after completing to set the stitches or activate any remaining adhesive residues. Use medium heat appropriate for the denim weight — typically one to two dots on the iron temperature dial for cotton-denim blends. Use a pressing cloth to protect any decorative stitching or applied finishes.
The new hem line should sit flat and appear identical to the original factory hem when finished. If you see puckering or lifting at any point, re-press or re-secure that section before completing the project. Check both legs for symmetry — lay the jeans flat with one leg on top of the other to compare the hem heights from the same vantage point.
After your first wear and wash, inspect the hem again. Glued hems in particular may need touch-up reinforcement at stress points after initial laundering. Address any lifting immediately to prevent the hem from progressing to a more serious separation.
When to Choose the Original Hem Method vs. Standard Hem
Both hemming methods have their place in garment alteration. The original hem method delivers superior aesthetics for quality denim; the standard hem provides a practical solution when the original hem is damaged or when working with budget denim where factory finishing isn’t worth preserving.
| Factor | Original Hem Method | Standard Hem |
|---|---|---|
| Appearance | Factory finish, no visible second seam | May show a second seam line |
| Skill required | Minimal | Basic sewing |
| Tools needed | Seam ripper + needle or glue | Sewing machine preferred |
| Best for | Quality denim, designer jeans, selvage | All jeans |
| Durability | Very durable when stitched | Very durable |
| Cost | Very low (thread or glue only) | Low |
Choose the original hem method when shortening jeans that cost more than $50, have distinctive factory finishing, are selvage denim, or have a chain-stitch hem you want to preserve. Choose a standard hem when the original hem is already damaged, when working with stretch denim where the original hem may not lay flat after refolding, or when you’re shortening by more than 3 inches (which can distort the leg taper on some jean styles).
For more information on caring for your jeans after alteration, see our guide to how to wash denim jeans properly. Proper washing extends the life of both the original hem and any alterations you make.
To learn about other common garment alterations, including how to taper jeans legs at home and how to fix a stretched waistband, explore our alteration guide.
Frequently Asked Questions
Can you shorten jeans without losing the original hem?
Yes — the original hem method allows you to shorten jeans while keeping the factory hem intact. Simply remove the stitching above the hem, cut the leg to your desired length, then fold the original hem back up and stitch it down over the new cut edge.
How much does it cost to shorten jeans at a tailor?
Professional hemming typically costs $10–$20 at a tailor. The DIY original hem method costs under $5 in materials if you already have basic sewing supplies.
Can you shorten skinny jeans using the original hem method?
Skinny jeans can be shortened using this method, but the tight taper may make folding and pinning the hem difficult. Consider a standard hem for very tapered styles, or work carefully with clips instead of pins.
Will the shortened jeans look the same as store-bought?
When done correctly, the original hem method produces results virtually identical to factory hems — the seam line, stitching, and width all match the original construction.
References
- Levi’s. (2024). Jeans Alterations Guide. Levi’s.
- Cotton Incorporated. (2024). Denim Care and Laundering Guidelines. Cotton Incorporated.
- American Society of Testing and Materials. (2023). ASTM D5489 – Standard Guide for Care Symbols for Care Instructions on Textile Products. ASTM International.


