Parameters and Programming of Soft Winding Machine (SSM)
SSM soft winding requires precise control of six core parameters—yarn length, traverse length, diameter, surface speed, tension, and overfeed—to produce wound packages suited for downstream textile processes. These parameters directly determine package density, shape, and dye uptake characteristics. This guide covers all SSM soft winding machine parameters with step-by-step programming instructions.
Parameters of Soft Winding — Quick Reference
Use this summary table to quickly identify the recommended settings for each winding parameter before programming your SSM soft winder.
| Parameter | Key Values / Range | Notes |
|---|---|---|
| Yarn Length | Formula: count × weight × 1.69 | Reduce package weight for finer counts to ensure uniform dye penetration |
| Traverse Length | 125 mm – 165 mm (common: 150 mm) | Must match bobbin perforation length exactly |
| Package Diameter | Max ~200 mm | Set below point where adjacent packages contact |
| Surface Speed | 400 – 800 m/min (common: 500 m/min) | Reduce for finer yarns with lower tensile strength |
| Initial Tension | 1.5 – 2.5× running tension | Establishes stable core; typical for cotton yarns |
| Initial Tension Time | 60 – 100 seconds | Below 60s = unstable core; above 100s = over-compacted core |
| Empty Tube Tension | 35 – 45% of initial tension | Standard cotton yarn; synthetic blends may need lower % |
| Full Package Tension | 70 – 85% of empty tube tension | Prevents outer-layer over-winding |
| Full Package Speed | 15 – 25% below production speed | Prevents excessive tension at outer layers |
| Overfeed | 10% – 25% | Standard range for most yarn types |
| Crossing Angle (Digicone) | 10° – 14° | Avoid above 14° to prevent ribbon formation |
| Winding Ratio (Precision) | 1.6 – 7.4 | Use fractional ratios (e.g. 5/3, 7/4, 11/7) to prevent patterned zones |
Parameters of Soft Winding
These parameters directly influence the shape and quality of the wound package.
Yarn Length
Winding machines accept yarn length as the primary input rather than weight. The count-to-length relationship follows a specific formula that accounts for the yarn’s linear density. For finer count yarns, lower package weights produce better results due to the increased total surface area at higher lengths.
For a 900 gm package with 20/1 yarn, the length calculation yields 20 × 900 × 1.69 = 30,420 meters. For the same weight with 50/1 yarn, the length reaches 50 × 900 × 1.69 = 76,050 meters—more than double the 20/1 length. The significantly higher surface area for finer yarns increases the risk of unlevel dyeing. Industry practice recommends reducing package weight for finer counts to ensure uniform dye penetration.
Traverse Length
Traverse length must match the bobbin perforation length precisely. When traverse length exceeds perforation length, the liquor cannot maintain equal pressure through the protruding yarn section, resulting in uneven dyeing. Standard traverse lengths for textile winding machines range from 125 mm to 165 mm, with 150 mm being common in production environments.
When traverse length falls below perforation length, pressure leakage occurs. Water follows the path of least resistance through uncovered holes, bypassing yarn in the perforated sections. Proper traverse-to-perforation alignment ensures consistent liquor flow throughout the package during dyeing.
Diameter
Two diameter values require specification:
Bobbin Diameter
Measure the bobbin diameter precisely using a slide caliper. Standard bare bobbin diameters measure approximately 69 mm. Enter this measured value directly into the machine parameters.
Package Diameter
Package diameter must account for spindle distribution within the carriers. Packages that contact each other laterally during dyeing cause catastrophic defects including dye channeling, uneven penetration, and physical damage. Full package diameters typically reach 200 mm. Always set the maximum package diameter below the point where adjacent packages would make contact.
Surface Speed
Surface speed represents the linear yarn uptake rate per minute and directly determines production throughput. Higher surface speeds increase output but require careful attention to yarn count limitations. Finer yarns with lower tensile strength may experience repeated breakage above certain speed thresholds. Typical winding speeds for soft yarn packages range from 400 m/min to 800 m/min, with 500 m/min being a common production setting.
Initial Speed
The package starts at reduced speed to overcome inertia and establish a stable foundation. Initial tension at this stage exceeds normal operating tension to compact inner layers. Setting initial speed too high causes repeated yarn breakage during the critical package formation phase. Reduce initial speed for delicate and fine count yarns.
Production Speed
Production speed operates the spindle throughout the majority of the winding cycle. This parameter primarily determines the production rate. Balance production speed against yarn tension limits and package building stability.
Full Package Speed
Tension naturally increases at the outer package layers as winding progresses. Set full package speed below production speed to prevent excessive tension that forces middle-layer yarns outward. Protruding yarns create surface irregularities that cause uneven dyeing. Reduce full package speed by 15–25% compared to production speed for standard yarns.
Tension
Tension values vary across different stages and points within the winding cycle. Apply precise tension control at each phase to achieve optimal package density and handling characteristics.
Initial Tension
Apply maximum tension during the initial winding phase to establish a stable core. The innermost layer requires the highest tension of any layer. Insufficient initial tension causes package collapse during handling or pressure differential stress in dyeing vessels. Typical initial tension values for cotton yarns range from 1.5 to 2.5 times the running tension.
Initial Tension Time
Maintain peak initial tension for a limited duration to avoid over-compaction. Industry practice establishes 60–100 seconds as the optimal initial tension time window. Times below 60 seconds may produce insufficient core stability, while times exceeding 100 seconds risk excessive core density that prevents proper liquor penetration during dyeing.
Empty Tube Tension
After the initial tension phase concludes, empty tube tension applies to the building package. Optimization requires empirical testing for each yarn type. Standard cotton yarn typically requires 35–45% of initial tension value. Synthetic blends may require lower percentages due to different elastic properties.
Full Package Tension
Reduce tension for the final winding stage to approximately 70–85% of empty tube tension. Lower final-stage tension prevents over-winding of outer layers that would constrict inner packages and restrict dyeing liquor circulation.
Feeder Speed or Overfeed
Overfeed represents the percentage difference between feeder speed and production speed. Control overfeed to manage yarn tension throughout the winding cycle. Standard overfeed values range from 10% to 25% for most yarn types.
| Overfeed Value | Feeder Behavior |
|---|---|
| −100% | Feeder remains stationary |
| 0% | Feeder speed equals production speed |
| +50% | Feeder rotates at 1.5× production speed |
Winding Type
Two primary winding technologies suit soft winding applications:
Precision Winding (Winding Ratio)
Precision winding requires selection of initial and final winding ratios that define the traverse-to-package-diameter relationship. Always select ratio values containing fractions rather than whole numbers to prevent patterned zones in the package. Acceptable winding ratios for most applications fall between 1.6 and 7.4, depending on package build stage. Fractional ratios such as 5/3, 7/4, or 11/7 produce pattern-free packages.
Digicone Winding (Crossing Angle)
Digicone winding specifies initial and final crossing angles rather than ratios. Maintain initial and final angles within 3–5 degrees of each other to prevent pattern zones. Optimal crossing angles for soft packages range from 10° to 14°. Angles above 14° risk ribbon formation and associated dyeing defects.
How to Program an SSM Soft Winding Machine
SSM soft winder programming follows a two-phase process: first creating the recipe from a template, then editing parameters to achieve desired settings.
Creating a New Recipe
Follow these steps to establish a new winding recipe:
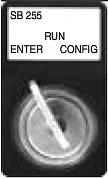
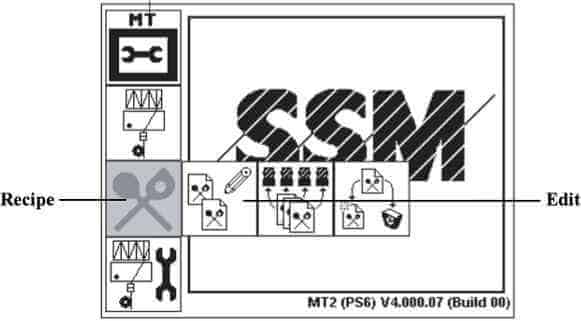
1. Turn the key to Enter
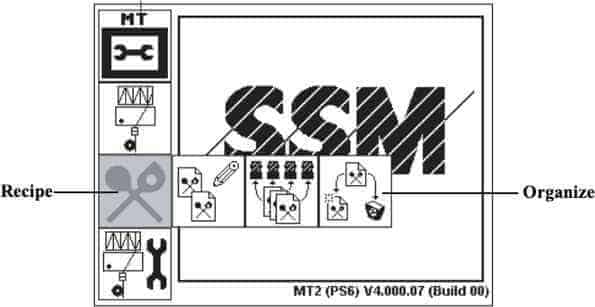
2. Select the Organize button in the Recipe function group
3. Select the New (1) button. The New Recipe menu appears.
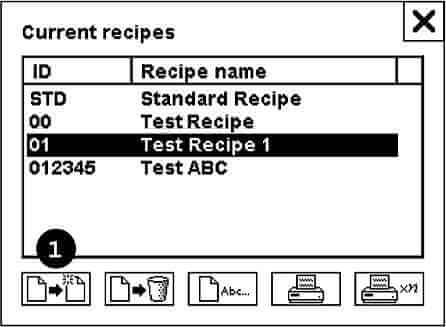
4. Select the Template button and choose an existing recipe as a pattern.
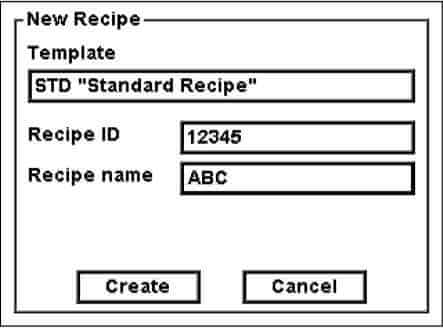
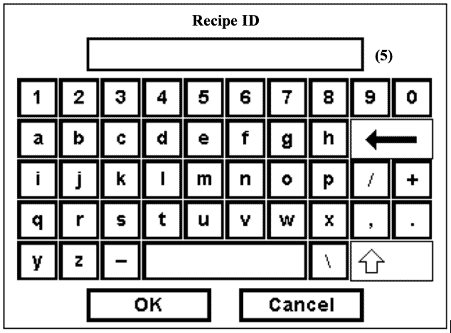
5. Tap the Recipe ID button and enter a preferred ID number up to 5 digits.
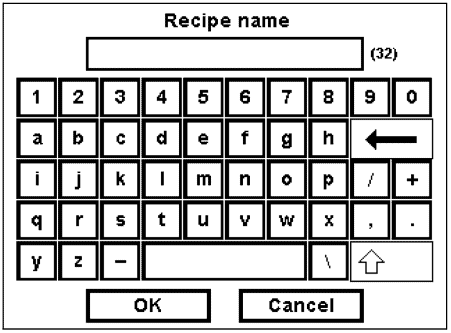
6. Select the Recipe name button and enter the required name.
7. Tap the Create button to save the recipe.
8. The new recipe appears in the list and parameters become editable.
Editing the Recipe
Follow these steps to modify an existing recipe:
1. Turn the Key to Enter
2. Select the Edit button in the Recipe function group
3. Call the Recipe button to display the list of existing recipes.
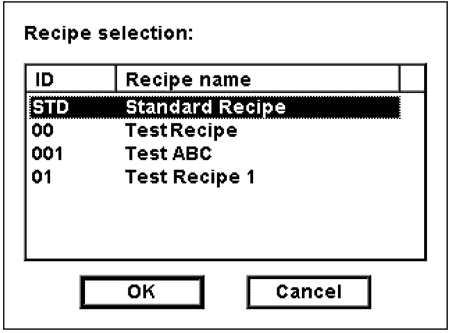
4. Select the desired recipe from the list showing ID and recipe name.
5. The parameter windows contain 8 sections. Values entered in each window save automatically.
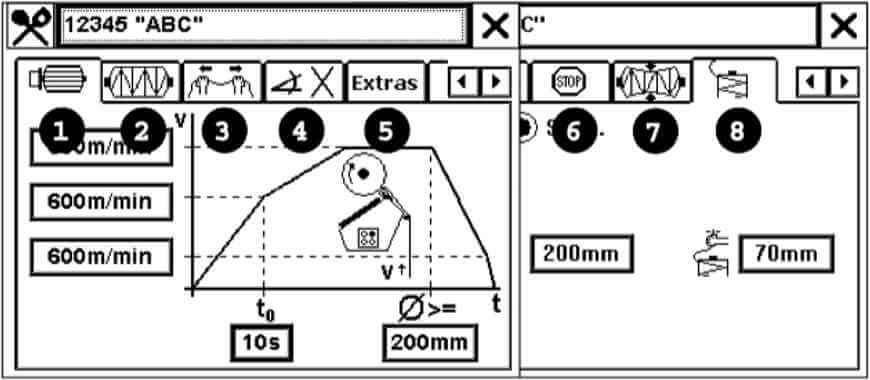
- Window 1: Drive Unit
- Window 2: Package
- Window 3: Yarn Tension

- Window 4: Winding Types
- Window 5: Extras

- Window 6: Stop

- Window 7: Density Monitoring
- Window 8: tensiso™
References
- Durur, E. & Çelik, S. (2016). Cross Winding of Yarn Packages. Journal of Textile & Textile Engineering. Springer.
- ISGEC. (2016). Suitable Traverse Ratios for Step Precision Winding. Journal of Textile & Textile Engineering, 7(3). https://springer.com/article/10.1186/s40691-016-0062-0
- ISO. (1980). ISO 5239:1980(en): Textile machinery and accessories — Winding — Basic terms. https://iso.org/standard/7585.html
- Goswami, B. C., Anandjiwala, R. D., & Hall, D. (2004). Textile Sizing. Marcel Dekker, Inc.


