How to Hem Pants at Home: No-Sew and Sewing Methods
Hemming shortens the length of pants by folding the original hem upward and securing it at the desired length. Hemming pants at home uses either temporary no-sew fixes (fabric glue or iron-on hem tape) or permanent hand-sewn or machine-sewn methods — the method depends on whether you need the alteration to last through repeated washing or just a single-season wear. Fabric glue bonds to most textiles within 4–6 hours of curing time, iron-on tape activates at 275°F (135°C) with a steam iron, and a traditional sewn hem requires a needle and thread or a sewing machine with a blind hem foot attachment. This guide covers all four methods so you can choose the right one for your fabric, schedule, and skill level.
Hemming Shortens Pants by Folding and Securing the Original Hem at the Desired Length
Hemming is the process of shortening pants by folding the original hem upward and securing it at the desired length. Every pair of pants sold today is manufactured with excess length intentionally built in — this standard practice across the apparel industry allows retailers to offer pants at standard inseam lengths while giving customers the option to customize the fit through professional or DIY clothing alterations guide. Buying pants that are slightly too long is not a defect — it is an invitation to personalize your fit. Four common reasons exist for hemming pants: store-bought pants are typically cut for someone taller than average with off-the-rack inseams routinely running 32–34 inches for a “regular” length that drags at the floor on anyone under about 5’9″ without heels; weight fluctuations change where pants break at the shoe; stylistic preferences shift between cuffed ankle looks and full-length dress trousers; and vintage sizing often uses different proportions than modern cuts. A properly executed hem maintains the original hem’s appearance — no one can see the alteration from the outside. The key to a professional-looking hem is preserving the original hem, which is the finished double-fold or serged edge that resists fraying and looks clean.
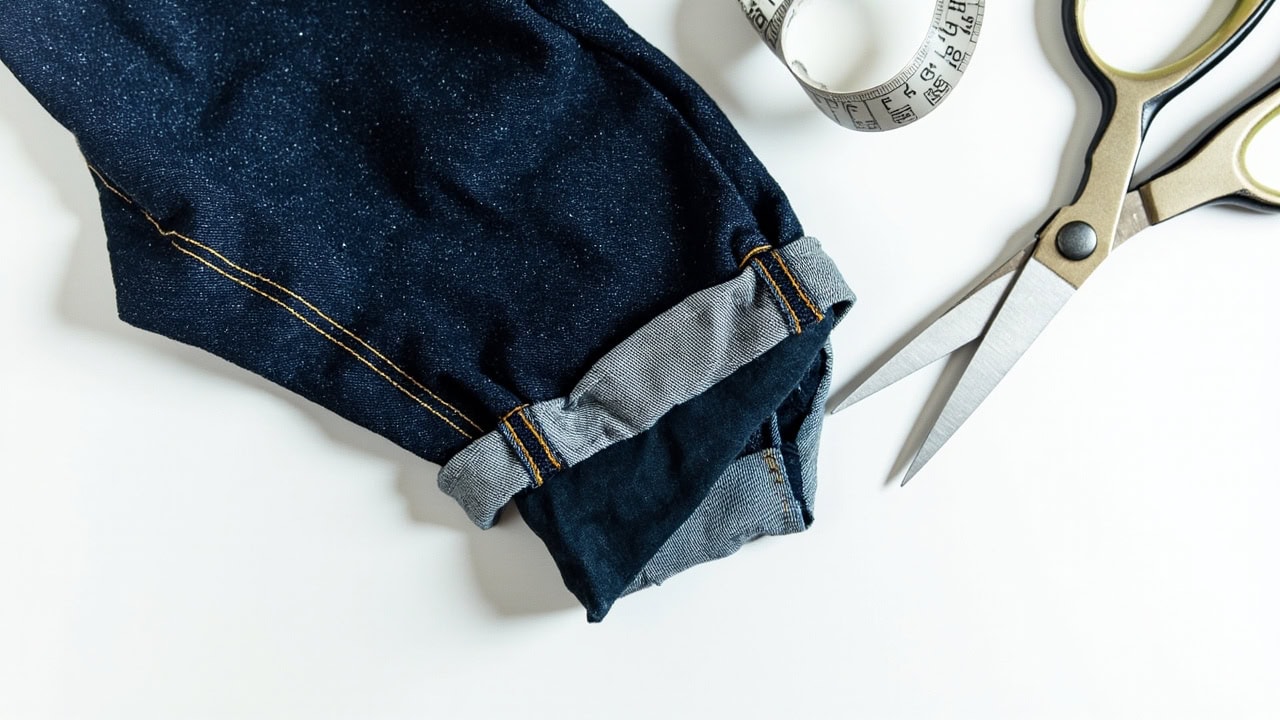
Gather the Appropriate Tools for Your Chosen Hemming Method Before Starting
Using the right supplies makes a significant difference in both the ease of the process and the durability of the result. The tools needed vary depending on whether you choose a no-sew method or a sewing method.
No-Sew Method Tools
- Fabric glue (permanent textile adhesive such as Aleene’s Fabric Fusion)
- Iron-on hem tape (Wonder Under, Heat n Bond Hem)
- Pressing cloth
- Steam iron
- Measuring tape
- Clips or pins to hold fabric in place
Sewing Method Tools
- Matching thread (cotton-wrapped polyester for cotton and polyester blends; silk thread for delicate fabrics)
- Hand-sewing needle (size 5–7 sharp or ballpoint, depending on fabric weight)
- Sewing machine (optional but recommended for speed)
- Blind hem foot attachment for sewing machine
- Measuring tape
- Pins or clips
- Seam ripper (for correcting mistakes)
- Iron and pressing cloth
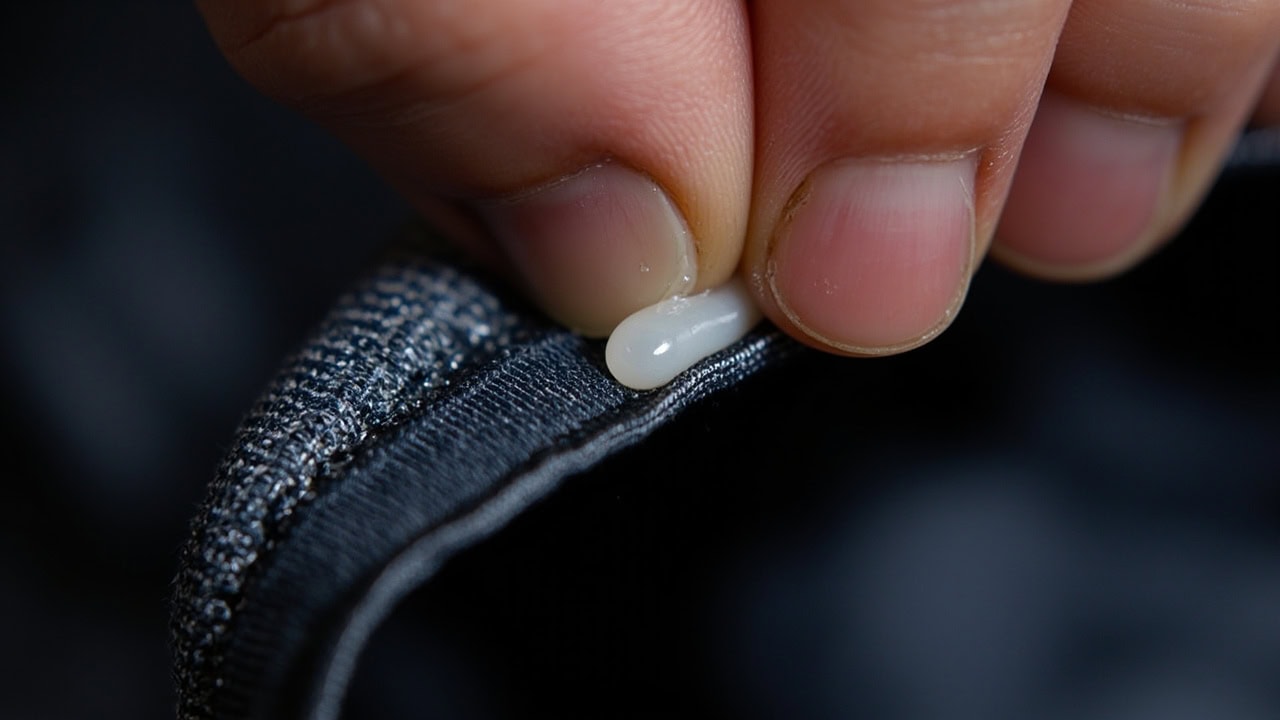
Fabric Glue Hem Uses Permanent Textile Adhesive for Delicate Fabrics and Quick Temporary Fixes
Fabric glue hemming suits situations requiring quick alterations, delicate fabrics that resist pinning and stitching, or temporary fixes that can be reversed. This method creates a wash-resistant bond (see the textile glossary for details) that holds through 20–40 wash cycles depending on the adhesive brand and laundering method. Fabric glue works particularly well on chiffon, silk, lace-trimmed pants, and any fabric where a needle might leave visible holes. Fabric glue is a permanent textile adhesive — once cured, it creates a flexible bond that survives machine washing in cold water. High-heat drying can weaken the bond over time; for pants dried on high heat regularly, consider the iron-on tape or sewn method instead for a more durable result.
- Try on the pants inside out and mark the desired length with chalk or a fabric marker on both pant legs. Stand straight — do not tilt or shift your posture mid-mark.
- Fold the hem up to the marked line. Press firmly with an iron to create a crisp, flat crease that will guide your glue line.
- Apply a thin, even line of fabric glue along the inside fold edge — typically ⅛ to ¼ inch from the top of the fold. Follow the glue manufacturer’s line-width guidelines on the bottle. Less is more: a thin line is sufficient; globs will seep through the fabric.
- Fold the hem up and press firmly for 30–60 seconds to set the initial bond.
- Allow the hem to cure fully for 4–6 hours before wearing or washing — this is the adhesive’s open time, during which the bond reaches full strength. Rushing this step causes most hem failures.
- For curved or cornered areas, clip the fabric allowance with small scissors to reduce bulk before gluing.
Fabric glue works on sheer and slippery fabrics where heat application would be problematic. It handles slight curves better because it stays flexible as it cures, unlike the rigid bond that heat-set tape creates.
Iron-On Hem Tape Uses Heat Activation at 275°F for Permanent Results on Cotton, Linen, and Polyester
Iron-on hem tape is a fusible web tape — typically ¾ inch (2 cm) wide — that bonds two fabric layers when activated by heat. It produces permanent results on appropriate fabrics and requires no special skills, making it the fastest no-sew path to a professional-looking hem. The activation temperature is 275°F (135°C), which corresponds to the “synthetics” or “wool” setting on most household irons. Iron-on hem tape works best on natural fibers (cotton, linen) and stable polyester blends. It is less ideal for sheer fabrics, stretch knits, or heavily textured materials where the heat and pressure cannot create an even bond across the full tape width. The tape will stop some fraying at the fold edge, but it is not a substitute for a properly serged or bound edge on fraying-prone fabrics.
- Try on the pants and mark the desired length inside with chalk — measure both legs at the same time while standing straight to ensure even length.
- Fold the hem to the marked line. Press with a dry iron set to 275°F (135°C) — no steam — to set the fold crisply before applying tape.
- Cut a length of hem tape to fit each pant leg. Slide the tape between the folded hem and the outside of the pant leg along the entire hem width.
- Set your iron to 275°F (135°C) — the synthetics/wool setting — with steam turned off. Place a pressing cloth over the hem area.
- Press firmly for 10–15 seconds per section, moving along the entire hem. Apply consistent, firm pressure — do not slide the iron, as this shifts the tape out of position.
- Let the hem cool completely for 10–15 minutes before moving or wearing. The bond continues strengthening as it cools.
- Repeat on the second leg, matching the first leg’s length precisely.
Iron-on tape is heat-sensitive. Repeated high-heat drying (above 300°F / 150°C) can gradually weaken the adhesive bond over many laundry cycles. For pants tumble dried on high heat frequently, a sewn hem will outperform tape over the long term.
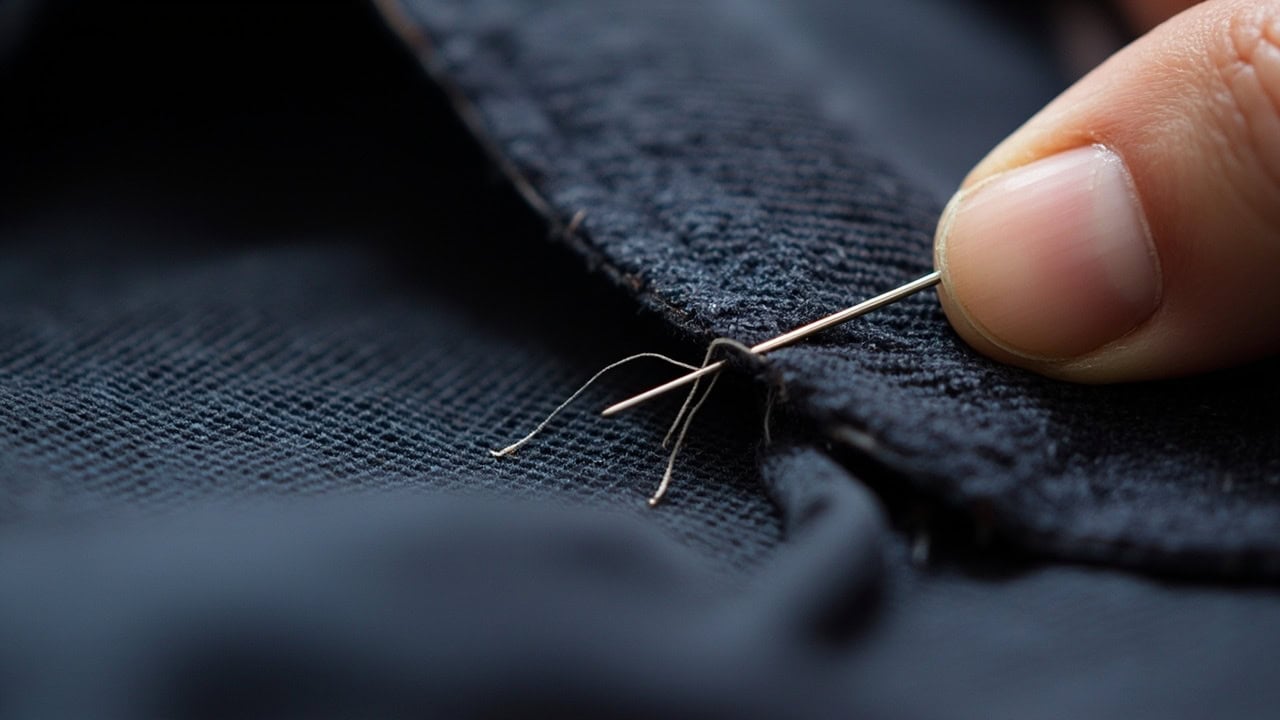
Hand-Sewn Blind Hem Produces an Invisible Finish Using a Slip Stitch on Every Fabric Type
The hand-sewn blind hem is the gold standard for professional alterations — it produces an invisible finish from the outside and works on every fabric type, from lightweight voiles to heavyweight denim. The technique takes 45–90 minutes per pair of pants, but it requires no special equipment beyond a needle and thread, making it the most accessible permanent method. The blind hem uses a stitch pattern where you catch only 1–2 threads of the main pant fabric on each stitch, keeping the thread invisible from the outside. The hem itself is folded under so that only the inner fold is stitched. A properly executed blind hem is undetectable from the exterior of the garment. The blind hem is particularly well-suited to dress trousers (see our dress trouser alteration guide) and high-quality garments where an invisible finish is paramount. It handles the slight forward pitch of dress trouser legs (which causes the front to naturally sit slightly shorter than the back) better than machine methods, because you can adjust stitch depth manually as you work.
- Try on the pants inside out and mark the desired length with chalk. Mark both legs at the same distance from the floor while standing straight.
- Fold the hem up 1–1.5 inches (2.5–4 cm) and press to create a crisp crease. Pin or clip every 2–3 inches to hold the fold in place while you work.
- Thread a hand-sewing needle with 18–24 inches of thread — this is the optimal length to avoid tangling. Knot the end securely.
- Begin by coming up through the fold of the hem so the knot is hidden inside the hem allowance. This is the foundation of an invisible hem.
- Pick up 1–2 threads of the main pant fabric just below the bottom edge of the fold — the goal is to catch fabric, not a visible amount of cloth.
- Then pick up 1–2 threads of the hem fabric at the fold line, working diagonally along the fold at a distance of ¼ inch from the previous stitch.
- Repeat every ¼ inch, working from right to left (or left to right if you are left-handed). Every 3–4 stitches, catch the original hem’s outer edge to anchor the hem permanently in place.
- When you reach the end, knot the thread and bury the tail inside the hem fold using your needle to pull it through the layers — do not cut the thread flush with the fabric.
- Press the finished hem with an iron to set the fold and flatten any minor puckering.
Machine-Sewn Blind Hem Delivers Consistent Invisible Results Faster Than Hand-Sewing
The machine-sewn blind hem combines sewing machine speed with the invisible finish of a hand-sewn hem. With a blind hem foot attachment — an inexpensive accessory that comes standard with most modern sewing machines — this method takes 15–30 minutes per pair of pants and produces a finish nearly as invisible as the hand method, with superior consistency and stitch strength. The blind hem foot uses a metal guide that rests against the hem fold while a specialized stitch pattern delivers straight stitches through the hem allowance and a single wide zigzag or catch stitch that just barely nips over into the main fabric. From the outside, only those tiny catch stitches are visible, and they disappear almost entirely when the hem is pressed. The machine delivers consistent stitch tension and stitch depth across the entire hem, eliminating the slight variation that naturally occurs in hand work. For frequently worn pants — especially jeans and heavy denim — the machine’s stronger, more uniform stitch is preferable to hand-sewing, which can occasionally pull or loosen over years of wear.
- Install the blind hem foot on your sewing machine. Thread the machine with matching thread in the needle and bobbin.
- Fold the hem up 1–1.5 inches, press, and pin or clip every 2–3 inches. For dress trousers, press the front crease (the forward break line) before hemming to preserve the trouser crease through the alteration.
- Set the machine stitch length to 2.5–3mm and select the blind hem stitch pattern — this is typically a setting on the stitch selector dial numbered 4 or 5 on most domestic machines.
- Place the fabric under the blind hem foot so that the metal guide rests snugly against the folded edge of the hem. The straight-stitch portion of the pattern will run through the hem allowance; the zigzag catch will nip over to catch the main fabric.
- Sew along the entire hem at a steady pace — do not pull or push the fabric through the machine. Let the machine’s feed dogs pull the fabric evenly.
- From the outside, check that only a faint line of stitches is visible just at the top edge of the hem fold. If stitches are too prominent, re-sew with the guide positioned slightly farther from the fold.
- Press the finished hem to blend the stitches and set the fold.
Choosing Between No-Sew and Sewing Hem Methods Depends on Fabric Type, Durability Needs, and Available Time
The choice between no-sew and sewing methods depends on three factors: how often you will wear and wash the pants, what fabric they are made from, and how much time you have. No-sew methods suit thin fabrics like chiffon, silk, and lightweight rayon where pinning leaves visible holes and machine stitching creates bulk. No-sew methods are also ideal for children’s clothing that will be outgrown quickly — the alteration can be made in under an hour and does not permanently modify the garment. If you need a hem done the same day for an event, fabric glue or iron-on tape will get you there faster than any sewing method. Sewn hems are correct for pants worn often and laundered frequently — denim jeans, work trousers, and everyday khakis all benefit from the long-term durability of stitched hems. Heavyweight fabrics like denim, canvas, and corduroy are too thick for fabric glue to penetrate effectively and too rough on needle edges for comfortable hand-sewing without a thimble and heavy-duty needle. When you want the most professional invisible finish, the hand-sewn blind hem remains the gold standard that alteration tailors use on high-end dress trousers.
| Method | Durability | Best Fabric | Best For | Time Required |
|---|---|---|---|---|
| Fabric Glue | Wash-resistant up to 30 cycles | Cotton, denim, synthetic blends | Delicate fabrics, quick fixes, thin materials | 4–6 hours cure time |
| Iron-On Tape | Permanent but heat-sensitive | Cotton, linen, polyester blends | Cotton/linen blends, quick permanent hem | 15–20 minutes |
| Hand-Sewn Blind Hem | Fully permanent | All fabrics | Most pants, dress trousers, any fabric | 45–90 minutes |
| Machine Blind Hem | Fully permanent | All fabrics | Pants worn frequently, best professional finish | 15–30 minutes |
When No-Sew Methods Are Appropriate
No-sew methods are the right choice for thin fabrics like chiffon, silk, and lightweight rayon where pinning leaves visible holes and machine stitching creates bulk. They are also ideal for children’s clothing that will be outgrown quickly — the alteration can be made in under an hour and does not permanently modify the garment. If you need a hem done the same day for an event, fabric glue or iron-on tape will get you there faster than any sewing method.
When Sewing Methods Are Appropriate
Sewn hems are the correct choice for pants you will wear often and launder frequently — denim jeans, work trousers, and everyday khakis all benefit from the long-term durability of stitched hems. Heavyweight fabrics like denim, canvas, and corduroy are too thick for fabric glue to penetrate effectively and too rough on needle edges for comfortable hand-sewing without a thimble and heavy-duty needle. When you want the most professional invisible finish, the hand-sewn blind hem remains the gold standard that alteration tailors use on high-end dress trousers.
Avoiding and Fixing Common Hemming Mistakes Ensures Professional Results
Four common hemming mistakes have proven solutions: uneven hem length, glue or tape showing through, bunched or puckered hems, and visible stitching from the outside. Each mistake has specific prevention steps and correction methods.
Preventing and Fixing Uneven Hem Length
The most common hemming error is ending up with one leg shorter than the other. This happens because people measure while standing but mark without checking both legs simultaneously. To prevent it: put on the pants, stand straight in front of a mirror, and have someone else mark both legs at the same distance from the floor while you look straight ahead. Before pinning, sit down — some people prefer a slightly shorter front hem to avoid bunching at the shoe. A quick check before you secure the hem costs far less time than re-doing it. If the mistake is already made, all four methods in this guide fold rather than cut, meaning the pants can be re-hemmed. Use a seam ripper or apply rubbing alcohol to a cotton swab to dissolve the old glue or tape line, then start fresh.
Preventing and Fixing Glue or Tape Showing Through
If the adhesive is visible from the outside, it was applied too close to the top edge of the fold. Apply your product closer to the inside edge — the glue or tape sits between the two layers of fabric, not at the point where the fold meets the pant leg. Using less product also helps: a thin, even line is all that is needed; globs of glue will inevitably squeeze out at the edges. For visible glue residue on the exterior, apply a small amount of rubbing alcohol to a cotton swab and gently blot the affected area — this dissolves most fabric glues without damaging the textile.
Preventing and Fixing Bunched or Puckered Hems
Fabric bunching occurs when the hem is secured without being properly pressed flat first, or when too many layers of fabric are stacked at the fold. For heavyweight fabrics like denim, grade the seam by trimming the inner hem allowance to reduce bulk — seam grading, which our textile glossary covers in detail, prevents the hem from creating a thick, stiff ridge on the inside of the pant leg. When machine hemming, do not pull the fabric through the machine; guide it gently and let the feed dogs pull evenly. Rushing creates the uneven fabric transport that causes puckering.
Preventing and Fixing Visible Stitching
For hand-sewn hems, visible stitching means you are catching too much fabric on each stitch. A proper blind hem catches only 1–2 threads of the main pant fabric — if you are pulling a visible amount of cloth through with each stitch, you will see the thread from the outside. Rethread your needle and start again, focusing on keeping the stitches shallow. For machine hems, visible stitching means the metal guide was positioned too far from the fold, causing the needle to stitch through the main fabric rather than just barely catching its edge. Re-stitch with the guide adjusted ⅛ inch closer to the fold.
Hemming Techniques Vary by Pant Style and Fabric Type for Optimal Results
Different pant styles require specific hemming approaches based on their fabric weight, construction, and expected use. Jeans, dress trousers, athletic pants, and casual chinos each have optimal hemming methods.
Dress Trousers Require Hand-Sewn Blind Hems for Invisible Finishes on Wool Fabrics
Dress trousers — wool, wool-blend, or synthetic dress fabrics — demand the hand-sewn blind hem for the cleanest result. These fabrics are typically medium-weight and stable, making them ideal for hand-stitching. The dimensional stability of wool (see our textile glossary) means the hem will hold its pressed crease well. Use a single thread and small, consistent stitches for an invisible finish. After hemming, re-press the front crease (the forward break line) by ironing along the crease with a damp pressing cloth and a medium-hot iron — this restores the trouser’s pressed appearance through the alteration.
Yoga Pants and Spandex Require No-Sew Methods to Protect Elastic Fibers
Athletic pants made from spandex, Lycra, or synthetic stretch blends require no-sew methods. These fabrics are heat-sensitive: high-heat sewing can damage the elastic fibers, causing the fabric to yellow, shrink unevenly, or lose its stretch recovery. Fabric glue is the best choice for yoga pants and athletic leggings — it creates a flexible bond that moves with the fabric’s stretch without cracking or peeling. If you prefer a stitched hem, use a narrow zigzag stitch (2mm width, 3mm length) with a stretch needle on a machine, and avoid pulling the fabric through as you sew.
Chinos and Cargo Pants Respond Well to Machine Blind Hems on Cotton Twill Fabrics
Cotton twill chinos and utility cargo pants respond well to the machine blind hem. These mid-weight fabrics are stable enough for machine stitching and benefit from the speed and durability that the machine method provides. Use all-purpose thread and a standard blind hem foot — no special adjustments are needed. Cargo pants with thick belt loops and reinforced pocket edges may require a size 90/14 universal needle to penetrate the multiple fabric layers without skipped stitches. After hemming any cotton or linen pant, check the fabric care guide for washing instructions. Unlined cotton and linen pants can be washed normally, but the hem’s bond or stitches will last longer if you use a gentle cycle and air-dry rather than tumble-drying on high heat.
Frequently Asked Questions About Hemming Pants
Can you hem pants without cutting them?
Yes — all four methods above fold and secure the original hem without cutting any fabric off. The pants remain alterable in the future if you need to let the hem back down.
How long does a fabric glue hem last?
A fabric glue hem typically lasts through 20–40 washes depending on the glue brand and how the pants are cared for. For permanent results, use iron-on hem tape or a sewn hem.
Can you use a regular sewing machine to hem pants?
Yes — a standard sewing machine with a blind hem foot attachment can produce professional-looking hems. Without the blind hem foot, you can use a straight stitch or narrow zigzag, though the finish will not be fully invisible.
What is the easiest way to hem pants at home?
Iron-on hem tape is the easiest no-sew method — it requires no special skills and takes 15–20 minutes per pair. For sewn methods, the machine blind hem is fastest if you have the foot attachment; the hand-sewn blind hem is the easiest to do without any special equipment.
References
- Treasure, J. (2024). How to Hem Pants Without Sewing. Treasurie.
- Aleene’s. (2024). Fabric Fusion Permanent Fabric Glue Product Information. Aleene’s.
- HeatnBond. (2024). HeatnBond Hemming Tape Product Page. HeatnBond.
- Singer. (2023). How to Sew a Blind Hem. Singer.
- Colman & Company. (2023). Machine Blind Hem Tutorial. Colman & Company.


