How to Cut Sashing Strips for A Quilt: Step By Step Guide
To cut sashing strips for quilts with precision, cut strips 1.5 to 2.5 inches wide to produce a finished visible width of 1 to 2 inches after the 1/4-inch seam allowance is sewn on each side. For standard 12-inch quilt blocks, cut sashing strips 13 inches long — the block dimension plus 1 inch for seam allowance.
This guide covers the complete process: standard measurements, professional-grade tools, and step-by-step technique for achieving consistent, museum-quality results in your quilt top construction.
Standard Sashing Strip Widths at a Glance
| Cut Strip Width | Finished Sashing Width | Best Used For |
|---|---|---|
| 1.5 inches | 1 inch | Narrow, delicate sashing on miniature or wall quilts |
| 2.0 inches | 1.5 inches | Standard lap quilts and baby quilts |
| 2.5 inches | 2 inches | Full/twin quilts and bed-size quilts |
| 3.0 inches | 2.5 inches | Bold, statement sashing on show quilts |
These measurements assume standard 1/4-inch seam allowance on both sides of the strip. A 2-inch finished sashing width requires cutting strips at 2.5 inches wide to account for the 1/2 inch total seam allowance.
Quick-Reference: Key Sashing Measurements
- Seam allowance: 1/4 inch (6.35mm) on each side — standard quilting measurement
- Strip length formula: Finished block size + 1 inch = cut strip length
- Border extension: 1 inch beyond quilt edge on each side (2 inches total overlap)
- Fabric grain: Cut along lengthwise grain for maximum stability
- Fabric width: Quilting cotton is typically 42–45 inches selvage to selvage
Tools Required for Cutting Sashing Strips
Professional sashing cuts require tools that deliver the precision needed for consistent results across an entire quilt top:
- Quilt ruler (6×24 inches or 6×12 inches) — Must have firm, non-slip edges and clear 1/8-inch markings for accuracy. Look for rulers with 30°, 45°, and 60° angle lines for bias cutting.
- Rotary cutter with a 45mm or 60mm blade — The 45mm blade suits most cotton quilting fabric; the 60mm blade cuts through multiple fabric layers efficiently. Replace blades after 10–15 hours of cutting use to maintain sharpness.
- Self-healing cutting mat (24×36 inches minimum) — Protects blade edge and provides a slip-resistant cutting surface. Rotate the mat 180° periodically to distribute wear evenly across all quadrants.
- Straight pins or quilting clips — Use glass-head pins for precision work; quilting clips (Binder clips in sizes 1–3) work better for layered fabric stacks and prevent finger fatigue.
Step-by-Step Process for Cutting Sashing Strips
Follow these steps precisely, as each action directly affects the accuracy of the finished quilt top.
Step 1: Mark and Secure the Fabric
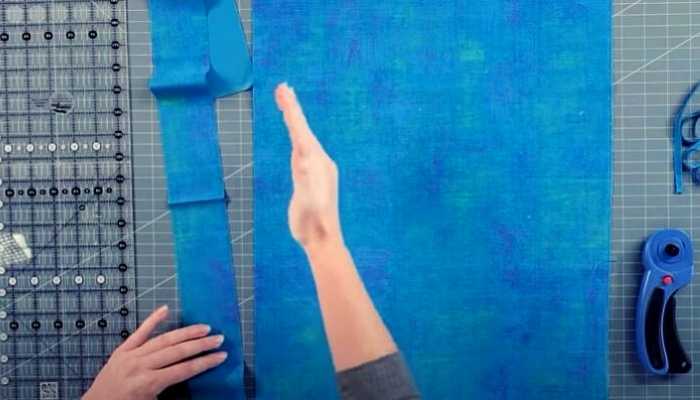
Wash and press your fabric before cutting. Pre-washing removes sizing chemicals and prevents shrinkage that would distort cuts after the first laundering. Press fabric with a dry iron set to the cotton setting (approximately 400°F / 204°C) or the appropriate temperature for your fabric content.
Fold the fabric along the lengthwise grain so the selvage edges align. The fabric fold running parallel to the selvage creates straight-of-grain strips with minimal stretch. Mark the cut line with a fabric chalk marker along the first cutting point, then pin or clip the fabric securely at each end before cutting. Remove pins from the path of the rotary cutter to avoid damaging the blade and causing injury.
Position the quilt ruler so its edge aligns precisely with the fabric fold or your marked cutting line. Keep the ruler stationary with firm downward pressure on the non-cutting hand (heel of hand over the ruler edge) and cut away from your body using a smooth, continuous motion along the ruler edge.
Step 2: Stitch the Sashing Strip Sides
Set your sewing machine to a straight stitch at 2.0–2.5mm stitch length (approximately 12 stitches per inch) or use a narrow zig-zag at 2.0mm width and 2.5mm length for added seam flexibility. Thread your machine with 100% cotton thread in a weight of 50wt or 60wt for seams that will be pressed flat without bulk.
Place two sashing strips with wrong sides together, aligning the long edges evenly. Pin at each end and at 4–6 inch intervals along the strip length to prevent shifting during sewing. Sew along one long edge using the machine’s 1/4-inch presser foot or a 1/4-inch seam guide to maintain consistent seam allowance.
Open the sewn strips so right sides face upward (as they will appear in the finished quilt). Fold the unsewn long edges toward the center seam and press with the iron. The fold creates the finished sashing edge. Pin at each end and along the length, then sew the second long edge using the same 1/4-inch seam allowance. Each completed sashing strip measures the desired finished width plus 1/2 inch total for seam allowances.
Step 3: Lay Out the Quilt Top
Arrange your quilt blocks on a flat surface in the desired layout. Place the first row of sashing strips vertically between blocks, ensuring even spacing of 1/4 inch to 1/2 inch between adjacent blocks and sashing strips. The sashing row should align flush with the top and bottom edges of the quilt blocks before sewing.
Sew each sashing strip to the adjacent block edge using a 1/4-inch seam, pressing seams open or toward the sashing as preferred for your quilt design. A quarter-inch seam pressed toward the sashing creates less bulk at intersections. Continue adding sashing rows between each horizontal block row until the quilt top is fully assembled.
Step 4: Add Border Strips
Measure the assembled quilt top across the horizontal axis at three points: left edge, center, and right edge. Use the center measurement as your cutting width for border strips, as the quilt top may have expanded or contracted slightly during construction.
Cut two border strips at this measured width plus 2 inches for overlap. Position each strip so it extends 1 inch beyond the quilt top edge on the left side and 1 inch beyond the edge on the right side. This provides the necessary excess for pinning, stitching, and trimming. Sew with a 1/4-inch seam, then fold and check the border alignment at corners before completing the second seam. Trim excess fabric flush with the quilt top edge using rotary cutter and ruler for a clean finish.
Common Sashing Cut Mistakes to Avoid
- Cutting off-grain: Strips cut at an angle will stretch and skew during assembly, causing wavy seams that cannot be pressed flat.
- Ignoring selvage shrinkage: Failing to pre-wash fabric can cause shrinkage after first wash, distorting sashing width by 1/8 inch or more.
- Dull rotary blade: A dull blade crushes fabric fibers instead of cutting cleanly, resulting in frayed edges that affect seam strength.
- Inconsistent strip widths: Even 1/16 inch variation per strip compounds across a quilt — 10 strips off by 1/16 inch equals 5/8 inch total error.
- Mismatched fabric batches: Strips cut from different fabric panels, even from the same bolt, may show shade variation after washing.
How Precise Sashing Cuts Affect Finished Quilt Quality
Inconsistent sashing strip widths create a chain reaction of problems that compound throughout the construction process. A strip cut 1/16 inch narrow, compounded across 10 sashing strips in a quilt, results in a cumulative error of more than 5/8 inch in the finished quilt width. This discrepancy manifests as puckered seams, misaligned borders, and a quilt top that does not lay flat on a bed or display frame.
Professional quilters cut all strips for a single quilt from the same fabric panel to ensure uniform color saturation and hand. Using strips cut from different fabric sections, even from the same bolt, may result in visible shade variation after the quilt is assembled and washed.
Applying Sashing Strip Techniques to Knitting a Buttonhole Band
The precision measuring and cutting methodology for quilting sashing strips applies directly to knitting a buttonhole band. Both crafts require measuring the target dimension twice before cutting, adding precise seam allowance to the cut measurement, and cutting along a straight, stable grain line. In buttonhole band construction, the equivalent seam allowance is the stitch binding-off width, which must match the button diameter plus the buttonhole placket seam depth.
Conclusion
Cutting sashing strips correctly determines whether your quilt top will be flat, square, and professional in appearance. By following the measurement standards of 1.5 to 2.5 inch cut widths for 1 to 2 inch finished sashing, using the 1/4 inch (6.35mm) standard quilting seam allowance, and cutting strips 13 inches long for 12-inch finished blocks, you will achieve the dimensional accuracy required for a quilt top that assembles without distortion. Invest in a quality rotary cutter, a firm-quot ruler, and a self-healing mat, and your sashing cuts will be precise enough for even the most complex quilt designs.
References
- Wikipedia. (2025). Quilting. Wikipedia, The Free Encyclopedia.


