How to Take Up a Skirt: Different Hem Types Explained
Taking up a skirt successfully requires matching your hem technique to the skirt’s original hem type — straight hems use single-fold methods, curved hems require bias cutting, rolled hems need narrow double-folds, and deep hems involve multiple fold layers. The three key variables are the amount to shorten, the skirt’s silhouette, and whether the original hem was cut straight or on the bias. This guide covers identification, tools, step-by-step methods, and expert-backed techniques for every hem type.
Why Hem Type Matters Before You Start
Every skirt has a specific hem construction based on its original design and silhouette. The hem is not just a finishing detail — it is a structural element that controls how the fabric drapes and moves. A straight hem on a pencil skirt allows the fabric to hang vertically, while a curved hem on an A-line skirt allows the flared fabric to sweep gracefully without pulling. Using the wrong technique disrupts this balance and can create visible wrinkles or a twisted hem that twists around the body rather than hanging straight. Identifying the hem type first saves time and prevents irreversible mistakes, particularly when cutting on the wrong grain of fabric.
Identifying Your Hem Type
Before selecting your alteration method, examine the skirt’s existing hem carefully. The four main hem types each suit different skirt silhouettes and fabric weights:
| Hem Type | Found On | Construction |
|---|---|---|
| Straight Hem | Pencil skirts, miniskirts, tailored designs | Cut perpendicular to the selvage, on-grain |
| Curved Hem | A-line skirts, flared skirts, hi-low designs | Cut in a curve, often on the bias grain at sides |
| Rolled Hem | Casual skirts, maxi skirts, lightweight fabrics | Narrow 1–2cm hem that rolls to the wrong side |
| Deep Hem | Pleated skirts, formal wear | Wide turned-up section 3–5cm with multiple fold layers |
Straight Hem
Straight hems are found on pencil skirts, miniskirts, and tailored designs. The hem edge is cut perpendicular to the selvage — meaning it runs on-grain with the fabric’s warp threads. This is the simplest hem type to alter because cutting straight maintains the fabric’s stability and prevents unexpected stretching or shrinking during pressing and wearing.
Curved Hem
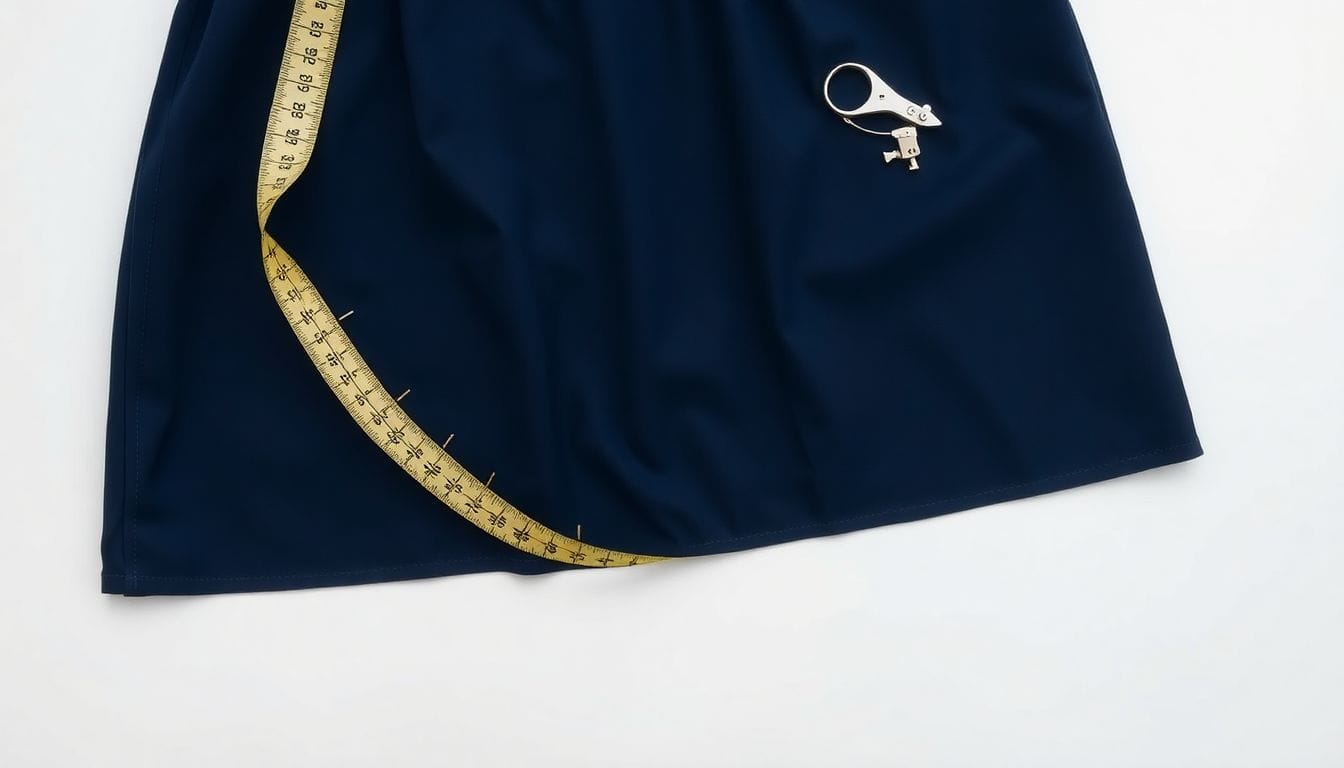
Curved hems are found on A-line skirts, flared skirts, and hi-low designs. The hem edge is cut in a curve, typically on the bias grain at the sides. When fabric is cut on the bias (at a 45-degree angle to the selvage), it gains fluidity and drapes naturally in curves. This is why bias-cut hems on A-line skirts sweep outward gracefully rather than hanging stiffly.
The critical distinction with curved hems is that they must be cut along the bias grain to maintain the original hem’s flow. Cutting a curved hem straight (on-grain) eliminates the bias stretch — referred to by professional tailors as “killing the bias” — causing the hem to pucker, pull, and refuse to lie flat against the body.
Rolled Hem
Rolled hems are found on casual skirts, maxi skirts, and lightweight fabrics. A rolled hem is a narrow hem (typically 1–2cm) that rolls naturally to the wrong side of the fabric, enclosing the raw edge without requiring a separate facing or binding. This hem type is common on flowy fabrics like chiffon, georgette, and lightweight cotton where a wider hem would add unnecessary bulk. For more on working with lightweight fabrics, see the guide to working with lightweight fabrics.
Deep Hem
Deep hems are found on pleated skirts and formal wear. They feature a wide turned-up section (3–5cm) with multiple fold layers that create a substantial hem allowance. Deep hems allow for future alterations — pleated skirts in particular often have very deep original hems precisely because the pleats need adequate fabric to maintain their shape and fullness when adjusted. The multiple fold layers also add weight to the bottom of the garment, helping formal skirts hang properly.
Tools and Materials Needed
Having the right tools ensures professional-quality results when taking up a skirt. The best sewing machines for beginners can handle most hemming tasks, though hand-sewing works well for delicate fabrics. Essential items include:
- Measuring tape
- Fabric chalk or water-soluble marker
- Sharp fabric scissors (shears) — never use dull scissors, which crush fabric fibers rather than cutting cleanly
- Pins or clips — use clips for thick or slippery fabrics where pins may not hold
- Hand sewing needle (for delicate fabrics) or sewing machine with appropriate needle for your fabric weight
- Thread matching the skirt fabric — use 100% polyester thread for synthetic fabrics and cotton-wrapped polyester for natural fibers
- Pressing iron and ironing board — a proper press is essential to set stitches and shape the hem
- Seam gauge or hem marker — an adjustable hem marker is particularly useful for curved hems
How to Take Up a Skirt: Step-by-Step
Follow these five steps for any hem type, adjusting the technique based on your specific hem construction.
Step 1 — Determine the Target Length
Try on the skirt and pin up to the desired length. Sit down and check that the length feels comfortable — skirts typically need 2–3cm extra length to allow for sitting without the hem riding up excessively. Mark the target length with fabric chalk at the center front and center back. Measure from floor to mark for reference and note this measurement — it will be your guide for checking evenness all around the hem.
For asymmetrical hi-low skirts, treat each section individually. Mark the target length at the center front, center back, and the low point of the asymmetrical edge. Connect these points smoothly with chalk before proceeding.
Step 2 — Measure and Mark the Hem Allowance
Decide on hem allowance based on your hem type. The basting stitch should be loose enough to remove easily but tight enough to hold the fold in place during pressing.
- Straight hems: 1.5–2cm hem allowance
- Rolled hems: 2–3cm hem allowance
- Curved hems: 2–3cm hem allowance
- Deep hems: 3–5cm hem allowance
Use a hem gauge or measuring tape to draw a parallel line at the hem allowance distance below your target line. Mark all around the hem edge at this measurement. For curved hems, this is particularly challenging — an adjustable hem marker with a sliding guide is the most effective tool for maintaining an even distance from the target line along a curve.
Step 3 — Cut the Excess Fabric
Straight hems: cut straight across, perpendicular to the selvage grain. The cut must be straight and level — any deviation will show in the finished hem. Use a ruler and fabric chalk to draw the cutting line before using shears.
Curved hems: cut along the existing curve, maintaining the bias angle at the side seams. This preserves the bias grain that allows the curved hem to drape naturally. Use sharp shears and cut in one smooth motion — don’t chop or saw, which creates jagged edges. For curved hems, use shears to make small triangular clips into the seam allowance (not through the hem itself) at intervals of 2–3cm around the curve. These clips release the tension that would otherwise cause the bias edge to pucker when the hem is folded and pressed.
After cutting, serge the raw edge or apply a zigzag stitch to prevent fraying. This is especially critical for woven fabrics like cotton, linen, and wool suiting. Knit fabrics generally do not require serging because they resist fraying due to their looped construction.
Step 4 — Prepare the Hem Edge
Straight hems: press a single fold (wrong side to wrong side) at the hem line; then fold again to the inside, enclosing the raw edge. The first press should be at the chalk line, creating a clean fold. The second fold brings the hem to the inside of the skirt. Press each fold thoroughly before pinning — pressing as you go produces crisper results than pressing at the end.
Curved hems: the bias-cut edge will naturally curve — this is expected and correct. Press gently and ease any pulling by steam-pressing and allowing the fabric to relax. Do not force a bias-cut edge flat or use heavy pressure, as this can distort the shape permanently. For very full curves, pin at the notches (clips) first, then distribute the excess evenly between pins before pressing.
Rolled hems: fold once 1cm to the wrong side, press, then roll again to enclose the raw edge completely. The rolled hem should be narrow (0.5–1cm visible on the right side) and roll naturally without requiring basting stitches to hold it in place on lightweight fabrics. For medium-weight fabrics, a few loose basting stitches may be needed to keep the roll in place during stitching.
Deep hems: press the inner fold and baste if needed before final stitching. Deep hems often have multiple fold layers — the outermost fold is the hem edge, and an inner fold creates the finished height of the hem. Baste through all layers at the fold lines to prevent shifting during the final stitching.
Step 5 — Stitch the Hem
Machine stitch on straight hems: use a straight stitch 0.5cm from the inner fold. For visibility (contrast thread) or durability (matching thread), adjust accordingly. On medium-weight fabrics, a slightly wider seam allowance (0.7–1cm) provides more strength. On sheer fabrics, a narrow seam (0.3–0.4cm) is less visible from the right side.
Hand stitch on delicate fabrics: use a blind hem stitch or slip stitch. The blind hem stitch catches a few threads of the outer fabric on each stitch while taking a small bite of the hem fabric, creating an nearly invisible finish. The slip stitch (also called a ladder stitch) is ideal for closing openings in lined garments or for hemming knits where the fabric stretches during stitching.
For thick fabrics (wool, denim, velvet): consider a twin-needle or serged finish for durability. A twin-needle creates two parallel lines of stitching on the right side with a zigzag pattern on the underside that allows the hem to stretch without breaking stitches. Serged finishes trim and overlock the raw edge in one step and are particularly effective for heavy knits and fleece.
Press the finished hem upward into position after stitching. Final pressing sets the stitches and shapes the hem to the skirt’s silhouette. For curved hems, a ham or dressmaker’s ham is essential for pressing the curved edge without creating unwanted creases in the main body of the skirt.
Hem Type by Skirt Style Reference
| Skirt Style | Typical Hem Type | Take-Up Method | Recommended Allowance |
|---|---|---|---|
| Pencil Skirt | Straight | Single or double fold | 1.5–2cm |
| A-Line | Curved | Bias cut and single fold | 2–3cm |
| Flared/Maxi | Curved | Bias cut, may need lining adjustment | 2–3cm |
| Pleated | Deep | Unpick original hem, re-fold | 3–5cm |
| Mini | Straight | Single fold, often minimal | 1–1.5cm |
| Hi-Low | Asymmetric | Treat each section individually | 2–3cm |
Common Mistakes When Taking Up a Skirt
Five common mistakes that professional tailors cite as the primary causes of failed home alterations are:
- Cutting off the selvage edge without accounting for fraying — The selvage is the tightly woven finished edge of fabric that resists fraying. When you cut into or remove it, the raw cross-grain edge is exposed and will fray progressively with washing. Always finish the raw edge with a zigzag, serge, or French seam before hemming. Alternatively, leave the selvage intact if it falls within your hem allowance.
- Not checking the grain alignment before cutting — A twisted hem is one of the most visible signs of a DIY alteration gone wrong. Before cutting, hang the skirt overnight with pins in the target position. If the side seams drift noticeably toward the front or back, the skirt may need a full side seam adjustment, not just a hem correction. A twisted hem indicates the side seams aren’t hanging vertically — a more fundamental issue than hem depth alone.
- Using the wrong hem allowance for the fabric weight — Heavyweight fabrics (denim, wool coating) need more clearance between the hem fold and the finished edge to avoid bulk. Using 1.5cm on a thick wool skirt creates a rigid, lumpy hem that does not drape naturally. For heavyweight fabrics, use 2.5–4cm depending on the fabric thickness.
- Skipping the fit check before cutting — Body weight fluctuates seasonally and over years. Always try on the skirt and check the target length with movement (sitting, walking, bending) before cutting. Adding length is straightforward; removing fabric is not. If the skirt feels tight at the waist, factor this into your alteration plan — taking up the hem is only part of the adjustment needed.
- Attempting to take up a curved hem without bias cutting — This is the most technically critical error. Cutting a bias-cut hem straight eliminates the bias grain’s natural drape and stretch, causing the hem to pucker, pull, and refuse to lie flat. The bias grain allows a curved hem to spread and settle naturally; without it, the hem is structurally compromised. Always re-cut curved hems along the original bias angle, not perpendicular to the selvage.
Taking Up Skirts With Lined Fabrics
Lined skirts require an additional step that separates the lining adjustment from the outer fabric adjustment. Linings are typically cut separately from the outer fabric and are designed to hang 1–2cm shorter than the outer fabric — this prevents the lining from showing below the hem of the skirt when viewed from the front.
To alter a lined skirt:
- Take up the outer fabric first following the steps above, using the appropriate hem type method.
- Turn the skirt inside out and locate the lining hem. The lining is usually attached to the waistband or facing at the top, and hangs freely at the bottom.
- Measure and mark the lining hem to hang 1–1.5cm above the finished outer hem. The lining should never be visible below the skirt hem, but it should not be so short that it pulls away from the outer fabric.
- Fold and stitch the lining hem using a straight stitch — linings are typically lightweight fabric (bemberg rayon, acetate, or lightweight polyester) that does not require a rolled or deep hem.
- Blind stitch the lining to the waistband seam allowance or tuck it into the hem allowance of the outer fabric. This secures the lining in place so it cannot shift or ride down during wear.
For skirts with facings rather than linings: ensure the facing is also shortened to match the new hem position. Facings are cut from the same fabric as the skirt and provide a clean finish at the waistline. If the facing is not adjusted along with the hem, it will pull away from the body or create an uneven transition between the facing and the skirt body.
If the skirt has a full lining that is attached at the hem (closed lining), you will need to open the lining hem stitching, adjust both layers separately, and then reseal the lining. Use a seam unpicker carefully to avoid damaging the outer fabric. Some fully closed linings require professional alteration due to the precision required to reopen and reseal the lining without leaving visible marks on the outer fabric.
Frequently Asked Questions
Q: Can you take up a skirt without sewing?
A: Using fabric glue or hem tape provides a temporary hold but will fail with washing and wear. For a permanent alteration, sewing with a machine or hand stitch is required — the type of stitch depends on the fabric weight and visibility preference. Hem tape (fusible web tape activated by heat from an iron) creates a stronger bond than fabric glue and can last through several wash cycles, but it is still not considered a permanent solution for skirt alterations.
Q: How much does it cost to take up a skirt professionally?
A: Professional alterations typically cost $10–$25 for a simple straight hem on a pencil or miniskirt and $20–$40 for a curved hem, as curved hems require more skill and time to cut and stitch correctly. Pleated skirts and formal wear with deep hems may cost more due to the additional steps required to unpick, adjust, and reseal pleats or multiple fold layers. Some tailors charge by the hour for complex alterations, with rates typically ranging from $30–$60 per hour.
Q: Can you take up a skirt that has a curved hem?
A: Yes — curved hems must be cut on the bias grain to maintain the flow of the original hem. Cutting a curved hem straight (on-grain) will result in a hem that puckers, pulls, and does not lie flat against the body. The key is to mark the new hemline following the original curve, then cut along that curve while preserving the bias grain at the side seams. The bias-cut edge gives the hem its natural drape and allows it to spread around the curve of the skirt’s silhouette.
Q: How do you take up a pleated skirt?
A: Pleated skirts require unpicking the original hem stitching, adjusting the pleat depth to redistribute the fullness, and re-stitching the hem. The pleat pattern must remain consistent throughout — this means measuring each pleat individually and ensuring the pleat edges (the creases) align both before and after the alteration. This is a more advanced alteration typically requiring professional help, particularly for knife-pleated skirts where the pleats are deeply pressed and must maintain their shape. A single misaligned pleat is highly visible and difficult to correct once the hem is restitched.
References
- Threads Magazine. (2024). Hemming Guide: Professional Techniques for Every Fabric. threadsmagazine.com
- Colette. (2024). The Art of Garment Alterations. colette.com
- Seamwork. (2024). Hemming: A Comprehensive Sewing Reference. seamwork.com
- CottonWorks. (2024). Fabric Care and Maintenance Guide. cottonworks.com
- Tilly and the Buttons. (2024). How to Hem: Professional Finishing Techniques. tillyandthebuttons.com


