How to Sew a Straight Stitch: The Foundation of All Sewing
A straight stitch is sewn by setting your sewing machine to the straight stitch position, using a medium stitch length of 2.5mm, and sewing at a consistent pace without pulling or pushing the fabric — this creates the strongest, most durable seam used in the vast majority of all sewing projects. The stitch penetrates both layers of fabric and locks together at each end with a backstitch for permanence. Once you master this single technique, you unlock the ability to construct garments, quilt layers, hem fabrics, and assemble home decor items with professional-grade durability.
The straight stitch is the most fundamental technique in sewing — every decorative stitch, every complex construction method, every advanced technique builds directly on this single skill. Understanding why the straight stitch works, how your machine creates it, and how to troubleshoot it separates beginner sewists who fight their machines from confident makers who produce clean, professional results every time.
What Is a Straight Stitch and Why Is It the Foundation?
A straight stitch is the most basic sewing machine stitch — one thread up, one thread down, locking together at regular intervals to form a continuous line of secure stitches. The stitch types and their uses guide explains that the straight stitch creates the strongest seam construction in garment making and home decor because the needle penetrates both fabric layers at identical intervals, creating a column of locked threads that distributes stress evenly along the seam. This foundation stitch appears across seams, hems, quilting, topstitching, and structural assembly in the vast majority of all sewing projects.
Three variables control straight stitch quality on every project. Stitch length — measured in millimeters (mm) — controls how much fabric is fed under the needle between each stitch, with 2.5mm as the standard medium setting. Thread tension balances top thread and bobbin thread to keep stitches flat and even, with a standard starting point of 4 on the tension dial. Needle position is centered for standard straight stitching and adjustable on some machines for edgestitching precision. All other decorative stitches — zigzag, satin stitch, mock overlock — are built on mastering this foundation first.
Tools and Materials Needed
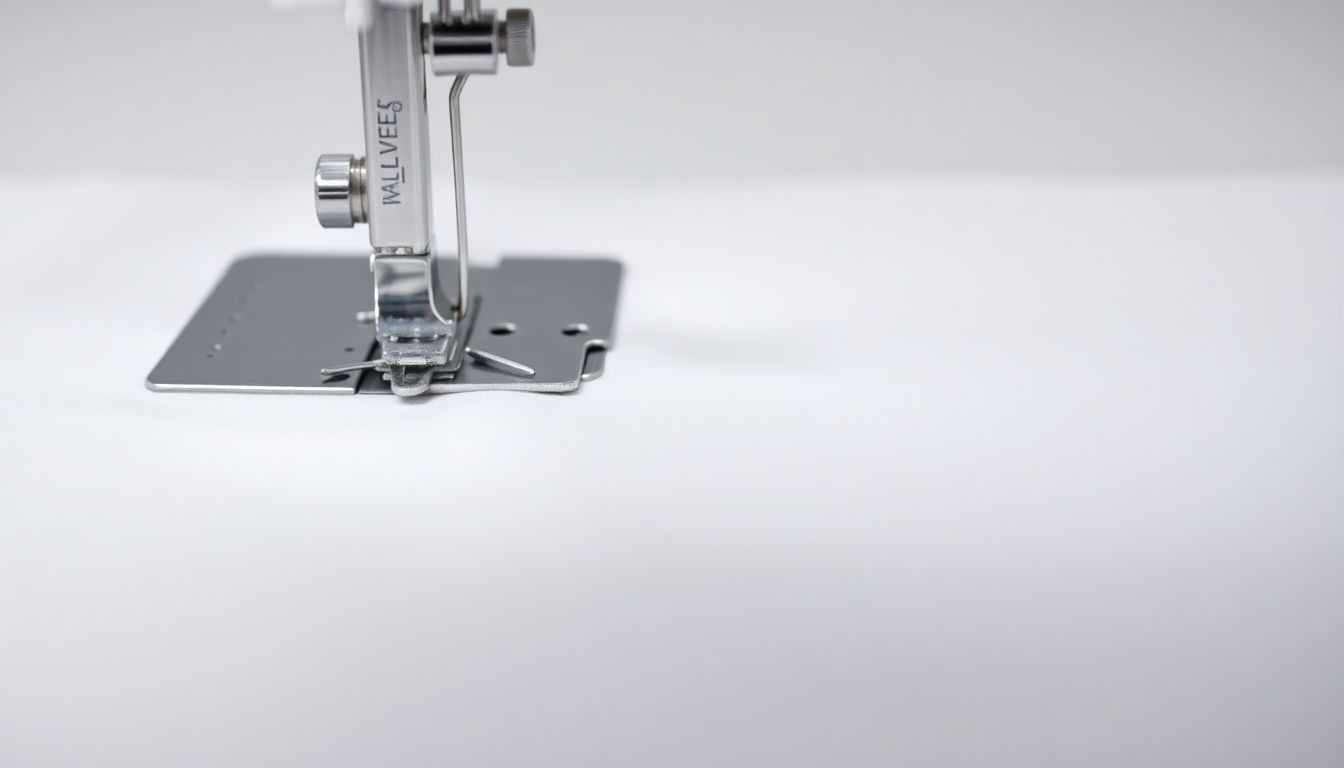
Straight stitch sewing requires minimal equipment — every standard sewing machine has straight stitch capability, and the remaining supplies are basic notions found in any sewist’s kit. The core tool is the sewing machine itself, which provides the straight stitch function through its basic construction: a needle that moves vertically, a bobbin beneath the fabric layers, and feed dogs that pull the fabric through at a controlled rate. All machines include this capability by default, making it the most accessible technique in sewing.
- Sewing machine with straight stitch capability (all machines include this)
- All-purpose sewing thread — polyester or cotton-wrapped polyester in a weight that matches your fabric
- Universal needles — size 80/12 for medium-weight fabrics, 70/10 for lightweight fabrics, and 90/14 for heavyweight fabrics
- Fabric layers to be joined (two layers minimum for a seam)
- Seam ripper for corrections
- Fabric scissors, Pins, and a seam gauge
The needle size directly affects stitch quality. A needle too large for your fabric creates visible holes; a needle too small increases the risk of skipped stitches and thread breakage. Needle size 70/10 suits sheer or lightweight woven fabrics. Needle size 80/12 suits medium-weight cottons and linens. Needle size 90/14 suits denim, canvas, or upholstery-weight fabrics. The how to choose the right sewing needle for your fabric guide covers this selection in detail.
How to Sew a Straight Stitch: Step-by-Step
The straight stitch process involves ten controlled steps. Each step affects the final result, and skipping any step — particularly backstitching — is the most common cause of seams that unravel in finished garments. Follow each step in sequence to produce a seam that locks securely and presses flat.
- Prepare your machine — Insert the needle correctly with the flat side facing the back of the machine, then thread the machine top and bobbin following the threading diagram printed on your machine’s arm. Pull both threads to the back of the machine and tuck them under the presser foot.
- Set stitch length — Turn the stitch length dial to 2.5mm for medium-weight fabric. Use 2.0mm for lightweight fabric or 3.0mm for heavyweight fabric. On most machines, the straight stitch is set at the “0” position — not the zigzag position. Never use the zigzag setting for straight stitching.
- Set stitch width — The straight stitch width is fixed at the center needle position (3.5mm on most machines). Do not attempt to adjust the width dial for straight stitching — center needle position is the correct setting.
- Position fabric — Place fabric layers with right sides together under the presser foot. Align the fabric edge with your desired seam allowance — typically 5/8 inch (1.5cm) for garment seams. The seam guide on the needle plate helps maintain consistent allowance.
- Lower the presser foot — Press the foot pedal or presser foot lever to lower the foot and hold the fabric in place. This activates the feed dogs, which pull the fabric through at a controlled rate.
- Sew the seam — Begin sewing slowly, keeping the fabric edge aligned with your chosen seam guide. Maintain steady speed throughout — do not pull or push the fabric. The feed dogs control the fabric movement; your hands simply guide alignment.
- Backstitch at the beginning — After sewing 3-4 stitches forward, sew 3-4 stitches backward to lock the seam. This creates a reinforced section that prevents unraveling at the seam’s start. Backstitching is non-negotiable for any structural seam.
- Continue sewing — Sew the full length of the seam at your chosen stitch length, keeping the fabric edge aligned with the seam guide. Consistent speed produces consistent stitch length.
- Backstitch at the end — Before reaching the fabric end, reverse and sew 3-4 stitches backward to lock the seam at its terminus. This step is equally important as backstitching at the beginning.
- Clip threads and press — Raise the presser foot, pull the fabric to the back of the machine, and clip threads at 3-4 inches. Press the seam flat with an iron set to the appropriate temperature for your fabric — this sets the stitches and professionalizes the finished seam.
The how to thread a sewing machine correctly guide covers machine preparation in more detail, but the most critical point is: always thread with the presser foot raised. This opens the tension disks fully, allowing the thread to seat properly when you lower the foot.
Common Mistakes and How to Fix Them
Straight stitch problems are among the most common issues new sewists encounter. Every symptom has a specific cause and a targeted fix — understanding this diagnostic relationship turns frustrating machine behavior into solvable puzzles. Most problems trace back to one of five root causes: incorrect needle insertion, improper threading, mismatched thread tension, wrong stitch length for the fabric weight, or feed dog misconfiguration.
| Problem | Cause | Fix |
|---|---|---|
| Skipped stitches | Needle inserted incorrectly, dull needle, wrong needle type for fabric | Reinsert needle with flat side facing back, replace needle if bent or used for 8+ hours, use ballpoint needle for knit fabrics |
| Puckered seam | Presser foot pressure too high, pulling fabric while sewing, lightweight fabric without stabilizer | Reduce pressure if your machine allows adjustment, use a walking foot, never pull fabric — guide only |
| Loopy stitches on underside | Incorrect threading, bobbin inserted incorrectly, bobbin wound unevenly | Rethread completely with presser foot raised, remove and reinsert bobbin, rewind bobbin evenly on a new spool |
| Uneven stitch length | Inconsistent sewing speed, fabric slipping at seam guide, feed dogs need cleaning | Practice maintaining steady speed, use a seam guide or walking foot, clean feed dogs with a small brush |
| Fabric not feeding | Feed dogs lowered, wrong presser foot installed, very slippery fabric | Raise feed dogs (dial or switch on machine front), use standard zigzag foot for straight stitch, use a walking foot for silk or satin |
Thread tension problems manifest as loops on either side of the fabric. When loops appear on the underside of the fabric, the top tension is too loose — increase the tension dial. When loops appear on the top surface, the top tension is too tight — decrease the dial. The standard starting point is 4 on your tension dial, and small adjustments of 0.5 to 1 unit make measurable differences in stitch quality.
Straight Stitch vs. Other Stitches: When to Use Each
Understanding when to use a straight stitch versus other stitch types prevents both over-engineering and under-engineering your seams. Each stitch serves a specific purpose, and using the right stitch for the right application produces better results with less effort. The straight stitch creates the strongest connection between fabric layers because every stitch goes straight down and locks at the same point, distributing stress evenly along the seam line.
| Technique | Best Use | Why Not Others |
|---|---|---|
| Straight stitch | Structural seams, hems, topstitching, quilting, basting | — |
| Zigzag stitch | Stretch seams, preventing fraying, decorative edges, rolled hems | Too bulky for structural seams, not needed for non-stretch wovens |
| Triple straight stitch | Heavy-duty seams, stress points, activewear, denim | Takes significantly longer to sew, over-engineered for light use |
| Decorative stitches | Ornamental topstitching, embellishment, heirloom stitching | Not strong enough for structural seams, designed for visibility not durability |
Zigzag and decorative stitches spread their stitches across a wider area, which allows fabric to stretch — essential for knits, but redundant and slower for non-stretch wovens where maximum strength is the goal. The straight stitch’s column-of-locked-threads structure resists separation along the seam line in a way that wider stitches cannot match.
Pressing Your Straight Stitch Seams
Pressing is not optional — it is a construction step. A well-pressed seam looks professional, ensures the garment hangs correctly, and distributes bulk evenly. Skipping pressing is the single most common reason finished garments look homemade rather than professionally made, regardless of how precise the stitching is. Always press seams open or to one side after sewing, using a dry iron set to the appropriate heat for your fabric content.
- Press on the wrong side first to see how the seam sits without committing to the final result
- Press the seam flat while it is still warm from sewing — thread fibers compress better when heated
- Use a pressing cloth between the iron and delicate fabrics to prevent shine or scorch marks
- Press the seam from both sides for heavyweight fabrics that hold bulk
The how to press seams like a professional guide covers steam settings, pressing tools, and techniques for specific seam types including French seams, flat-felled seams, and complex multi-layer constructions.
Frequently Asked Questions
These common questions about straight stitch technique come up frequently in sewing instruction and address the most frequent pain points for sewists learning this foundational technique. Each answer provides the specific technical guidance you need to apply the straight stitch correctly in your projects.
Stitch Length for Cotton: The 2.5mm Standard
Use 2.5mm stitch length for medium-weight cotton. Lightweight cotton works well at 2.0mm, and heavyweight canvas or denim at 3.0mm. The shorter the stitch, the more dense and strong the seam; longer stitches are faster but less secure. Adjusting stitch length for fabric weight is one of the most effective ways to improve seam quality without changing any other machine setting.
Backstitching: Locking Seams at Start and End
Yes — always backstitch 3-4 stitches at the beginning and end of any structural seam. This locks the stitches and prevents unraveling. For purely decorative topstitching, you can leave the ends unbackstitched for a cleaner look. Backstitching is the single most skipped step by beginners and the most common cause of seams that come apart in finished garments.
Straight Stitch on Stretch Fabric: Why It Fails
A straight stitch alone will break when stretch fabric is pulled — use a zigzag or a stretch stitch instead. If you must use straight stitch on knits, sew with a ballpoint needle and slightly lengthen the stitch to 3.0mm to allow some give. The straight stitch’s rigid vertical locking structure has no mechanisms to accommodate stretch, making it incompatible with knit fabrics without modification.
Straight Stitch vs. Zigzag: Structural Difference
A straight stitch uses one line of stitching with threads locking vertically between fabric layers. A zigzag stitch creates a side-to-side motion that covers a wider area and allows the fabric to stretch without breaking — essential for knit fabrics and rolled hems. The straight stitch’s column-of-locked-threads design maximizes seam strength in woven fabrics where stretch is not required.
Authoritative Sources on Straight Stitch Techniques
- Treasurie Sewing. (2024). Stitch Length Technical Reference Guide. Treasurie Sewing Blog.
- Treasurie Sewing. (2024). Sewing Machine Thread Tension: Symptoms and Adjustments. Treasurie Sewing Blog.
- Singer. (2024). Sewing Machine Tutorials and Stitch Guides. Singer.
- American Sewing Guild. (2023). The Complete Guide to Sewing Techniques. Singer Sewing Reference Library.


