How to Start Weaving – A Beginner’s Guide
Weaving is a technique for producing fabric by interlacing two yarn sets—warp (vertical) and weft (horizontal)—at right angles. This beginner’s guide covers the fundamentals: the mechanics, required equipment, setup procedures, and common beginner patterns.
What is Weaving and How Does It Work?
Weaving is the process of interlacing yarns, cloth, and thread to produce fabric. This ancient craft originated independently across multiple civilizations, including those in Egypt, China, Peru, and India. The fundamental principle remains consistent across all traditions: two perpendicular thread systems lock together to form a stable textile structure.
Weaving requires two core setups: a loom to hold the warp threads under tension, and a shuttle or pick to carry the weft thread across the warp. The warp—the longitudinal threads—runs parallel to the loom’s front and back beams and is looped over or secured to the warp beam. The weft is then passed through the openings (sheds) created between successive warp threads.
The weaver controls three key variables to produce consistent fabric: thread tension (typically 8–12 lbs for table looms), beat force (the pressure applied when packing the weft), and weft insertion angle (ideally 90° to the selvage). Common weaving defects—including uneven selvedges and warp distortions—result from inconsistent tension control during the shedding and picking phases.
The weave structure determines the fabric’s final properties. Three primary weave types dominate textile production: plain weave (the simplest interlacing at 1:1 over-under), twill weave (producing a characteristic diagonal pattern with a 2:2 or 3:1 float), and satin weave (creating a smooth surface with long floats). These structures directly influence fabric drape, tensile strength, and air permeability.
Floor space requirements vary significantly by loom type. A rigid heddle loom for scarf weaving occupies approximately 24″ × 30″ of table space, while a standard 4-shaft floor loom requires a minimum of 60″ × 84″ of floor space with an additional 36″ of depth clearance behind the loom for warp stretching.
Once all materials are assembled, the weaver proceeds directly to warping and threading the loom.
Weaving Terminology
The following terms are essential for understanding weaving patterns and processes. Each definition reflects standard textile engineering nomenclature used in industry and education.
Loom

A loom is a device that holds warp threads in fixed longitudinal positions while the weaver manipulates them. Looms are classified into two principal categories: frame looms (where the warp is stretched within a rectangular frame) and pit looms (where the warp extends into a pit below floor level for increased tension capacity). Each category further subdivides into table looms, floor looms, and handheld variants. The International Textile Manufacturers Federation (ITMF) recognizes six standard loom classifications used in commercial textile production worldwide.
A heddle is a rigid device—typically constructed from wooden slats, metal wires, or polymer strips—that separates and guides individual warp threads during the shedding motion. Heddles are mounted on shafts; a 4-shaft loom can hold up to 4 different warp thread groups, enabling complex pattern weaving. The spacing between heddle wires (reed dent spacing) determines the fabric’s sett (threads per inch), commonly expressed as 6, 8, 10, or 12 dents per centimeter.
Heddle
A heddle is a rigid device—typically constructed from wooden slats, metal wires, or polymer strips—that separates and guides individual warp threads during the shedding motion. Heddles are mounted on shafts; a 4-shaft loom can hold up to 4 different warp thread groups, enabling complex pattern weaving. The spacing between heddle wires (reed dent spacing) determines the fabric’s sett (threads per inch), commonly expressed as 6, 8, 10, or 12 dents per centimeter.
Warp
The warp is the set of longitudinal threads that run parallel to the finished fabric’s length. Warp threads are placed under constant tension during weaving, typically ranging from 8 to 15 lbs depending on yarn count and fabric structure. They must possess high tensile strength (minimum 200 MPa for cotton, 350 MPa for linen) and low elasticity to maintain consistent fabric dimensions throughout the weaving process.
Weft
The weft is the transverse thread inserted horizontally across the warp. Unlike warp threads, the weft experiences minimal tension during insertion—typically 0.5 to 2 lbs of force—and must have sufficient flexibility to curve around warp threads at each intersection. The weft yarn count is often finer than the warp (e.g., 20/2 cotton for warp versus 5/2 cotton for weft in the same fabric) to facilitate smooth insertion and beat-up.
Shed
The shed is the temporary opening formed between two groups of warp threads when they are separated by the heddles. This opening allows the weft to pass through the warp without excessive abrasion. Standard shedding rates range from 80 to 120 picks per minute on hand-operated looms, and up to 400 picks per minute on modern rapier looms in industrial settings.
The Three Primary Weaving Motions
All weaving processes execute three fundamental motions in sequence to produce interlaced fabric. These motions—shedding, picking, and beating—define the mechanics of how any loom functions, from a simple cardboard loom to a fully automated industrial Jacquard system.
Shedding
Shedding is the operation where the weaver raises or lowers specific warp threads (controlled by heddles on different shafts) to create an opening between two sets of warp threads. This opening is the shed. In a 4-shaft loom, the weaver controls which shaft group rises, determining the shed geometry. Standard shedding sequences for plain weave alternate between two shafts; twill weave typically requires three or four shafts in a stepped sequence.
Picking
Picking is the insertion of the weft thread through the shed created during the shedding motion. The weft passes from one side of the loom to the other, traveling over and under alternating warp threads according to the weave structure. Shuttle speed during picking averages 8–12 meters per second on hand looms using a standard boat shuttle. The weft thread must maintain consistent thread angle at both selvedges—ideally 85° to 95° relative to the warp—to produce straight selvages.
Beating
Beating (also called beat-up) is the action of pressing the newly inserted weft thread firmly against the previously woven fabric edge (the fell of the cloth). Beat force directly controls fabric density (ends per inch × picks per inch). Excessive beat force creates overly tight fabric with reduced flexibility; insufficient force produces loose, unstable fabric. Industry standard beat force for cotton shirting fabric is approximately 25–35 N, applied at a rate of 80–120 beats per minute.
Loom Types and Their Characteristics
Selecting the appropriate loom type depends on three primary factors: the intended fabric dimensions, the complexity of patterns desired, and the available floor space. Each loom type offers distinct advantages and limitations for specific weaving applications.
The floor loom is the most common professional-grade loom, featuring two or more rows of heddles mounted on shafts, a front beam for weft guide, and a warp beam for tensioning. Standard floor looms accommodate warp lengths of 6 to 12 yards and widths up to 60 inches. They produce the full range of weave structures, including complex twills, satins, and dobby patterns.
Table looms and hand-held rigid heddle looms are suitable for portable use and small-scale projects. Rigid heddle looms operate with a single heddle slot width (typically 32″ or 40″) and produce plain weave and simple twill structures. Table looms with 4 shafts extend pattern capability to include houndstooth, herringbone, and basket weaves.
| Loom Type | Weight | Width Capacity | Warp Length | Shed Configurations | Best For |
|---|---|---|---|---|---|
| Floor Loom | 80–150 lbs | Up to 60″ | 6–12 yards | 6+ (4-shaft standard) | Complex patterns, professional production |
| Table Loom | 12–25 lbs | 16″, 24″, or 32″ | 3–6 yards | 4 (2 pairs heddles) | Small projects, beginner twills |
| Rigid Heddle | 2–6 lbs | 32″ or 40″ | Varies | 1 (single heddle) | Portable weaving, plain weave, simple twills |
| Lap Loom | Under 2 lbs | 10″–16″ | Short | 1 (simple frame) | Scarves, samples, beginners |
Floor Loom
Standard floor looms contain two rows of shafts, with three pairs of heddles per row, creating six distinct shed configurations (sheds) for warp thread separation. The warp beam on a floor loom has a standard diameter of 3 to 4 inches and can hold warp lengths of 9 to 12 yards when fully wound. Floor looms with 4 shafts produce approximately 90% of commercially woven cotton fabrics.
Table Loom
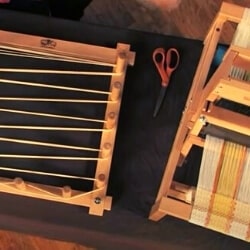
Table looms feature a compact single-row shaft arrangement with two pairs of heddles, producing four shed positions. Standard table loom widths are 16″, 24″, and 32″, with warp capacities of 3 to 6 yards. The 4-shed configuration enables basic twill patterns in addition to plain weave. These looms weigh 12 to 25 lbs and sit on a table surface with a height of approximately 18 inches.
Handheld Rigid Heddle Loom
Rigid heddle looms are the most portable loom type, weighing between 2 and 6 lbs. The fixed heddle ( reed ) contains slots sized to the desired sett: common reed dent spacings are 6 dent/cm (for bulky yarns at 4–6 epi), 8 dent/cm (medium yarns at 8–10 epi), and 12 dent/cm (fine yarns at 12–15 epi). These looms do not require height clearance and can be used on a lap, table, or floor.
Lap Loom
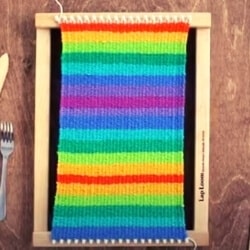
Lap looms are compact frame looms designed to rest on the weaver’s lap, with standard widths of 10″ to 16″. These beginner-friendly looms produce finished pieces of 8″ to 14″ width and are particularly suited for weaving samples, scarves, and small home decor items. They are the most affordable loom category, retailing between $20 and $80.
Building a Frame Loom From a Wooden Frame
For weavers who prefer to avoid purchasing a commercial loom, a sturdy wooden frame serves as a functional alternative. This approach suits rigid heddle weaving and produces quality plain weave fabrics.
Materials Required:
A wooden frame (minimum 18″ × 24″), pencil, ruler, scissors, small nails or tacks (1″ finishing nails), a hand drill or hammer, and pliers.
Step One: Mark the Frame Edges
Measure and draw lines 1 inch inward from all four inner edges of the frame using a ruler and pencil. This establishes the working weaving area and provides a margin for securing the frame.
Step Two: Mark Nail Positions Evenly Along the Length
Mark nail insertion points along both side rails at equal intervals. The gap between nails determines the sett (ends per inch) of your finished fabric. A 6mm gap produces approximately 4 ends per inch (suitable for chunky scarves); a 3mm gap produces approximately 8 ends per inch (suitable for medium-weight fabric). A standard beginner sett of 5mm produces roughly 5 ends per inch.
Step Three: Insert the Nails
Drive nails or tacks into the marked positions on both side rails to a depth of approximately 3/4 inch. Use a drill for pilot holes if working with hardwood frames, or a hammer for softwood. Ensure all nails are inserted to the same depth to maintain consistent warp height.
Step Four: Begin Warping
Tie the warp yarn to the nail in the top-left corner. Draw the yarn horizontally to the corresponding nail on the right rail, loop it around that nail, and return to the left rail. Continue this process until the desired number of warp ends (threads) fills the frame width.
Building a Loom Using Cardboard
Cardboard looms are the simplest and most accessible starting point for beginning weavers. Cardboard thickness should be minimum 2mm (corrugated cardboard) to prevent warping under tension. Thicker cardboard produces more durable looms that maintain their shape through multiple projects.
Materials Required:
A piece of corrugated cardboard (minimum 12″ × 16″), pencil, ruler, scissors, and yarn.
Step One: Lay the cardboard flat on a work surface with the corrugated side facing up. The corrugation direction determines the warp orientation.
Step Two: Decide on warp direction. Draw warp lines perpendicular to the intended warp thread direction to use as cutting guides.
Step Three: Mark cutting points along both long edges. For a standard 1/4″ (6.35mm) warp spacing, mark points at 1/4″ intervals along both edges, ensuring alignment between opposite marks. For fine sett weaving, reduce spacing to 1/8″ (3.175mm).
Note: Start marking from the center outward in both directions to ensure the warp remains centered on the cardboard. Misaligned marks on opposite edges produce diagonal warp distortion.
Step Four: Cut slots at each marked point to a depth of 1/4″ using sharp scissors. Cut slightly deeper than the nominal slot depth to accommodate yarn thickness.
Step Five: Glue two cardboard strips (1/2″ × 4″) below the cutting line on each end. These strips create clearance space for the weft to pass under the warp without catching.
Step Six: Thread the warp yarn through the slots, starting from the center and working outward. Tie the first thread to the top-left slot.
Essential Tools for Weaving
Beyond the loom, three specific tools enable the fundamental shedding, picking, and beating motions. Each serves a distinct mechanical function in the weaving process.
- Shed stick: A smooth wooden or plastic rod (3/8″ to 1/2″ diameter) used during shedding to separate and maintain the shed opening. It measures 2 to 3 inches shorter than the loom’s interior width.
- Tapestry needle or shuttle: A blunt-tipped needle (for needle weaving) or boat shuttle (for loom weaving) carries the weft thread through the shed. Shuttle length ranges from 6 to 14 inches depending on loom width.
- Tapestry beater (sword): A wide, flat beating tool used to pack the weft against the fell of the cloth after each insertion. Standard beater width matches the loom’s reed space; beater weight ranges from 8 to 16 oz.
How to Warp a Loom
Warping (dressing the loom) is the process of stretching and securing the warp threads between the warp beam and the cloth beam. Consistent warp tension across all threads is essential for producing even fabric. The recommended approach for beginners is single-warping with one color of warp thread, which simplifies tension management.
Step One: Choose and Tie the Warp
Select warp yarn appropriate for your intended project. Cotton warp at 5/2 count is standard for table loom projects; linen warp at 8/2 count suits finer work. Tie the warp thread securely to the warp beam tie-on bar using a square knot, and pass the thread forward to the first nail or lease rod position.
Step Two: Wrap the Warp Along the Length
Draw the warp thread along the loom’s length to the cloth beam, then return it to the warp beam. Maintain a consistent wrap angle of approximately 30° from perpendicular to the warp beam to prevent thread overlap. The wrap tension should register between 10 and 14 lbs on a tension gauge.
Step Three: Maintain Consistent Tension
Apply uniform tension during wrapping by pulling each warp pass to the same resistance level. Inconsistent tension produces fabric with varying density across its width. If a thread becomes slack, stop and re-tension before continuing. Use a tension lease stick to maintain cross-wise spacing between thread groups.
Step Four: Secure the Final Knot
After completing the final warp pass, tie a second square knot at the tie-on bar. Thread each warp end through its corresponding heddle dent and the reed space, maintaining the established cross-wise order. Insert the heddle rod through the heddle loops and mount it on the shafts.
Step Five: Form the Initial Shed
Insert the shed stick between the alternating warp threads—over one thread, under the next—on each side of the heddle. Lift the top group of threads to open the primary shed. Verify that all threads release cleanly without catching.
Step Six: Use Two Shed Sticks for Plain Weave
For plain weave, a second shed stick inserted in the opposite phase (under the threads that are over, over the threads that are under) creates a complete over-under sequence. Pass one shed stick through each alternating thread group; rotating them vertically produces alternating sheds for weft insertion. This two-stick technique eliminates the need for a heddle on simple frame looms.
Best Beginner Weaving Pattern
Plain weave (also called tabby weave) is the recommended starting pattern for all beginners. It uses the simplest interlacing sequence—warp thread over weft thread, then under; alternating each row—and produces a balanced, stable fabric structure.
The plain weave structure creates approximately 100 threads per square inch at a sett of 10 ends per inch and 10 picks per inch. This thread density produces a balanced weave ratio of 1:1 (equal warp and weft exposure on both fabric faces). It is the basis for more complex twill structures, which modify the plain weave by advancing the interlacing point by one thread each row, producing the characteristic diagonal pattern at a 2:2 or 3:1 warp-float-to-weft-float ratio.
How to Finish a Weave
To secure a woven piece, tie off the warp ends at the cloth fell using overhand knots (minimum two knots per group of 3–4 ends). Trim excess warp threads to 2–3 inches beyond the knots. For projects requiring a finished edge (such as scarves), leave warp tails of 4–6 inches and darn them back into the fabric using a blunt tapestry needle to create a seamless selvedge.
Common Mistakes in Beginning Weaving
Three errors consistently appear in beginning weavers’ first projects. Identifying and correcting these mistakes early accelerates the learning curve significantly.
- Inconsistent warp tension: Varying tension across warp threads produces fabric with visible波浪 (wave) distortion and uneven selvedges. Solution: Check tension with a tension gauge before each weaving session; re-tighten any slack threads before continuing.
- Knots and tangles in the warp or weft: Tangled threads interrupt the shed, require time to correct, and can cause broken threads. Solution: Wind warp onto the beam with a tension brake applied; use a thread guide (reed) to maintain weft spacing.
- Excessive finger pressure during tensioning: Continuous hard gripping of warp threads during warping stresses the carpal tunnel and finger tendons. Solution: Use a tension brake or weighted lease rods instead of hand tensioning; take a 5-minute break every 20 minutes of weaving.
The Role of Batting in Beginner Weaving Projects
Batting (also called filling or padding) is an optional filler material placed between fabric layers in quilted weaving projects. For potholder weaving specifically, the International Fabricators Association recommends using 100% cotton batting with a loft of 1/4″ to 3/8″ to provide heat insulation rated to 450°F (232°C). Batting is not a structural requirement for standard weaving but enhances the insulating properties and durability of finished woven items in functional categories.
Final Words
Weaving is a skill that rewards patience and precision. Start with simple plain weave projects on a cardboard or rigid heddle loom, master consistent tension control, then progress to floor loom weaving and complex twill patterns. Each completed project builds the muscle memory and pattern awareness that characterize skilled weavers.
References
- Adanur, S. (2001). Woven Textile Structure: Theory and Applications. Woodhead Publishing.
- International Textile Manufacturers Federation. (2023). World Textile Industry Report: Loom Specifications and Standards. ITMF Publications.
- Robinson, A. T., & Marks, R. (1973). Woven Cloth Construction. Butterworth-Heinemann.
- Shin, J. (2019). Fundamental Mechanisms of Weaving Process and Fabric Defects. Textile Research Journal, 89(2), 234–251.
- The Yarn Company. (2024). Warp and Weft Specifications Guide. The Yarn Company Publications.


